Monday, 23 January 2012

Green chilli pickle

IMG_8151-1
How are you all my lovelies? Has the New Year been fruitful to you? It has been uneventful for me so far and I want to fast forward to spring. Although winter has not been terrible this time (we haven't had to turn on the heaters regularly), I am really looking forward to spring and summer which, at the moment, is so far away. 

The trip home was good fun and 3 weeks went by so so fast and I'm kicking myself for not staying on for some more time. Its strange how a country and its ways just grow on you and you head to the place you called home only to find their ways annoying. I had a couple of epiphanies after I got home. Care to read?
1. I will give up cooking and baking altogether if I move back to India. I care too much about convenience and much less about my passion (if I can call it that) for baking. UK has spoilt me with ready made ingredients, like simple powdered sugar for instance. I hate having to grind sugar (large as rocks btw) and make a mess with the powder. The weather makes it impossible to store maida, baking powder, etc etc at room temp, which means the refrigerator is packed with things and I hate a stuffed refrigerator. I cooked thrice in 3 weeks and hated every moment of it. The 2 cakes I made was a disaster and the butter chicken, my family complained, was too bland like the Brits have it (this, after gloating on my previous post about how I figured out the perfect, traditional chicken tikka masala).
2. I expected people to stand in line at payment counters and like an IDIOT followed it twice or thrice until I realised it was never going to happen. I was jostled around and lost my cool once, after which Ro decided to never come out shopping with me. I realised I was a sucker for anything organised (This, coming from someone who thinks you don't need to organise anything. So you can imagine my shock after I realised this)
3. Zebra crossing is just a pretty design on the road. I got shouted at by a driver because i was trying to cross at a zebra crossing.
4. To prove that I could still handle street food, I went ahead and had all sorts of junk from the road side only to be gently told by my immune system that I couldn't handle it. I was devastated that even milk was creating issues for me :(
5. Movie channels are fab, and I realised I missed watching all the nonsensical mallu movies so much
IMG_8159
6. Rains are still the most awesomest in Kerala. Ah so green and lush and absolutely romantic it is. It poured like mad a couple of days I was there and unlike here when I tell Ro, 'ah I wish I could have hot vada and chai right now' and could do nothing but just wish for it, back home, I exclaimed it out loud and in an hour I actually had steaming hot vada's and chai on my table.
7. That said, I'm absolutely sick of mallu food. Although I'm having rice withdrawals now and am trying hard not to go ballistic on it, it feels great to not have anything mallu for a while.
8. I hate Indian Chinese. Its got nothing Chinese about it except a bucket full of soy sauce. We went to our fav Chinese restaurant the day we landed and it was heavenly. We both decided that getting back to London was so worth it :)
9. I am not the emotional type who misses the parents and broods about it once I'm back (unlike my brother who is still such a baby about it), but I wished for the first time the entire clan lived in the same country at least (not India though). Close enough to drop in whenever we wanted to but far enough to not be visited often. That is more likely to become a reality in the US where half of the clan already is :(
10. Its soothing to know that Ro and myself, we still miss each other when apart (even though we are about 6 yrs into our married life)
IMG_8182
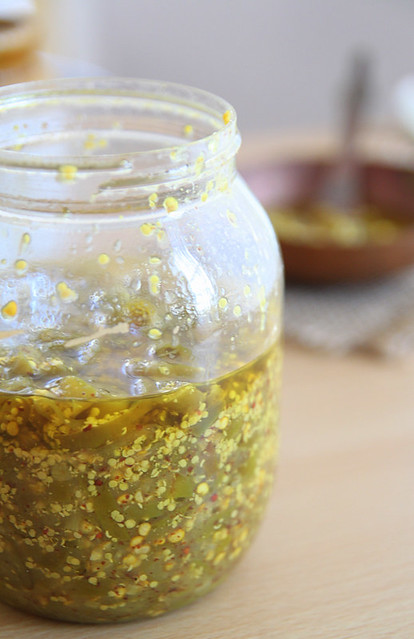
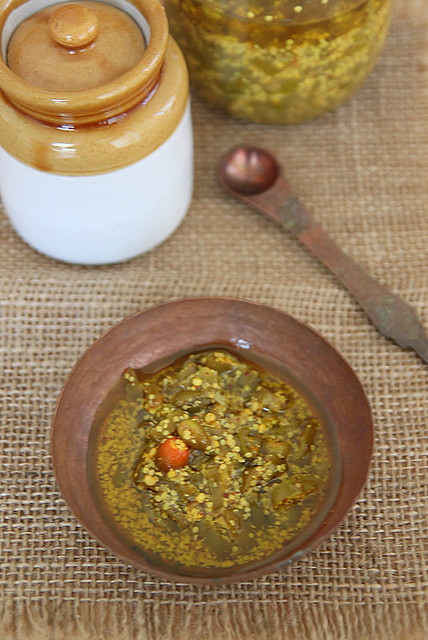
Ok that's enough ranting to make up for not having written in 2 weeks right? Coming to the recipe, this is probably the yummiest chilli pickle I've ever had. My best friends mom, who is also my neighbour and like a mom to me, made this the last time I was in India. I could only bring back very little of it last time and it got over in a jiffy. I got the recipe from her, made it once by quartering the recipe and without the right ingredients and it was not delightful, to say the least. So this time I decided to just bring one whole bottle full, clicked some pics and decided to blog it since its definitely a keeper. There's no cooking involved and its super duper easy to put together. I have this with dosa's and parathas and with just about anything and trust me its divine. I have given the exact measurements, but feel free to halve it for convenience sake.
IMG_8128
Green chillies- 1 kg 
Lemon juice- 50gms
Turmeric powder- 5 gms
Split mustard seeds (kaduku parippu)- 100 gms 
Asafoetida- 2 tsp
Fenugreek powder- 5 gms
Salt- 250 to 300 gms
Gingelly oil (sesame oil)- 1 cup

Wash and pat dry the green chillies, cut into small rounds and transfer to a large bowl.
Add all the ingredients except oil and mix well till the chilli pieces are all more or less evenly coated with the masala.
Slowly pour the gingelly oil on top of the chillies and gently stir it in.
Transfer to clean bottles, seal with a tight lid and leave it to mature for a minimum of 1 week, after which the chillies would be soft and ready to be dug into
IMG_8142
Notes: Go for the mild green chillies if you cant handle the heat. Definitely not the birds eye, but finger chillies should be OK if spice is not too much of an issue. Apparently, the big ones you now get in India are not that spicy any more, so choose that if you have the option  
You can either buy split mustard seeds or make your own by coarsely grinding/ pounding black mustard seeds with a pestle and mortar, but not too fine.

Tuesday, 10 January 2012

Espresso macarons filled with dark chocolate ganache

IMG_7750
I finally tackled my fear of egg whites- learning to separate them, whipping them to desired consistencies etc- and am very proud. After making the creme brulee I had some egg whites maturing in the refrigerator and I had no clue what to do with them. Well I sort of had a clue, but since my confidence levels were not up to mark, googled for hours deciding what to do with the egg whites.

Nothing interesting came out of the search and so I finally gave into the macaron frenzy that almost every food blogger is now aware of. I was very very sceptical as to how it would turn out and Shab and Finla totally helped me out with the entire thing. To be honest it was Shabs continuous FB status updates about her awesome mac flavours and finding feet that made me even consider making macs (at some point in my blog life), but it happened sooner than I thought.

I know I'm making it sound like an achievement, and trust me it is, when you see the feet (which you obviously know what it is) you feel joy (melo drama to the core, but please humour me). I would have been devastated if my macs hadn't come out decent, because for 1 it is not an easy job, 2, the quantity of ingredients used is not less and 3, its bloody messy. So after all this if my macs hadn't come out well, I would have cried, seriously, I would have screamed and cried and maybe even pulled my hair out.
IMG_7729
I went through the mac bible (as I would like to call it) like a girl studying for the exams, that if someone questioned me what the first line on page 3 was I would say it, even in my sleep. I don't think I have ever been this determined to make something right. I was warned that I would be addicted to making macs again and again and in different flavours, once I got the hang oft it...but I must say, I'm done with the whole mac thing. Its too much of work and I care way too much about feet that I cant handle that pressure again :). But like I have previously mentioned, every food blogger should have tried making a red velvet cake, baked bread and made macarons at least once in their blog life. Now that the macaron bit is out of the way, I have all the time to experiment with bread (I do bake bread, but it's still not perfect) and the red velvet cake (this doesn't count as I made it with a mix).

Word of advice to those trying to make macarons for the first time, read the mac bible mentioned above and Meeta's notes on the same and you should be good to go. If you don't find feet, that's fine too. Just sandwich them anyway and give it to your husband saying its this awesome new dessert that you came up with. Mine would believe it in a second and so I wasn't too concerned about the "omg who will eat these feetless things' part of it. Pics are not that great cos after I was done with the whole episode, it was about 3pm and there was very little light. I was also in no mood to make it presentable, and hence the gloomy pics.
IMG_7743
Recipe adapted from here
Icing sugar- 117 gms
Ground almonds- 60 gms (refer notes)
Espresso powder- 7 gms
Cocoa powder- 15 gms
Egg whites- 60 gms (refer notes)
Granulated sugar- 40 gms

Filling:
Dark chocolate- 100 gms, chopped fine
Double cream- 75 ml
IMG_7732
Get the baking tray with baking paper ready. You would ideally need two trays for this quantity.
In a food processor or grinder pulse the icing sugar, ground almonds, espresso powder and cocoa powder till nice and powdery.
Then sift the mix a couple of times and make sure there are no lumps. The mix may still be not fine as icing sugar, but it should not have any larger chunks or lumps whatsoever.
Using a free standing mixer with whisk attachment or a hand mixer, whisk the egg whites till frothy.
Then add the granulated sugar bit by bit, while continuously beating, till soft peaks form. It should hold its beak shape when you lift the whisk up, but shouldn't be too dry and stiff. (Refer the mac bible for explicit guidelines)
Into the almond-sugar mix add the meringue and fold it in using a spatula by starting from the bottom and continuing to the top (again refer the bible), till you get a smooth even mixture.
The batter should fall back in ribbons when you lift the spatula. Also put a spoonful on a plate and if it spreads out on its own, then you are good to go. If it doesn't, then give a couple more folds and it should be fine.
Place the batter into a piping bag with a plain tip, and pipe away, leaving about 2 inches gap between the shells.
Leave aside to dry for half an hour.
Towards the last 10 minutes, pre heat the oven to 140C and once the time is up, place the tray in the middle rack and bake for 12 to 15 minutes. At this point praying to the mac gods for feet would be a great idea (I swear I did this)
Once done, cool on a rack completely before doing the filling.

For the filling, bring the cream to a gentle boil and pour over the chopped chocolate. Keep aside for a few minutes.
Once the entire chocolate has melted, stir gently to mix it all in and get a smooth and silky texture.
Keep aside to cool completely
When ready to assemble, slather on to (or pipe) the macaron shells, sandwich them. EAT
IMG_7752
Notes: The espresso powder I used was really strong, so the coffee flavours were a tad too prevalent. If not a coffee fan, then you might as well replace with instant coffee powder.
The macarons are immensely sweet, so the dark chocolate ganache paired fairly well with the sweetness. Perfect balance, if you ask me.
The almond powder is a pain in the a**. The ones we get here are coarse and so I had to sieve it a couple of times, then pulse it with the other mentioned ingredients and then sieve again a couple of times to get a somewhat fine consistency. 
Use egg whites matured in the refrigerator for 2 to 3 days for best results. I brought them to room temperature before using though.
If you have a template it makes matters easy, but as usual the last minute madness made me forget all about it and so i just randomly piped them on to the paper.
YOU NEED PATIENCE to make them :)

Wednesday, 4 January 2012

Paneer tikka masala

IMG_6900
...is such a popular dish here in UK, it puts me to shame. I mean at least the ones I have tasted are so goddamn horrible, I have no idea how people eat it assuming its one of the most awesomest Indian dishes to date. I tried it at a restaurant once and it was so sweet and horrible, I don't even want to describe how the store bought ones tasted.

See, when I first came UK 4 years back, for one whole year, we survived on store bought ready meals and such and since the tikka masala's looked popular here, I used to quench my poor Indian palate with those pathetic store bought tikka masala preparations and each time I swore never to buy it again.

It was only recently I made myself a batch of the paneer tikka masala at home and realised it was actually so so so much more different and better than the restaurant/ store bought ones. I'm sure the authentic Indian restaurants will do justice, but I've had terrible bad luck with take always and never again will I buy this.

That said, making it is no easy feat. Its time consuming and messy, not to mention highly unhealthy. But once in a while I guess its ok to indulge (although I notice, this once-in-a-while is becoming a little too often), so go ahead and make this. Its fabulous with parathas and naan.
IMG_6906
Recipe adapted from here and here
For marinade
Paneer- 200- 220 gms (around 2-21/2 cups), cut into cubes
Greek yoghurt- 3 tbsp
Chilli powder- 1/2 tsp
Ginger paste- 1/2 tbsp
Garlic paste- 1/2 tbsp
Tandoori masala- 1 tsp (optional)
Kasoori methi (dried fenugreek leaves)- 1/2 tsp, crushed
Lime juice- a few splashes
Salt- to taste
IMG_6931
For the sauce
Ginger paste- 1/2 tbsp
Garlic paste- 1/2 tbsp
Tomato purée- 1 cup
Kashmiri chilli powder- 1 tsp
Coriander powder- 1 tsp
Garam masala- 1/2 tsp
Kasoori methi- 1 tsp, crushed
Single pouring cream- around 1/4 cup
Sugar- 1/2 tsp
Oil- 1/2 tbsp
Water- 1 cup
Salt- to taste
Coriander leaves- 2 tbsp (optional)
IMG_6893
If the paneer is store bought, then cut them into cubes and pour some hot water over. Keep aside for a couple of minutes and then drain to get soft, clean paneer.
Marinate the paneer with all the ingredients under the 'to marinate' section and keep aside for 1/2 an hour.
When ready to use, preheat the oven to about 200C.
Line a baking tray with aluminium foil and layer the paneer on it.
Bake for about 5 minutes on each side and then turn the grill mode and broil on high for about 3 to 4 minutes on each side, to get a charred effect.
Remove from the tray and keep aside.
In a large saucepan heat the oil and add the ginger and garlic paste. Cover to avoid spluttering all over the place.
Add the tomato puree and cook, stirring in between, for about 5 minutes
In goes the chilli powder and coriander powder, stir it in a cook further, till you start noticing the oil separate.
Add half the water, stir and bring to a gentle boil.
Reduce heat and add the sugar and kasoori methi. Stir it in and cook for a couple of minutes
Finally slide in the paneer tikka and garam masala and stir to cover the paneer pieces with all the gravy.
Add about 1/2 cup more of water, stir well and cook for another 5 to 6 minutes. Check for salt, add if required.
Just before taking it off the flame, reduce heat and stir in the cream.
Garnish with coriander leaves and serve hot.
IMG_6879
Notes: Replace paneer with chicken, voila..chicken tikka masala :)
I am thinking, there are so many ways of making this, but this clicked for us and we loved it

Thursday, 29 December 2011

Nigella's triple chocolate cookies

IMG_7265
The husband came back one day after a conference at some fancy hotel and kept raving about the double chocolate cookies they served with tea. I didn't really care for it much, since I don't have the hots for chocolate. A couple of days later he brought home some chocolate cookies which he claimed came close to those he had, but still not there yet.

It lay on my kitchen counter till one day I got back after my swimming session so totally hungry and since there was nothing in the house I could eat (without preparation) I opened one cookie packet (they came in individual tiny packs) and popped into my mouth.
IMG_7285
It tasted good, not divine or absolutely awesome, but good. I thought, why not make some for Ro since he keeps begging for chocolatey things all the time. I scouted around the net for a while and landed on Nigella's recipe. Its weird that I say this, but somehow all Nigella's chocolate based recipes have turned out pretty decent for me. This one didn't fail me either. It was as chocolately as Ro wanted and disappeared in 2 days, like I wanted, win-win situation if u ask me.

I love any kinda cookie straight out of the oven and after that don't really care for it that much. This too made its way through to my stomach immediately after it was taken out of the oven and after that it was all left for Ro. Its not the crunchy cookies, its more like a cakey, slightly chewy cookies which are so easy to make and as per Nigella, you can even freeze the dough for later use. She says you get 12 large cookies out of the measurements, but I halved it and made smaller cookies which are much easier to handle. Feel free to double it and make huge chunky cookies if you please.

On another note, I'm thoroughly enjoying my time at home doing absolutely nothing. Tried to bake some cupcakes but i seriously had no patience. Hats off to you guys in India who manage to bake well. I hated the fact that there was no brown sugar available, no ready made confectioners sugar, hated the heat which caused the frosting melt etc...wayy too much trouble to go through for a batch of cake. So I just decided it I shall never be baking if at all I get back to India. The convenience of UK has spoilt me, there I said it.. :)
Hope you all have a fabulous New Year with your loved ones. I will NOT be spending NYE with the husband this year, instead we are heading to two different parties. What fun :)
IMG_7295
Recipe halved from here
Dark chocolate- 62 gms
Plain flour- 75 gms 
Cocoa powder- 15 gms
Baking soda- 1/2 tsp
Salt- 1/4 tsp
Butter- 62 gms (softened)
Dark brown sugar- 38 gms
Caster sugar- 25 gms
Vanilla extract- 1/2 tsp
Egg- 1 small
Dark chocolate chips- 125 gms
IMG_7280
Break the dark chocolate into smaller pieces and melt in a double boiler or in a heat proof bowl kept over simmering water.
Keep stirring till the chocolate has completely melted. Keep aside to cool a bit.
Meanwhile, whisk together the flour, cocoa powder, baking soda and salt in a large bowl.
Into another bowl add the butter and cream it along with both the sugars till light and fluffy. A good wire whisk would do the job with a bit of an effort.
Pour in the melted chocolate and stir well to combine evenly.
In goes the vanilla extract and egg and beat it in to combine well.
Tip in the dry ingredients and using a wooden spoon combine well, making sure there are no traces of flour seen.
Finally fold in the chocolate chips.
Line a baking tray with parchment paper and using an ice cream scoop, scoop out the dough and place at least 2 inches apart. (if you are making large ones, you would get about 6 of them).
Bake in an oven pre heated at 170C for about 10 minutes. 
Get a tooth pick and gently insert it into the centre of a cookie, if it comes out clean (without any wet batter sticking to it) then you are good to go. If you have accidentally punctured a chocolate chip, then try again in another part of the cookie.
leave to cool for about 5 minutes on the tray and then transfer to a rack and cool completely before storing in containers.
IMG_7298
Notes: The original recipe called for about 175 gms of chocolate chips, but I thought that was a tad too much, although next time I may try it out that way.
As per Nigella, make the dough as per instructions, scoop them into the baking tray as mentioned above and freeze just so they become hard enough. Then remove them from the tray, transfer to freezer bags and stash it back into the freezer till you are ready to use. I guess you can then bake directly from frozen, just that it might take a tad longer than usual.
Add some raspberry liqueur to the dough and I'm thinking it would be heavenly, or all spice for that matter.
Replace caster sugar with granulated sugar, I don't see that much of a problem there.
Kept them out for Santa on Christmas Eve and there was none left. He definitely loved these with his glass of milk, I hope you do too :)
Sending these to Forever Nigella: #10 Christmas Presence hosted by the lovely Sarah of Maison Cupcake

Friday, 23 December 2011

Chicken stuffed buns

IMG_6705
Here is something to take centre stage on your Christmas table, something I absolutely love, thanks to Ria's easy recipe. I have tried this a couple of times and love it. You can play around with the stuffing and what's even better is, you can freeze them and bake as and when required.

Ria's recipe yields absolutely soft and spongy buns and although they are a delight to feast on, Ro keeps complaining about them sticking in his mouth (which I agree, but he's all dramatic about it). So I now make a whole wheat-plain flour combo which still yields soft buns and doesn't have the sticking problem. I would like to think its more healthier as well :)
IMG_6702
Recipe adapted from here & here (yields around 15 medium sized buns)
For the dough
Plain flour- 1 1/2 cups (plus enough to dust the work surface)
Wholemeal flour- 1/2 cup
Active dry yeast- 1 tbsp
Sugar- 1 tbsp
Warm water- 2 tbsp
Warm milk- 1/2 cup
Oil- 1/4 cup
Egg- 1, lightly beaten
Salt- to taste
Egg white or milk for wash
Sesame seeds- to sprinkle on top (optional)

For the filling
Minced/ shredded chicken- 400 gms
Onion- 1 large, finely chopped
Ginger paste- 1/2 tbsp
Garlic paste- 1/2 tbsp
Green chillies- 2, finely chopped (optional)
Tomato- 1 large, finely chopped
Kashmiri chilli powder- 1 tsp
Coriander powder- 1 1/2 tsp
Turmeric powder- 1/4 tsp
Potato- 1 large, diced into small cubes
Garam masala- 1 tsp
Coconut milk- 1/4 to 1/2 cup
Coriander leaves- a couple of stalks chopped fine (optional)
Oil- 2 tbsp
Salt- to taste
IMG_6710
Whisk together both the flours along with some salt and keep aside.
Take 1/2 tbsp flour from the mix and combine it with 1/2 tbsp sugar and yeast.
Add the warm water to that and mix well till the sugar and yeast has completely dissolved.
Keep aside for 10 minutes to activate the yeast. You would know its alive by the bubbles that form.
Into a large mixing bowl pour the milk, oil and remaining sugar. Stir to dissolve the sugar.
Tip in 1 cup of the flour mix and using a wooden spoon mix well till you get a paste like consistency.
Add the beaten egg followed by the yeast mix and stir it in.
Finally add the remaining 1 cup flour and stir vigorously till everything comes together. You can do this entire process using a mixer with dough hook attachment.
Otherwise, knead it well on a floured work surface for at least 10 minutes, till the dough is soft and pliable.
Oil the same mixing bowl lightly and keep the dough in it. Cover with a kitchen towel and leave in a warm place to rise. I preheat the oven to 100C for about 5 minutes, turn it off and then place the dough inside.
IMG_7148-1
While the dough is proofing, get the filling ready.
Heat oil in a large frying pan and saute the onions till they turn a light golden brown in colour
Add the ginger and garlic pastes and stir for about 2 minutes or till the raw smell disappears.
In goes the chilli, coriander and turmeric powder. Stir for a minute or so for the spices to cook
Throw in the diced tomato/ paste and cook till the oil starts separating. This could take about 6 to 7 minutes on medium heat.
Add the diced potato followed by minced/ shredded chicken, season with enough salt and stir to bring all the ingredients together.
Cook till the chicken and potatoes are done and the water has completely evaporated. 
When it is more or less dry, add the coconut milk and stir well. Cook further till you get a semi-gravy like consistency. It shouldn't be too watery, nor too dry.
Sprinkle the garam masala and coriander leaves and give one final stir. Do the taste test, add more if required.
Once done, transfer into a bowl and keep aside to cool completely.
IMG_6697
Assembling
Once the dough has doubled in size, punch it down gently using your hands, give a couple of gentle kneads and divide the dough into 15 equal parts. (If you have an obsession like me, then weigh each ball to get the exact size)
Take a dough ball, make a small disc shape (either using your rolling pin, or stretch using your hands) and place 1 tbsp of the filling into the centre.
Wrap it up by bring all the edges together and pinch the top gently to seal the filling.
Try and reshape them into a perfect ball and place on a baking tray lined with parchment paper.
Continue doing the same with all the dough balls and keep them aside for about 30 minutes to prove again.
Towards the end of your proving time, preheat the oven to 200C.
Just before you chuck them into the oven, whisk the egg white a bit and brush generously on top of the buns.
Sprinkle sesame seeds (if using) and bake in the middle shelf for 10 to 12 minutes or the tops are golden brown and glossy.
Take it out of the oven, cool for about 3 to 4 minutes, arrange them in a bread basket and serve with all the Christmas charm you can muster up :)
IMG_6733
Notes: If you cant get hold of chicken breasts, then get chicken breasts, slice them into small chunks and precook in a saucepan along with a pinch of turmeric powder, salt and 2 tbsp of water. Once cooked, shred them and use that instead.
If you plan on making the buns only the next day, then place them in the refrigerator overnight. Bring it to room temperature before proceeding with the filling.

Sunday, 18 December 2011

Curried carrot and lentil soup


IMG_7911
Its absolute soup weather here, and since this year winter came in a lil late (thank god for that) we haven't really had much of a soup thing going on. The other day Ro got back from home craving for a bowl of hot tom yum soup and even insisted we head out to a Thai restaurant to have some. I shrugged it off saying I slogged in the kitchen for one whole hour (yes too much time) to come up with dinner and also left overs in the fridge make me uneasy. I love an empty fridge as opposed to others who love an over filled fridge :)

Although I love a good bowl of soup on and off, I am not really an expert at making them. In fact I honestly suck at it. So its all soup sachets and canned soup jazzed up with veggies and all sorts of stuff. If it wasn't for some carrots I needed to get rid of from the fridge, I wouldn't have made this soup either. Carrots are not really a favourite of mine, and other than eating them raw, I really cant handle them. This soup however was a welcome change. The sweetness actually was a good thing, since it matched perfectly well with the lentils and Indian flavours.
IMG_7828
On a completely different note (although those of you on FB will already know), we are off to India, tomorrow, for 3 weeks (rather unexpectedly) and I am super thrilled that I get to spend Christmas and New Years with family and friends. This time, unlike last year, I shall just be resting and relaxing and watching loads of mallu movies and harassing my brother and sis-in-law. Although I have promised mom a lot of baking and this and that, I am pretty sure I WILL NOT be doing any of those. Good thing my mom doesn't read the blog :)

I wanted to fix up a couple of guest posts by a few of my favourite bloggers in my absence, but then a one week notice to all of them is rather unfair and so I have just decided to go ahead and schedule a couple of posts while I'm away. So if I don't visit y'all for a month, please do pardon me, its only because I'm either sitting in front of the TV, or prop shopping (plan to do loads of it) or sleeping, or eating, in Kerala. But do drop in, as I have a couple of interesting recipes making its appearances here.
IMG_7855
Onion- 1 large, roughly chopped
Garlic- 4 pods, peeled and roughly chopped
Carrots- 200 gms, peeled and chopped into cubes or rounds
Red lentils- 1/4 cup
Cumin powder- 1/2 tsp
Coriander powder- 1 tsp
Red chilli powder- to taste
Pepper powder- to taste
Soup cube- 1 small (vegetable or chicken)
Water 500 ml
Salt- to taste
Oil- 1/2 tbsp
Milk- 1/4 cup
IMG_7891
Heat the oil in a pressure cooker and throw in the onions and garlic. Sauté for about five minutes on medium heat till wilted.
Throw in the cumin, coriander and chilli powders and cook till the raw smell of the masala's disappear, about a minute or so.
Add the lentils and carrot and stir around, making sure all the masala catches on to them.
Add the soup cube, water and bring to a boil.
Place the lid on the cooker along with the weight and cook for about 15 minutes or 3 to 4 whistles.
Once the pressure dies, open the lid, add the milk, season with enough salt and pepper and bring to a gentle boil.
Take it off the fire and wait for the soup to cool a bit before using an immersion blender to make a smooth mix, or if you prefer to leave it chunky, go ahead and serve it with some herbed garlic bread (I adapted Shabs recipe, just that I used chopped parsley instead of basil)
IMG_7912
Notes: Freeze the soup in an air tight container and use it later on a rainy day
Replace the masala powders with about 2 tsps of curry powder
The soup cube makes all the difference, so don't omit that

Sending these over to the Christmas Carrot Competition over at Love the Garden.

Thursday, 15 December 2011

Caramel pear (upside down) cake- A guest post for Monsoon Spice

IMG_6819
The great thing about blogging is the fact that you can make so many friends in the virtual world, and somewhere along the way you are itching to meet them face to face and talk about all things food and photography related. Sia of Monsoon Spice is one person I'd like to meet some day and if lucky, get to taste some of the amazing food she makes as well. Although Monsoon Spice had a permanent position on my bookmarks bar, it was only recently that I got to befriend the gorgeous person (with the gorgeous hair, if I may add) behind the blog. Thanks to facebook, I now not only wish to see Sia, but also her lil dumpling who is simply the cutest.
IMG_6854-1
Monsoon Spice is nothing short of perfection and her recipes are all worth devouring into. Her moong and spring onion dal, one of my absolute favs, still saves me on a rainy day and I have bookmarked quite a few other recipes to try, with the mirch ka achar (seriously, I'm drooling just thinking about it) topping the list. So imagine my delight when Sia asked me if I could do a guest post for Monsoon Spice while she was holidaying in India. Of course I wasn't gonna pass and so here I am with a delicious caramel pear cake which is divine in taste and EASY to make.
IMG_6834
The base is a French yoghurt cake which is so easy to put together, even an amateur baker can do it. Trust me when I say that because this was the first cake I learnt to bake on my own. It has never failed me and no matter how hard you try to goof up, the end result will always be good. The cake is also my base for any fancy cakes, and adapts to almost any flavour, fruit, topping and frosting. I particularly like the upside down cake combo because the caramel kinda bubbles up when it is baking in the oven, causing an overall caramelised effect and the cake becomes more like a sponge pudding which you can never say no to.
IMG_6843
So without rambling further, here is an utterly delicious cake you can whip up this holiday season. Head over to Sia's space to check out the recipe, and enjoy more pics. Once again thanks a bunch Sia, for this lovely opportunity.