Showing posts with label tea time snack. Show all posts

Friday, 28 April 2023

One bowl blueberry buckle

Recipe adapted from here

Unsalted butter- 113 gms, roughly sliced
Plain flour- 1cup
Baking powder- 1 1/2 tsp
Salt- 3/4th tsp
Granulated sugar- 1 cup
Whole milk- 1 cup
Vanilla extract- 1 tsp
Blueberries- 3/4th cup (frozen or fresh)

Preheat the oven to 190c.
Put the sliced butter into a 9x5inch loaf pan and place in the oven to melt.
Once fully melted, remove from the oven and keep aside. 
Whisk together all the remaining ingredients, except blueberries, till you get a smooth batter. (I first mix the dry ingredients and then mix in the milk and vanilla, but totally not needed. I do it out of practise)
Pour the mix into the loaf pan and roughly mix it with the whisk itself. Dont go crazy whisking it, there should still be large traces of butter visible, which is what gives fabulous buttery edges to the buckle.
Place it back into the oven and bake for about 50 to 55 minutes, or till a skewer inserted into the centre comes out clean. It should be nice and brown all over.
Place on a cooling rack and serve as slices or scoop it out and serve with ice cream.

Notes: The original recipe calls for self-raising flour, so omit baking powder in which case.
The buckle does buckle a bit once it cools down, so dont be alarmed.
Once my 50 minutes was up, i did reduce the temp to 170 and bake for another 5 more minutes, but i didnt think it was actually needed. So 50 minutes at 190 was the perfect timing for me
This is a stupidly easy recipe, everything prepped and cooked in under an hr really.
I like to serve it slightly warm. The caramelised buttery edges are really tasty.

Tuesday, 21 September 2021

Bahama Mama banana rum cake

Recipe adapted from here
For the cake
Pecans- 3/4th cup
Butter, unsalted- 1 1/2 cups, at room temperature
Caster sugar- 1 3/4 cups
Brown sugar- 3/4th cup
Eggs- 5 medium
Banana- 1 cup, mashed (very ripe)
Vanilla extract- 2 tsp
Dark rum- 3 tbsp
Plain flour- 3 cups
Baking soda- 1 tsp
Baking powder- 1 tsp
Salt- 1 tsp
Yoghurt- 3/4th cup

Rum glaze
Butter- 1/2 cup
Water- 1/4 cup
Brown sugar- 1/4 cup
Caster sugar- 1/4 cup
Dark rum- 1/2 cup

Preheat oven to 175C and generously grease a large bundt pan with cooking spray or butter. Make sure you get it into the creases if its not the basic tube bundt.
Lightly toast the pecans in a pan over medium heat.  Roughly chop and sprinkle at the bottom of the bundt pan. Keep aside
In a large bowl, using a hand held mixer, cream together the butter and both sugars till light and fluffy.
Add the eggs one at a time, beating well after each addition followed by mashed bananas, vanilla and rum. Mix well.
Sift in the flour, baking powder, baking soda and salt and using the lowest setting on the mixer mix well till no traces of flour is seen.
Finally beat in the yoghurt and pour the batter into the cake pan, and bake in the centre rack of the oven for about 60 to 80 minutes, or till a skewer inserted into the cake comes out clean.
While the cake is baking, make the rum glaze.
Mix all the ingredients for the glaze in a saucepan on medium high heat and bring to a boil.
Reduce heat to medium and simmer for about 5 minutes.
Remove from heat and keep warm.

Once the cake is done, transfer to a wire rack and cool for about five minutes.
Poke holes in the cake and pour half the glaze all over as evenly as possible.
Cool for a further five minutes and then invert on to a serving plate.
Spoon the remaining glaze on to the cake, bit by bit and let it stand till all the glaze has been absorbed. 
Wait till the cake cools completely to slice and serve.

Notes: The cake has a really strong flavour of rum. Omit the rum in the glaze if you are not a rum fan.
Use good, ripe bananas and this cake will be fabulous. I used the Indian bananas as opposed to the ones you get in the supermarkets here.

Friday, 30 April 2021

Cardamom cake with crackly almonds and sugar

Recipe adapted from here
Butter- to grease the cake tin
Caster sugar- around 2 tbsp
Almond flakes-  1/2 cup

Caster sugar- 264 gms
Eggs- 4 large
Plain flour- 160 gms
Salt- 1/4 tsp
Cardamom seeds- 1/2 tbsp (powdered)
Butter- 150 gms, melted
Vanilla extract- 1/2 tsp

Preheat oven to 170c (fan assisted) and grease a 9 inch pan using the butter. Make sure you generously do this.
Also line the base of the pan with grease proof paper.
Put the 2 tbsp sugar into the cake pan and swirl around/shake/tap to coat the side and base of the pan, as evenly as possible. Leave the remaining sugar if any at the base of the pan.
Cover the bottom of the pan with almond flakes. keep aside.
In a bowl whisk together the caster sugar and eggs using a hand held blender or in a free standing mixer., till it becomes pale and double in volume. This step is important so dont skimp it. It took me around 6 minutes.
Slowly fold in the flour and salt without deflating the batter.
Pour in melted butter, vanilla extract and cardamom powder and give a good mix, again without deflating the batter too much. The melted butter may go right to the bottom, so do scrape well and fold.
Pour slowly into the prepared cake tin, give a good tap on the counter and put into the oven.
Bake for about 45 minutes or till a skewer inserted into the centre of the cake comes out clean (original recipe said to bake at 35 minutes, but it just wasnt done, so mine took about 45 minutes. Start checking at 35 minutes and keep increasing just 5 minutes at a time.)
Remove from oven and leave on the counter.
After five minutes run a knife around the sides of the pan and invert onto a cooling rack (i inverted it directly on to a serving plate)
Peel off the grease proof paper slowly, while the cake is still warm and leave to cool completely before cutting.

Thursday, 26 November 2020

Chicken sandwich

Makes 4 loaded paninis or about 10 bread sandwiches
Boneless chicken- 500gms, cut into medium pieces (I've used breasts here, you can use thighs as well, but make sure you remove all the fat)
Pepper powder- 3/4th tsp
Salt- to taste

Mayonnaise- 4 to 5 tbsp
Bell pepper- 1 small, chopped into small cubes
Spring onions- 2, finely chopped
Seasoning of choice- 1/2 tsp (optional. I've used everything but the bagel seasoning here, but Italian herbs work great as well)

Bread slices- 20 (you can remove the crust if you prefer. I usually keep it on)

Season the boneless chicken with salt and pepper and cook covered in a frying pan over medium heat.
The chicken will ooze out enough water, but if not add a tbsp or so to aid the cooking.
Open the lid in between and give a good stir. 
Once the water has oozed out, cook without lid till the chicken is done and all the water has evaporated.

Once cool, transfer to a big bowl and shred the chicken using a fork, or if you have a food processor pulse a few times, just to shred the chicken. Make sure you dont make it paste like.
Add the mayo, bell pepper, spring onions and seasoning and mix till well combined.
Check for salt and add more if required.
The mix should be moist and not dry, so add mayo as  required.

Fill the bread slices generously with the filling and serve at room temp.
Notes: I've used the exact same filling as canape fillings on top of sliced cucumber and in vol-au-vent cases.
Ive also used it as a chicken salad along with lettuce, tomatoes and olives.
Add a green chilli or two while you chop up the chicken and it will add a hit of spice.
Replace spring onions with finely chopped red onions for a different taste.

Thursday, 12 March 2020

Madurai kari dosa

Makes 6 to 7
Dosa batter- 1 to 1 1/2 cups (not too loose)
Ghee/ sesame oil- couple of teaspoons
Eggs- 2 small
Mutton kheema- around 3/4 cups
Salt- to taste
Pepper- to taste
Coriander leaves- 3 to 4 tbsp, finely chopped

Make the mutton kheema as per this recipe. Use mutton mince and omit the potatoes.
For the dosa, you wont need 500gms mince, so for me this is mostly a what-to-do-with-leftover-kheema kinda dish.

Beat the eggs till slightly frothy.

Place a dosa tawa on medium heat and pour in one ladle full of the batter. Dont spread it too much, it must be thick, like a kal/ thattu dosa.
Cover with a lid, and just when you start seeing the bubbles, drizzle some ghee/oil along the edges.
Reduce the heat a bit and add about 2 to 3 tsp of the beaten egg, spread it carefully.
Season with salt and pepper and top with 2 to 3 tsp of kheema followed by a sprinkling of coriander leaves.
Press the meat slightly using a spatula and cook for about a minute,
Carefully flip the dosa and cook for another minute or so.
Make sure you dont burn the kheema, it should be a fried consistency.
Serve hot with some empty gravy on the side.

Notes: When i had this at the legendary Konar Mess in Madurai as part of the food walk i did, they drizzle a bit of mutton curry as well on top of the egg and then top with the kheema.
Also, the dosa is really thick.
The kheema on the dosa must be slightly fried and not burnt. So when its flipped, make sure you dont keep it on for a long time.

Thursday, 27 February 2020

Masala egg and vegetable butter sandwich

Recipe adapted from Sanjeev Kapoor Khazana (serves 2)
Eggs- 2 large
Onions- 2 tbsp, finely chopped
Tomato- 2 tbsp, finely chopped
Chilli powder- 1/4 tsp
Turmeric powder- a pinch
Salt- to taste

Bell pepper- 1/3rd cup, julienned
Cabbage- 1/3rd cup, julienned
Carrot- 1/3rd cup, julienned
Mayonnaise- 2 tbsp
Salt- to taste
Pepper- to taste

Butter- 1 tbsp
Bread- 4 medium slices
Cheese- 3 to 4 tbs

Beat the eggs along with onions, tomato, chilli, turmeric and salt. Keep aside.
Mix together the sliced vegetables with mayo, salt and pepper. Keep aside.

Place a frying pan/tawa on medium heat, and melt 1/2 tbsp butter.
Dip (rather generously) 2 slices of bread into the egg mixture, both sides, and place on the pan. Top with a few scoops of the egg, tomato and onion mix.
Flip over after 2 minutes and top with about half the veg mix and half the cheese.
Close the sandwich with the other slice and continue grilling the sandwich till the cheese slightly melts.
Keep flipping the sandwich carefully so both sides are slightly crisp.
Remove from the pan, slice the sandwich into two and place on a serving plate.
Continue the same with the remaining slices of bread.
Serve with some tomato sauce on the side.

Monday, 26 June 2017

French yogurt cake with cardamom and pistachio

Makes 1 loaf cake (double the recipe for an 8inch round cake)

c05ed260-ae3b-442e-908f-c094490a28f4
Granulated sugar- 1/2 cup
Eggs- 1 large
Vanilla extract- 1/4 tsp
Plain yoghurt- 1/4 cup

All purpose flour- 1/2 cup + 2 tbsp
Baking powder- 1 tsp
Salt- a pinch
Ground cardamom- 3/4th tsp

Flavourless oil- 1/4 cup
Pistachio nuts- 1/2 cup, lightly crushed
2fdb8d0c-239f-42e0-bf30-c3625c22bcf0

Preheat oven to 175C and line a small loaf pan with baking paper.
In a mixing bowl whisk together the sugar, eggs, vanilla extract and yogurt till well combined and pale yellow..approx 3 to 4 minutes.
Add the dry ingredients (flour to cardamom) and mix well to combine.
Pour in the oil and fold lightly, don't have to whisk vigorously, but make sure its all mixed well
Pour the batter into the pan and top with the chopped nuts.
Bake for about 30 minutes or till a skewer comes out clean.
Take them out and leave to cool completely on a cooling rack.
Slice and have with a cuppa.

Monday, 27 February 2017

Stuffed Welsh Rarebit

878f7098-1681-4e9b-a2fe-288c9d97a8f6 
Serves 4
For the cheese sauce
Grated mature Cheddar cheese- 1 heaped cup + enough to top the slices of bread
Goats cheese- 3 heaped tbsp
Double cream- 1/2 cup
Milk- a generous splash
Paprika- 1/2 tsp (optional)
Mustard- a generous pinch
Worcestershire sauce- 1/2 tsp
Pepper- to taste

4 slices of chunky bread
Leftover roasted chicken- 3/4th cup, shredded (or any chicken, I've used breaded ones from the supermarket)
Thyme leaves- a sprig, to garnish

Mix together all the ingredients for the cheese sauce in a saucepan.
Keep the heat on medium and keep cooking till all of the cheese is melted and the mixture becomes thick. 
Keep stirring at intervals to make sure the sauce doesn't stick to base, and keep scraping the sides while you go.
IMG_2676
Simultaneously, toast the slices of bread either in a toaster or under the oven grill. Make sure you don't burn them.
Place the toasted slices in an oven proof tray or a cast iron skillet and top them with shredded chicken.
Pour the cheese sauce on top of the chicken and bread slices, to cover them quite generously. Its ok if the sauce drips along the sides.
Grate some more cheese on top, sprinkle some thyme leaves on top and place under the oven grill for about 5 minutes, just to melt the cheese and warm the chicken a bit.
Dig into this devilishly decadent dish  straight out of the oven and with a salad side if needed.

Notes: You can use any cheese of choice. I once tried it with spicy Mexican cheese and it was bloody brilliant. 
The goats cheese is also purely optional, but that little bit does make a difference in taste.
Stuff it with any meat of choice, pulled pork would be a great alternative as will be prawns.

Wednesday, 4 November 2015

Caramelised onion and French goats cheese tartlets

IMG_8724 
The weather in this part of the world is turning cold and wintry and its our first Autumn since we've moved out into the suburbs so I'm quite enjoying the fall colours around us. We drove around a bit last weekend to take in the colours and was completely in awe of how gorgeous the Chilterns were. The mist started rolling in out of nowhere and I couldn't help but stop and take some pictures. Even more impressed with my new OnePlus 2 phone camera that has done justice to the scene. I just shot these on HDR mode, no post processing or filters and some pretty cool features to play around with.
IMG_20151101_163636

IMG_20151101_163509
Moving on to today's recipe, goats cheese is not something I've always loved. It was more like an acquired taste and now I've begun to enjoy it quite a bit. That said, it doesn't make its way through to my dishes at home that often and its only when a recipe particularly calls for it, that i pick it up. I had no idea there were a few varieties of goats cheese until The French Goats Cheese team got in touch explaining about the different varieties available and most importantly how versatile they were. Till now, all i knew was it was used it salads. I couldn't be more wrong- you can whip them up for a mousse, melt on vegetables, spread on toasts and so on. 
IMG_8701
One of my favourite ways to comsume goats cheese is to slice up a fresh baguette, toast it lightly, crumble some goats cheese and top with a slice of roasted pear with honey and thyme. Its delicious and you just cant stop at one. I was put forth with a challenge to encourage people to think outside the box when it comes to using French Goat's cheese. I don't know if this recipe can be called thinking outside the box, but it worked wonders for us. Caramelised onions and goats cheese is a match made in heaven and I couldn't think of a better way to put the cheese that was sent to me to good use.
CX1211
The Crottin de Chavignol is slightly crumbly but gorgeous, and was used in my pear crostini. The Valencay, a creamy white soft cheese is perfect in salads, but i decided to use it atop my tart and the mini log which is the most popular was used up melted on a toast. To discover more about French Goat's cheese and recipe inspiration please visit the website.

Recipe inspiration here
IMG_8730 
Olive oil- 2 tbsp
White onions- 2 large, thinly sliced
Dark brown sugar- 2 tbsp
Thyme- a few sprigs (dried or fresh)
Salt and pepper- to taste
White wine vinegar- 2 tbsp

Puff pastry- 1 sheet, thawed and rolled out to a rectangle and about 1 inch thick (I got a ready rolled one)
Goats cheese- around 100gms, crumbled (I used Valencay, a French goats cheese)
Milk- 2 tbsp, to brush the pastry
IMG_8679
Heat the olive oil in a large frying pan on low-medium heat, and throw in the onions.
Cook till they soften and turns a golden brown in colour, but doesn't burn. This could take around 15 to 20 minutes.
Keep stirring in between to prevent the onions from sticking to the bottom.
Once you attain the brown colour, add the dark brown sugar and mix well with the onions.
Continue cooking to allow the sugar to caramelise and the colour to change to a darker brown, another 10 minutes or so. Again make sure you keep stirring to stop the onions from burning.
Pour in the vinegar and de-glaze the pan after which you add the thyme, and season with salt and pepper.
Give a good stir and take the mix off the heat. Keep aside.
IMG_8687
Preheat oven to 100C and cut out 8 circles or rectangles from the rolled out puff pastry.
Place them on a baking tray lined with baking paper and score the outer edge of the pastry, about 1 in inside with a sharp knife. Don't go all the way to the base, this is to just give a sort of rim.
Brush all over with the milk and bake in the oven for 12 to 15 minutes, or till golden brown and puffed.
Remove from the oven and press down the inner circle leaving the outer in tact. This sort of gives it a vol-au-vent look.
Fill the pastry cases with caramelised onions and top with the crumbled goats cheese.
Place it back in the oven for another 10 minutes, after which you can take it out and serve warm.
IMG_8719
Notes: The caramelising bit takes a bit of time, I agree which is why its a good idea to do it a day or so ahead and use as required for the tarts
Instead of making tartlets, you can of course use the entire puff pastry as it is and once done slice into squares and serve.
White wine vinegar can be replaced with red wine vinegar or balsamic vinegar.

With thanks to French Goats Cheese for sending over samples and accompaniments. 

Wednesday, 17 June 2015

Curried prawn puffs

IMG_6629
When mallu's talk about puffs, there's always a nostalgic story attached to it- would have had it for tea after school, would be from a favourite bakery in the neighbourhood, was lovingly made by mom etc. I, have none of those memories!

I was not really fond of those bakery snacks except for a few and given a choice I used to prefer cupcakes, cookies and the like, which i think my mum also preferred making, not to mention she was great at it. So our tea time snacks were really innovative cakes, sandwiches, bakes, milkshakes etc etc. On those rare occasions my mum used to get vada or ethakka appam, I used to create such a fuss. Fast forward to about 20 years later and here I am in a foreign country craving the dry egg puffs we used to get at this bakery called Jayaram bakery in Trivandrum.

Karma is a bitch.
IMG_6562
So anyways, I couldn't just hop over to a bakery here and ask for egg puffs which meant i had to make it and make i did, plenty of times. I've since experimented with chicken, beef and prawn puffs and of the 4 the prawn being my favourite is making its way through to the blog after ages. It tastes good, is perfect with tea and freezes well. Sold!

Recipe has been adapted from Shabs, whose prawn filling is one I've tried lots of times and its so versatile and can be used as a filling for anything and everything and also tastes great with rice and rotis. I prefer making them with the tiny prawns as i feel they taste glorious.

Makes 8
IMG_6596
Prawn (the small variety)- 200 gms
Kashmiri chilli powder- 1 1/2 tsp
Turmeric powder- 1/4 tsp
Salt- to taste

Coconut oil- 2 tbsp
Onions- 2, finely chopped
Garlic- 5 cloves
Ginger- 1 tbsp, roughly chopped
Green chilli- 2
Turmeric powder- 1/4 tsp
Fennel powder- 1/2 tsp
Pepper powder- 1/2 tsp
Garam masala- 1/4 tsp
Coriander leaves- 1/4 cup
Grated coconut- 1/4 cup
Salt- to taste

Ready rolled puff pastry- 1 sheet
Egg- 1 small, for egg wash
IMG_6622
Marinate the prawn with the chilli powder, turmeric powder and salt and keep aside while you prepare the rest of the ingredients

Heat oil in a pan and sauté the onions till they become soft and translucent.
Grind together the garlic, ginger and green chilli and add to the onion. Saute for a further 5 minutes on medium heat, or till the raw smell disappears.
Add the salt, turmeric, fennel and pepper powders and saute for a couple more minutes before adding the marinated prawns along with the garam masala, coriander leaves and grated coconut, and mix it all together.
Remember, prawn cooks really fast, so make sure you don't keep it on for too long.
Once the prawns are cooked and the flavours have all been infused, take it off the heat and leave aside to cool.

Pre heat the oven to 200C and line a baking tray with baking paper
Roll out the puff pastry into a rectangle sheet.
Cut into half and divide the pastry into 8.
Take a tbsp of the prawn filling and place into the centre of each cut pastry sheet.
Wet the edges with water lightly and seal the pastry properly.
Place on the baking tray and do an egg wash and bake for about 15 minutes or till the pastry has become golden brown.
Remove from oven and leave aside to cool for a couple of minutes before digging in.
IMG_6641 
Notes: I have made the same using 1/4 cup thick coconut milk instead of the grated coconut and must say the coconut milk won with regard to taste. The grated coconut however lends a bite.
My oven gets really hot so it was done in about 13 minutes and as you can see i ended up browning them a bit too much.
Use shredded chicken for a chicken version.
They freeze really well, do it before the egg wash (clearly!). and then dont even thaw, just do the egg wash and bake. Of course it will need to be in the oven longer.

Friday, 13 February 2015

Rosewater pistachio cupcakes with mascarpone cream frosting

IMG_0900
Because its Valentines day and because no ones going to do anything special for me and because I felt like eating cake :)

I used to get all upset cos Ro hates everything to do with celebrating something (although he gives me some darn gift these days so i wouldnt sulk and make his life hell). These cupcakes were baked eons ago for Great British Chefs. I'm not a rosewater fan but the pistachio cake on its own is brill. Try it, cos you know, its Valentines day and all.

Makes 8 cupcakes
IMG_0892
Pistachio nuts- 50 gms
Ground almonds- 60 gms
Plain flour- 25 gms
Baking powder- 1/2 tsp
Butter- 100 gms, at room temperature
Caster sugar- 100 gms
Eggs- 2 small
Milk-2 tbsp
Rosewater- 1 1/2 tsp
Vanilla extract- 1/2 tsp (optional)
9776683646_65464c1d4a_o
Preheat oven to 176C and line a cupcake pan with 8 liners
Grind together the pistachio nuts, almonds and plai flour in a grinder or food processor. Make sure you dont over do this, or else you will be left with lumps.
Transfer to a bowl and add the baking powder.
In a separate bowl beat together the butter and sugar till light and fluffy.
Add the eggs, one after the other, beating well after each addition.
Pour in the milk, followed by rosewater and vanilla (if using) and mix well until well combined.
Fold in the ground mix using a spatula, till there is no trace of it in the batter.
Pour into the cupcake liners till about 3/4th full and bake for about 20 to 25 minutes or till a skewer inserted into the centre of the cupcakes come out clean.
Take them out of the oven and leave to cool completely on a cooling rack while you get the frosting done.

Mascarpone cream frosting
IMG_0898
Double cream- 100 ml (cold)
Mascarpone cheese- 250 gms 
Icing suagr- 2 tbsp
Red food colouring- a small bit to get the rose colour (optional)

Whisk the double cream in a large, clean bowl using the whisk attachment of your mixer or even a hand held whisk till stiff peaks form. Be careful to not overdo the beating or else it would split.
In another bowl mix the mascarpone cheese and icing sugar slowly till well combined.
Add this to the whipped cream, followed by vanilla and food colouring and continue whisking on low speed till they all come together and are mixed well.
Transfer into a piping bag and once the cupcakes are completely cool, pipe them.
Store in refrigerator for up to 4 days.

Sunday, 21 December 2014

Christmas morning macarons: hazelnut macarons with spiced coffee and chocolate ganache

IMG_514h4 
I once tried making hazelnut macarons, quite arrogant of me really, because it was the second time i was ever trying out macarons. I hadnt even perfected normal almond macarons, so its no surprise that the hazelnut ones didnt turn out nice. So without even trying to figure out what went wrong, that was put to rest.

Now that i eat, breathe, live macarons, I thought i should try the hazelnut ones a go, also because i was getting a bit bored of serving the almond ones to friends and family and before they started complaining about it, thought I should play around with the recipe a bit. Macarons are so temperamental, and fails with the slightest of changes, so technically I should have gone with a recipe using powdered hazelnut, but I couldn't find one that follows the French meringue method, hence I just sub'ed the almond measurement in my regular recipe with hazelnut. Of course my heart was in my mouth till i saw the feet, but it all worked out well in the end.
IMG_5188
When its baking it smells just like nutella and taste wise, its not as neutral as the almond ones, so you need to be quite careful with the filling flavour. They are obviously nuttier and if you didn't know its hazelnut, you would be a bit confused as to what the taste is. I loved it, but Ro was not too sure, he said I should stick to almonds, how boring! Anyways, to play it safe I filled them with my spiced coffee stash (from my Harrods Hamper- yes i know eons back, but its only taken out every Christmas), perfect for Christmas morning and since hazelnut and coffee is a gorgeous match it went down very well with me :)

Talking about Christmas, have you all planned your feast yet? My house is all decorated (yes, as you can see, this year i went a bit crazy with diy christmas decorations), presents are all wrapped and i am all ready for my huge Christmas feast. I have invited a couple of friends over and have already planned my menu starting with cocktails and champagne all the way to cheese, dessert and coffee. Hopefully I'd be able to post one more recipe before the year ends, but if I don't come back, here's wishing My Kitchen Antics' readers a very merry Christmas and a kick ass New Year.

Makes 22 medium size macarons
IMG_5143 
Ground hazelnuts- 60 gms, after sifting
Powdered/ icing sugar- 100 gms
Egg whites- 60 gms
Caster sugar- 40 gms
Vanilla bean paste- 1/4 tsp (optional)

For a detailed macaron making process, check out this post of mine.
Get the baking tray with baking paper ready. Make sure you cut them exactly to fit the size of your pan without any folds or dents, because this will affect the shape of your macaron. You would need 2 trays for this quantity.
Sift the ground hazelnut with the icing sugar to remove any lumps.
Using a free standing mixer with whisk attachment or hand mixer, whisk the egg whites till frothy.
Add the caster sugar bit by bit, while continuously beating the egg white, till soft peaks form. (When in doubt, beat till still peaks form, so you don't deflate the meringue too soon)
Into the meringue mix add the sifted hazelnut-sugar mix and vanilla bean paste and fold gently using a spatula, starting from the bottom and continuing to the top till you get a smooth even mixture, with no meringue visible.
Go really easy on the folding because if you over do it, you could end up with disfigured macarons when you pipe them out. To test of the batter is of correct consistency the batter should fall back in ribbons when you life the spatula and the ribbons should have disappeared in about a minute or so. If it doesn't, then give a couple more gentle strokes and test again.
IMG_5207 
Pour the batter into piping bag with a plain round tip and pipe small round, leaving about 2 inches gap between the shells for them to spread and expand.
Leave aside to dry for 20 to 30 minutes. Again, this completely varies, If the batter is towards the looser side, it would take longer to dry, if it is humid it would take longer to dry and sometimes with no particular reason it just takes forever. If you don't leave it to dry enough, you wont get a proper developed feet.
Lightly touch the piped batter with your finger and if it doesn't stick them it means you are good to go.
When the batter is drying pre heat the oven to 140C and once ready place the tray in the middle rack and bake for 13 to 15 mins.
If your macarons are undercooked, it becomes crinkled and hollow. It also becomes too delicate to handle as well. So when it doubt, bake a little longer, but make sure you don't burn them.
Once done, cool completely in the tray itself before filling.

Spiced coffee and chocolate ganache
IMG_5212
Dark chocolate- 1/2 cup
Double cream- 1/4 cup
Spiced coffee- 1/4 cup (brewed with 2 heaped teaspoons of spiced coffee)

Melt together the chocolate and cream in the microwave, in bursts of 30 to 45 seconds.
Stir in the spiced coffee and make sure its all mixed together.
Pour into a piping bag and place in the fridge to firm up, and till ready to use.
IMG_5180 
When ready to fill, pair the macarons with similar sized ones and pipe the filling on to the shells.
Sandwich them and store in an air tight container till ready to serve.
They taste better when the flavours have mixed well and has moistened in the fridge for a couple of hours.
If you leave it in the fridge for a long time, it would moisten too much leaving you with soggy shells.

Notes: If you want to do your own spiced coffee, add a 1/4 tsp cinnamon, 1/4 tsp all spice and a pinch of nutmeg
Of course, just replace the 60gms of ground hazelnuts with ground almonds and you'll get the original almond macarons

Thursday, 25 September 2014

Brownie butter cake

IMG_4534 (2)
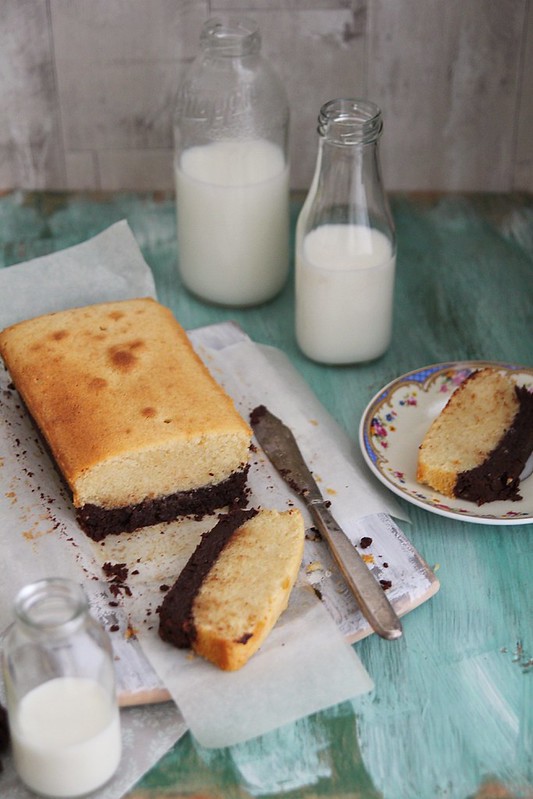
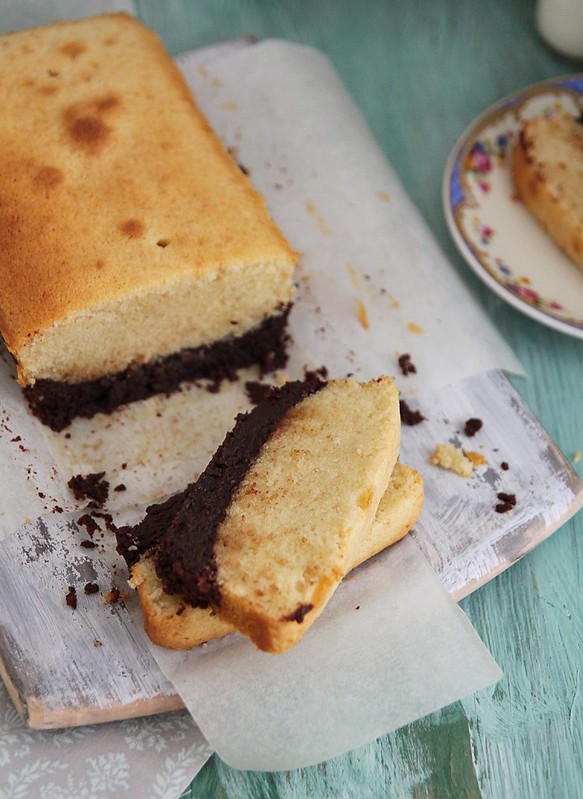
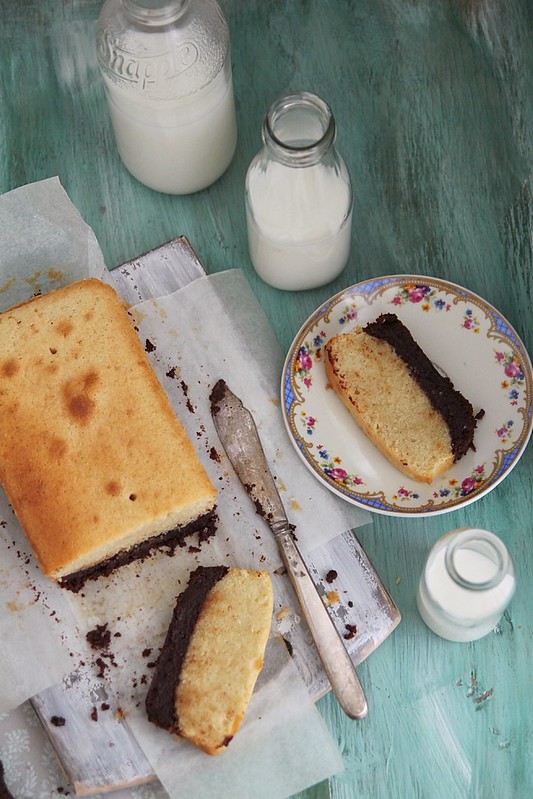
Brownie and a butter cake together. Need i say more? Yeah, didn't think so. Every other day Ro asks me, whats for dessert, do we have cake, whats for tea and the answer to this most of the time is, er chocolates? fruit? He gets distracted with those options most of the time, but otherwise he makes a face and pretends like I've deprived him of his basic necessities.

I made my custard cake sometime last month on a whim, (mostly to finish off the last of the custard powder and baking soda that had gone past expiry) and I wasn't sure it would work because expired baking soda fetches the most horrid cakes. To my surprise however, this one turned out so so good, much better than the first time and it stayed perfectly moist at room temperature for about 5 days- all i did was cover the cake pan with foil.
IMG_4508 (1) 
I put Ro through the torture of watching Great British Bake Off and about 2 weeks back on a Sunday evening he wanted to eat cake and trying to get me off the couch challenged me to bake a cake in 1 hr. He did the whole GBBO intro line and all, and me like an idiot fell for it. So i got around baking my mums beat and bake chocolate cake- a cake id grown up with, but never managed to get right for some strange reason. This time I was so hasty with the recipe and couldn't care if it turned out nice or not cos 1- I'm not a chocolate cake fan and 2- Ro would eat anything with chocolate, no matter how it turns out. Surprise, surprise I'd made the most perfect chocolate cake in less than an hour. I was so proud of myself, not because i did it in time, but because i managed to get the taste bang on- the taste of the cake just as i remember from my childhood. Needless to say, the husband polished it all off in no time.

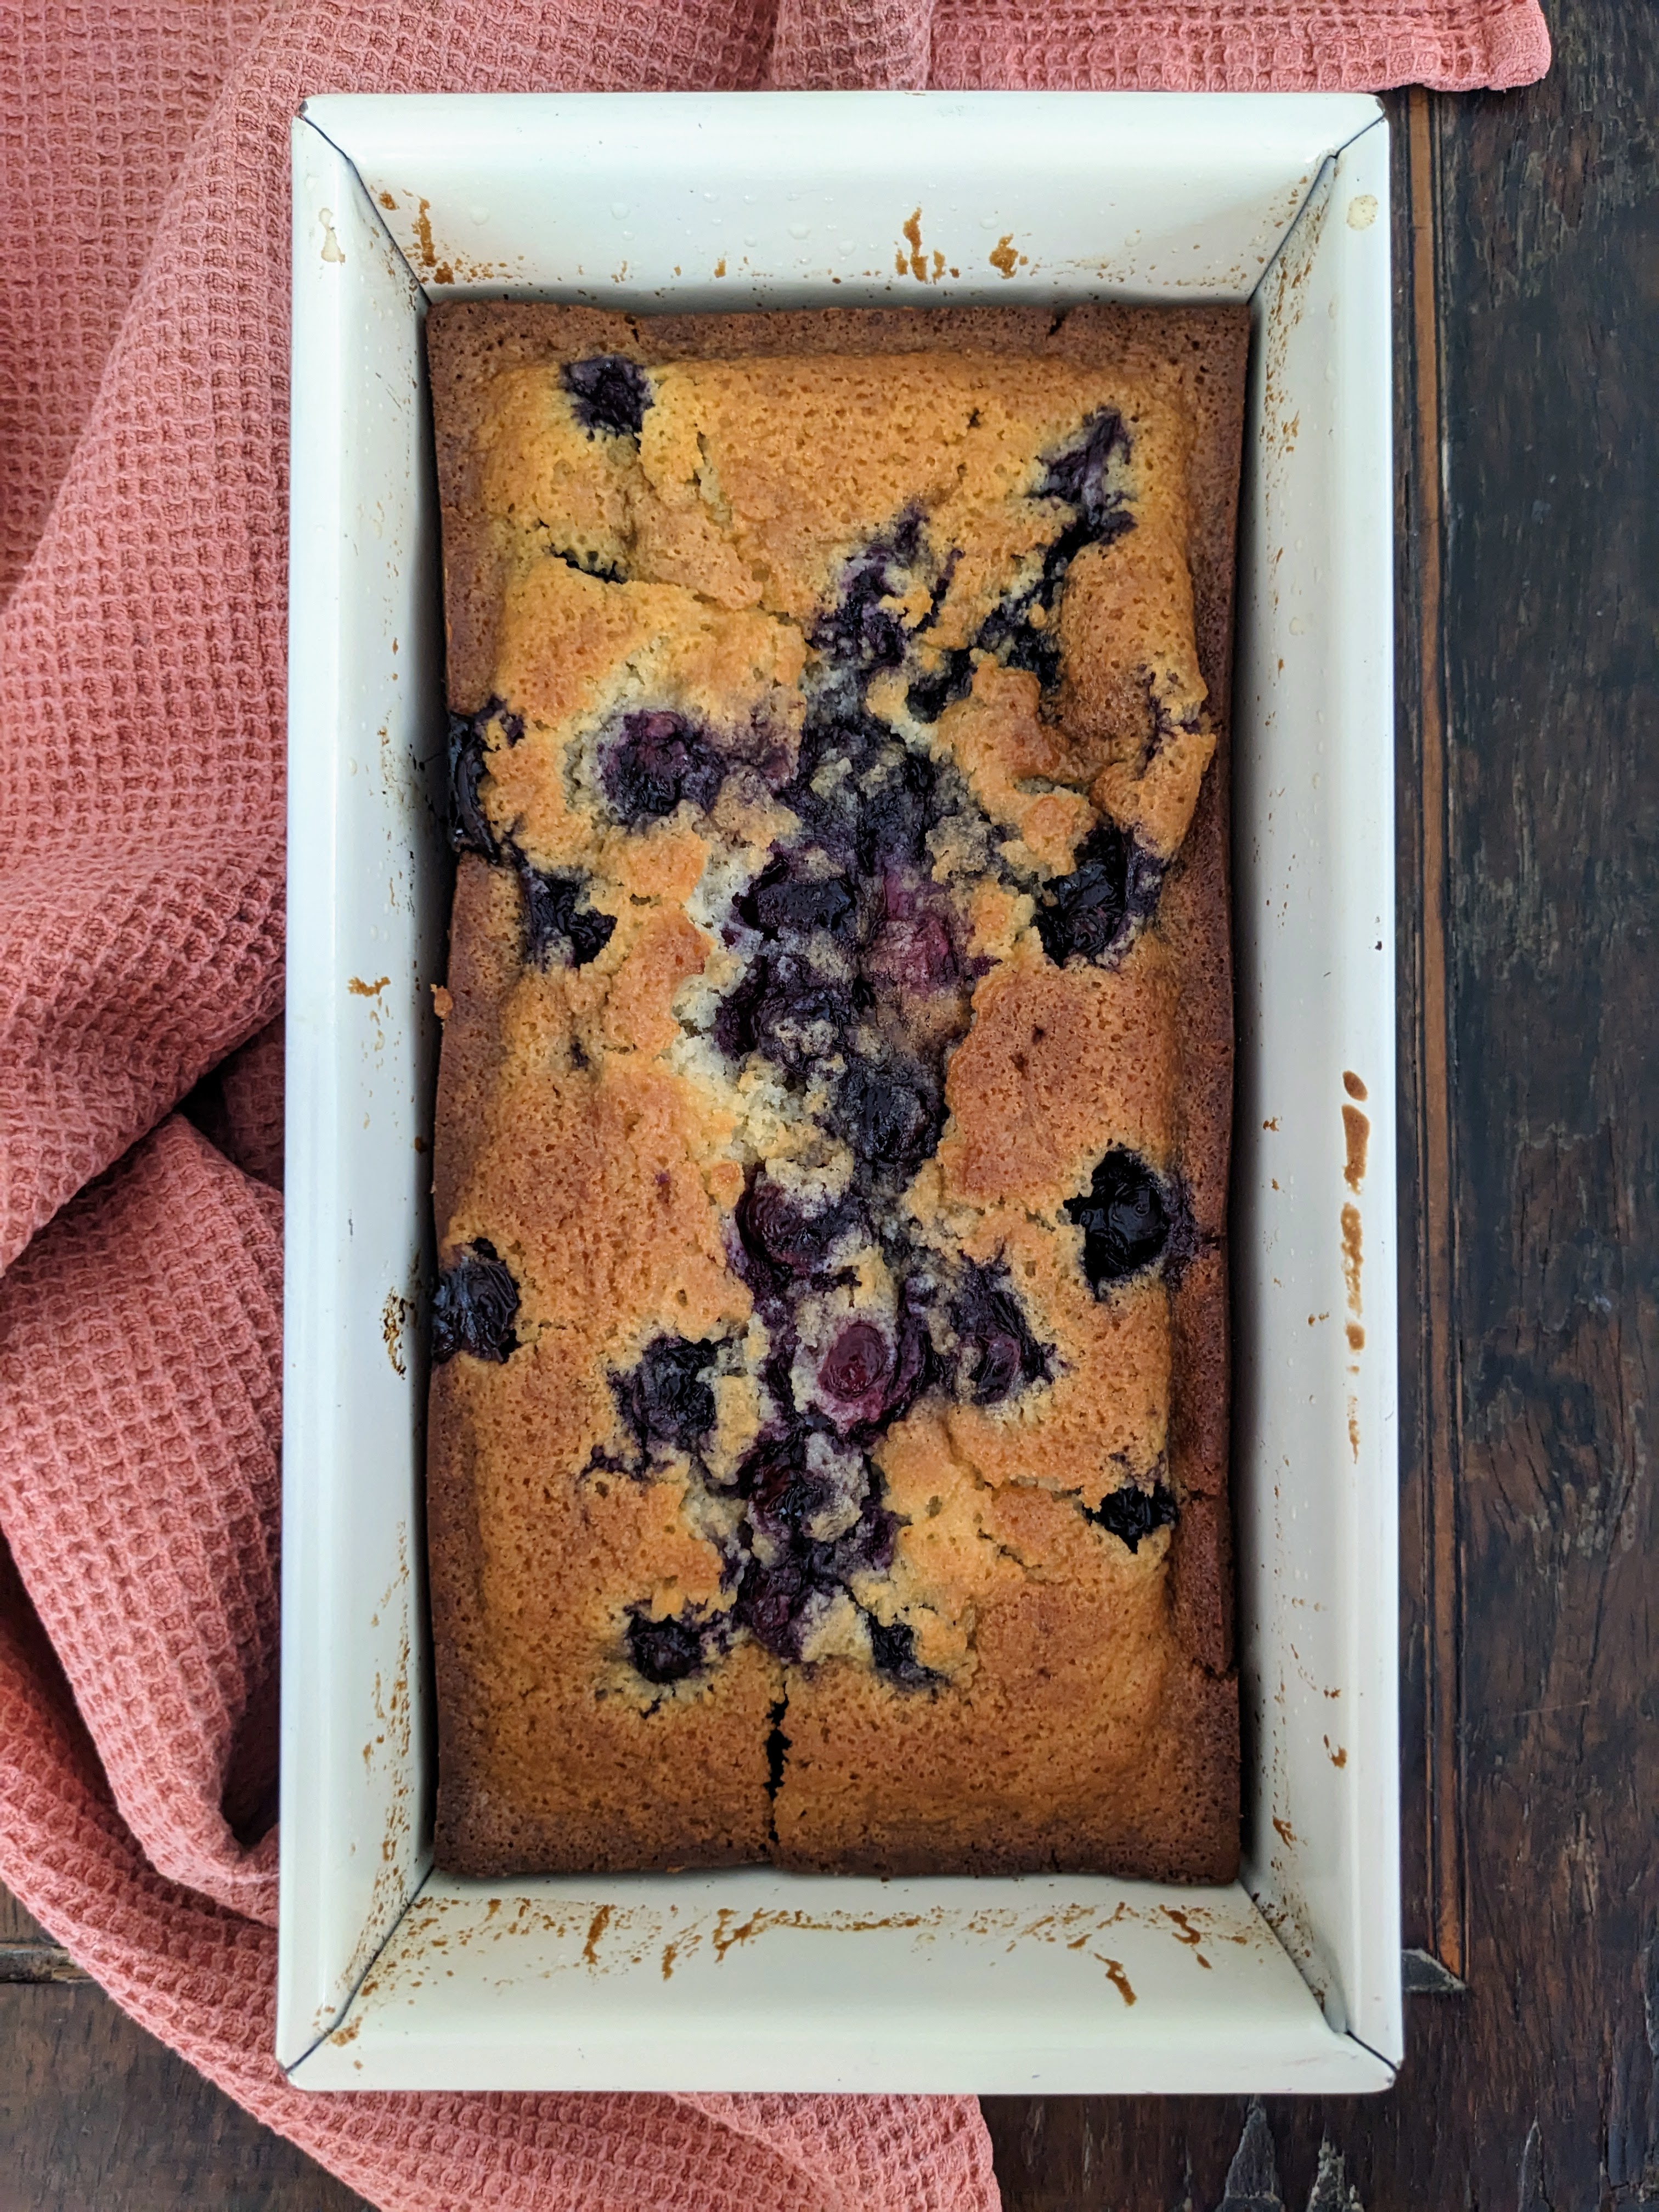
Since the cake luck was prevailing right now, I decided to bake a cake again, today. When I'm in the cake baking mood, its almost always a new recipe I put to test (along with my patience). I'd bookmarked Bee's brownie butter cake ages back and had completely forgotten about it till this morning when i was scouting my bookmarked list. I checked if i had all the ingredients, and except for brown sugar, i had all the other things needed. I still decided to go ahead, substituting brown sugar for demerara sugar.

I initially thought it was going to take time, but nope, had it all done in under an hour again and its a cake that can actually make someone say wow. I am not a big fan of brownies, so i really didn't care too much for that layer, but omg the butter cake was so so good. Moist like nobody's business and so darn tasty. I must remember to make just that one of these days.

Recipe adapted from here
IMG_4517 (1) 
For the brownie base
Dark chocolate- 140 gms, chopped into small pieces
Unsalted butter- 50 gms
Demerera sugar- 50 gms
Egg- 1, at room temperature
Plain flour- 35 gms

For the butter cake
Unsalted butter- 120 gms, at room temperature
Granulated sugar- 100 gms
Vanilla extract- 1/2 tsp
Eggs- 2, at room temperature
Plain flour- 120 gms
Baking powder- 1/2 tsp
Milk- 50 ml
IMG_4525 (1)
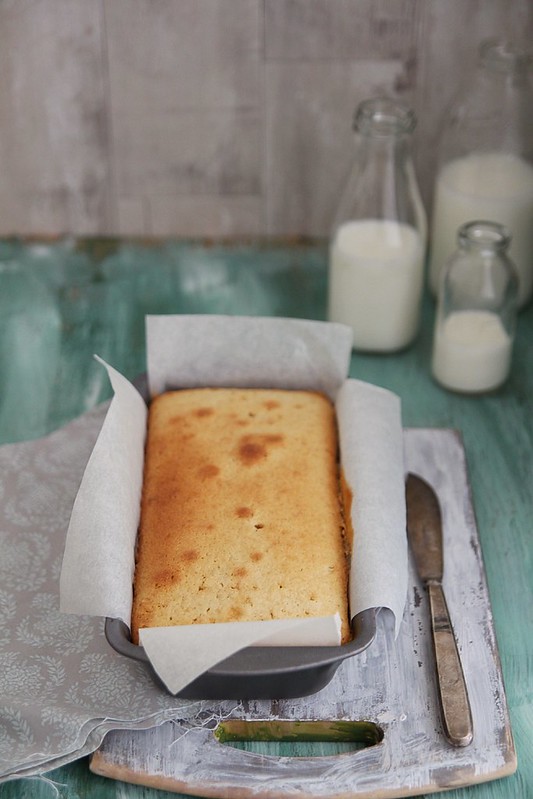
Preheat the oven to 180C and line a 20 x 10 cm loaf pan with baking paper.
On a bain marie melt the chocolate and butter till nice and smooth.
Take it off heat, leave aside for a couple of minutes and into it add the sugar. Whisk well
Break the egg into it, and beat till well combined.
Pour into the greased and lined loaf pan and chuck into the oven.
Bake for 15 minutes

While the brownie is baking, get on with the butter cake.
Cream together the butter and sugar in a mixing bowl till light and fluffy. You can either use a hand held blender or a spatula. I wanted it to be as simple as possible, so i didn't use my free standing mixer. Feel free to do so.
In goes the vanilla extract followed by eggs one after the other, beating well after each addition. The mix may look a bit curdled, but don't worry, the flour would sort this out.
Whisk together the plain flour and baking powder in a separate bowl and add it to the batter, alternating with the milk. 
Once the brownie comes out of the oven, reduce heat to 160C and pour the cake batter on top and immediately even it out with a spatula.
Chuck it back into the oven and bake for a further 30 minutes or till a skewer inserted into the centre of the cake comes out clean.
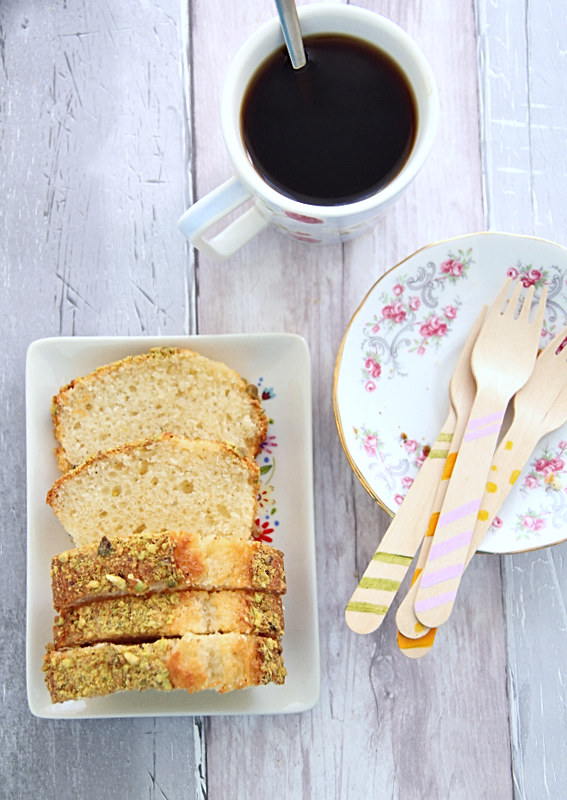
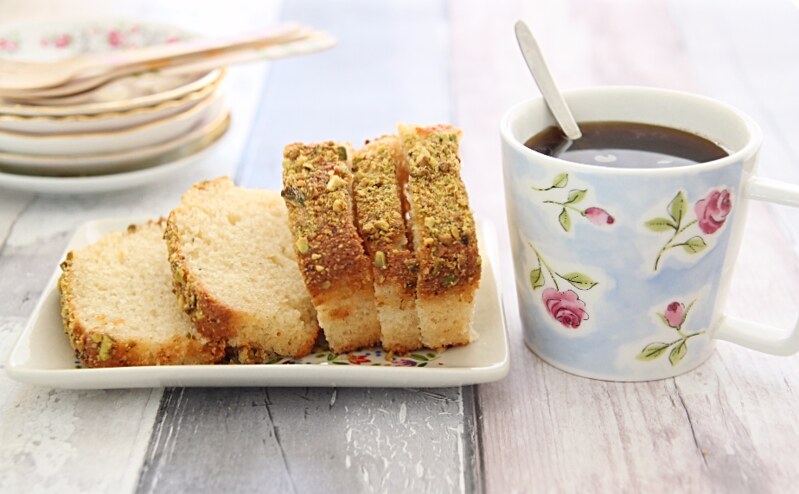
Once done, cool the cake on a rack and let the cake settle before slicing.
IMG_4530 (1)
Notes: Like i mentioned earlier i didn't have brown sugar, so used demerara instead. Please use brown sugar if you have it.
The brownie bit was still very gooey when i cut into it around 15 minutes later. But was fine when i went back to slice it around an hour later. Yes it was torture waiting to dig in. Using a serrated knife helps.
The cake batter when poured on top of the hot brownie melts immediately. Don't panic, just don't wait but try and do the deed as quickly as possible.

Tuesday, 17 June 2014

Lime and coconut crinkle cookies

IMG_3779
Its been a while since I posted a cookie recipe on the blog. Well, that's because I rarely make cookies and other than biting into them fresh out of the oven, I kinda don't like them that much. Of course its a different story for Ro, who claims he buys Oreo cookies just because I don't make any at home.

So last week I was heading over to G's place for a fun afternoon dress-up session (more about that later) and I had to take something for her lil boy who is so so adorable. I was on a tight schedule and had to figure something that could be easily made, with available ingredients and of course tastes good. I scouted around my bookmarked recipes and found this recipe, and I strangely had a couple of limes lying around in the fridge.
IMG_3763 
I've developed this new found love for lime (well, I always liked it in a margarita), mostly after tasting the awesome lime filling my boss makes for the macarons. It's perhaps one of my fav fillings, closely followed by passion fruit. I was a bit sceptical about whether kids would like lime and coconut as a flavour, as its somehow very adult-y, but then I had to give it a shot to see if it was worth it. I for one, loved it. G told me she and her nanny loved it, but I didn't get around to asking if lil S liked it. I served the leftover few to my niece and nephew the next day and they loved it, so I'm thinking even kids may actually have a thing for that flavour.

To be honest its very lime-y and coconutty. If you don't like these two flavours that much, then don't even bother scrolling down. If you like the lime flavour, but the coconut not so much, then do as the original recipe calls for where you roll the dough in granulated sugar and not coconut. The 15gms of coconut in the cookie doesn't really bring out too much of its flavour. I wanted it to be coconutty and hence rolled it it coconut.

Recipe adapted from here (makes around 36 to 38 cookies)
IMG_3749
Unsalted butter- 80 gms, at room temperature
Caster sugar- 100 gms
Egg- 1, small
Lime zest- from 1 lime
Lime juice- 2 tbsp
Dessicated coconut- 15 gms + enough to roll the cookies
Plain flour- 220 gms
Baking powder- 2 tsp
Icing sugar- to roll the cookies (around 2 tbsp)

Cream together the butter and sugar in a large mixing bowl, till light and fluffy. I used a silicone spatula for this as my butter was of a nice easy-to-handle consistency. Use the paddle attachment of your stand mixer to make the creaming easier.
Into the mix add the egg, lime zest and juice and dessicated coconut.
Mix till you get a smooth mix. I switched to a wooden spoon to make this job easier. You can use the same spatula, or even a whisk if that's easier for you.
Sieve together the plain flour and baking powder and add it to the butter mix, bit by bit, mixing after each addition. Use a fork to do the mixing.
One the mixture has come together, cover with a cling film and refrigerate for about 1/2 an hour.
IMG_3785
When ready to bake, preheat the oven to 180C and line 2 baking trays with baking paper.
Into a large plate add the icing sugar on one side and the dessicated coconut on the other. 
Keep a cup with water ready by the side because you'd need to keep wetting your hands to roll the dough.
Make small balls with the dough, first roll it in the dessicated coconut, followed by a generous roll in the icing sugar and place on the baking tray about an inch apart.
Continue till you finish the entire dough.
Bake for about 10 minutes and 12 if its a bit on the bigger side but not longer.
Cool on wire racks and enjoy them immediately or store in air tight containers and use up in 2 to 3 days (if you can stay away from it that long) :)
IMG_3757
Notes: The mix curdled quite a bit when i started mixing and of course I panicked but once you add the flour, it becomes alright
The original recipe used granulated sugar for the first coat, but i thought coconut was a better option. Feel free to replace it with granulated sugar.
The cookies are really lime-y, so reduce it to 1 tbsp if you don't want it too strong.

Friday, 14 February 2014

Lemon madeleines

I know this post was supposed to go up a couple of weeks back, but that was me being optimistic about posting stuff on the blog from home. Horrible internet connection and working on a tablet is not really a favourite thing, and to add to it, blogger or flickr - one of these- were acting up, forbidding me to place images the way I want. Anyways, I had to have the post up and running because as part of my New Year resolution, at least a recipe post a week on the blog was a must. I actually don't have anything else in my drafts and if i need to keep with the resolution:
1. The weather must be significantly better for me to (want to) take pictures
2. I should get off my lazy ass and cook
3. I should unpack my bags and dig out the props i bought from India (really cool ones BTW)
4. I should get off my lazy ass and COOK!!!

After diving straight into work, today is my day off and I don't see any of the above happening. Its Valentine's day, and what I should actually be doing is to cook up a storm for Ro (who couldn't care less about VD) and then cuddle up and watch a movie or something. But all I'm thinking of is what cocktail I can make with the new bottle of Cointreau I picked up from duty free and how many varieties I can whip up with the mixers lying around home. (It's only 11.30am btw! Do I have a drinking problem??? No don't answer that). Its raining and unbelievably windy and I don't want to cant go out. Oh, and Ro is working from home and in about 15 minutes he's going to ask me 'what's for lunch.' I'm going to reply 'love and fresh air,' and then it might end up in an argument and we'd be the awesome couple who fights on every VD.
Ok so madeleines. When I visited Paris last September with my blog buds, one of the things on my 'to buy list' was a madeleine tray. We visited a couple of stores that sell cooking paraphernalia and they all had gorgeous madeleine trays, but bloody expensive. So I conveniently forgot about it and instead came back home with other rubbish.  

Imagine my excitement when I found a similar tray in TKMaxx for a third of the price. I had to pick it up and make madeleines immediately. So I did and they came out perfectly well. Its so easy to incorporate a flavour of choice into these and I chose lemon- i used my home made extract. Its just a basic sponge recipe and I'm sure you can make it without the molds, but then they wont be called madeleines, will they? I once saw a post trending on Pinterest where oven safe spoons replace the molds. They don't give you the bump, but they do look pretty madeleine like and is a substitute for the tray. 

Enjoy!

Recipe adapted from here (makes 18, 8cm madeleines)
Eggs- 3 large, at room temperature
Granulated sugar- 1/2 cup
Dark brown sugar- 2 tbsp
Butter- 1/2 cup
Plain flour- 1 cup
Baking powder- 1/2 tsp
Salt- a pinch
Vanilla extract- 1 tsp
Lemon extract- 1/2 tsp
Lemon zest- 1 tsp, freshly grated
Whisk together the flour, baking powder and salt in a bowl and keep aside.
Beat together the eggs and both the sugars on high speed, either in a free standing mixer with whisk attachment, or using a hand whisk, for about 5 to 8 minutes or till pale and thick.
While the egg mix is being whisked, melt the butter in a saucepan and keep aside. It should be warm to touch.
Into the egg mix add the vanilla and lemon extracts and the lemon zest and whisk till just combined.
Sift in the flour mix bit by bit, folding well after each addition. Do this slowly and carefully, as you don't want to deflate the egg mix. I used a silicone spatula to fold it in.
Take about 1 cup of this batter and mix it with the warm melted butter.
Whisk it in really well to make sure the butter has been nicely mixed in with the batter.
Add this to the remaining egg batter and gently fold it in till well mixed. (Its easier to mix a bit of the batter with the melted butter and then add that to the bigger batch. You also don't end up deflating the mix too much.)
Cover with a cling film and refrigerate for a minimum of 1 hour. You can also keep it up to 3 days in the fridge.
When ready to bake, preheat oven to 190C and generously grease a 2 12 mold madeleine trays with melted butter using a pastry brush. Also dust the molds with plain flour (tapping out the excess) to be on the safer side.
Drop a tbsp each of batter into each mold. It will be slightly domed in the centre which is precisely what you want.
Bake for about 9 to 11 minutes or just until the cake springs back when touched with a finger, or till the edges turn a light brown. Don't over bake it.
Take the pans out of the oven and immediately tap out the madeleines on to a wire rack.
Dust with some icing sugar and serve immediately with a cup of coffee.

Notes: I had only one 12 mold tray and so after i finished baking the first batch, i kept it aside for a few minutes to cool down and then repeated the greasing process. The dough was kept back in the fridge while the first batch was baking. The second batch also came out perfectly fine for me.
The madeleines are best had immediately, but it can also be stored up to 3 days in an air tight container in the fridge.

Sunday, 9 December 2012

Smoked salmon- two ways

IMG_5133
It's beginning to look and feel a lot like Christmas this side of the pond. Temperatures have significantly dropped and a white Christmas is predicted for London this year. We did have our tiny stint with snow recently, but thanks to a drunken night out, I happily missed the snowfall (or flurries??) by sleeping in late. It wasn't that strong in Central London and since it didn't even settle on the ground, there was no proof that it actually snowed. I was, needless to say, a bit bummed that I missed the first snow fall of the season, and added to it was everyone flaunting snow pics and status updates on FB. I am praying it does snow like crazy one of these days, much to the husbands annoyance :)

I know we are all running around trying to get gifts sorted in time for the big day. If you want some cool Christmas gift ideas visit The Handpicked Collection online store for some inspiration. The pretty heart shaped chopping board in the pic was my Christmas gift from the lovely people over at The Handpicked Collection. Also, they have launched The Handpicked Food Store online which features award winning smoked salmon and other fine foods from artisan British producers, handpicked by food experts. I was sent a smoked salmon taster to review from the store, and I decided to go ahead and use it wisely in a dish, or two.

Smoked salmon-cream cheese sandwich (makes 4 finger sandwiches)
IMG_5251 
Smoked salmon- 3 to 4 thin slices
Green cucumber- peeled and sliced into 8 small rounds
Whole wheat bread- 2 slices (use white if preferred)
Cream cheese- 2 tbsp
Chives- 1 tsp, finely chopped
Salt and pepper- to season (optional)

Mix together the cream cheese and chives and spread the mix on the sandwich slices.
Top with smoked salmon slices. Trim to required length, if necessary.
Place the cucumber rounds on top of the salmon and season with salt and pepper.
Finally, top with the remaining bread slice, cheese side facing downwards.
Using a serrated knife slice the sandwich into quarters and serve with some crisps.

Notes: Use a mayo-chive mix if you don't have cream cheese.
Slice off the edges from the bread if you want to, but we keep it on 
You can flavour the cream cheese with lemon, garlic, parsley etc etc.

Smoked salmon breakfast bruschetta (makes 2)
IMG_5179 
Sour dough bread- 2 slices, toasted just before assembling
Butter- 2 tbsp
Eggs- 2, well beaten
Tomato- 1 small, cut into rounds
Salt and pepper- to taste
Chutney- 2 tsp (optional)
Smoked salmon- 2 thin slices, diced into long strips
Chives- finely chopped, to garnish

Heat a non stick frying pan and melt 1 tbsp of butter.
When bubbling, add the tomato rounds and fry on medium heat till done and slightly charred. About 3 to 4 minutes.
Flip the rounds and fry for a further 3 to 4 minutes.
Remove with a slotted spoon and drain on paper towels. Season with enough salt and pepper.
Into the same frying pan, add the eggs and scramble till the eggs are cooked, but don't dry it out too much.
Season with salt and pepper, give a final stir and transfer to a bowl.
IMG_5173
To assemble, place the toasted bread on to serving plates and butter them well using the remaining butter.
Add a layer of chutney (if using) and spread it as evenly as possible.
Top with the grilled tomato followed by scrambled egg and slices of smoked salmon
Drizzle some of the chutney on top of the salmon, garnish with chives and serve immediately.

With thanks to The Handpicked Collection and Handpicked Food Store for samples