Showing posts with label Delectable Desserts. Show all posts

Wednesday, 11 November 2020

Chocolate, bread & butter pudding

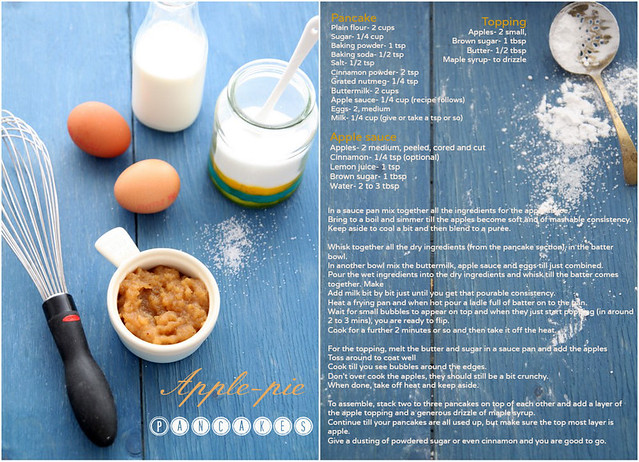
Recipe adapted from here (serves 6)
White bread- 10 to 11 slices, crusts removed 
Dark chocolate- 50 gms, roughly chopped
Milk chocolate- 100 gms, roughly chopped
Cocoa powder- 2 tbsp (good quality dark one like Green & Blacks)
Butter- 75 gms, cut into cubes
Double cream- 450 ml
Dark rum- 4 tbsp (optional)
Vanilla extract- 1/2 tsp (optional)
Caster sugar- 80 gms
Cinnamon- a generous pinch
Eggs- 3

Slice each of the bread slices diagonally to get 4 triangles. Bread that is a day or two old would be ideal.
Place the dark chocolate, milk chocolate, cocoa powder, butter, cream, rum (if using),  sugar and cinnamon in a heat proof bowl and melt over barely simmer water. Make sure the bowl doesnt touch the water.
Using a spatula, mix well until the chocolate, butter and sugar have completely melted.
Take it off heat, add the vanilla extract, and using a balloon whisk, give the chocolate mix a good beating to emulsify it and bring everything together.
Once slightly cool, add the eggs into the mix, one by one, beating well after each addition. You can also whisk all 3 eggs in a separate bowl and tip into the chocolate as well.
Pour about an inch of chocolate sauce into a rectangle/square oven proof dish.
Arrange a layer of bread triangles over the chocolate in rows, in an overlapping manner.
Pour half of the remaining chocolate sauce over the bread, as evenly as possible, and using a fork, gently press the bread slices down so it gets covered with the sauce.
Place the final layer of bread triangles and pour over all the remaining chocolate sauce, again making sure the bread is properly covered with sauce.
Cover the dish with cling film and place at room temp for 2 hours and then transfer to the refrigerator for a minimum of 24hrs. This step is very important. The more it soaks the better.
When ready to cook, preheat oven to 180C
Remove clingfilm and bake the pudding for 30 to 35 minutes.
The top would be a bit crunchy, while the inside would be gooey.
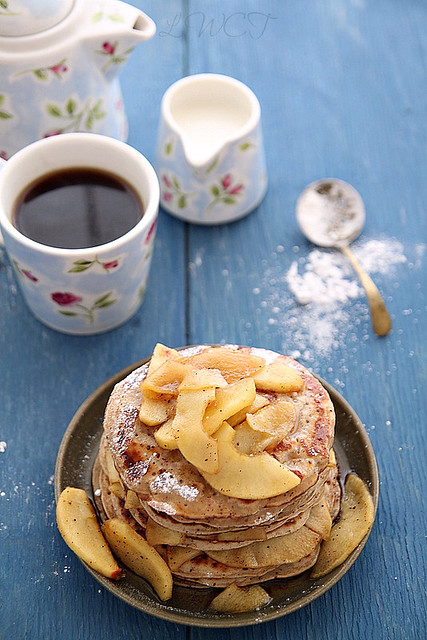
Leave to stand for about 10 minutes, after which you can scoop into dessert bowl and have with cold custard or pouring cream.

Notes: Original recipe called for 150 gms of dark chocolate. I bought milk chocolate by accident and hence had to compensate with cocoa and reducing the sugar so it wasnt cloyingly sweet. 
If using 150gms of dark chocolate, omit the cocoa and milk chocolate, and increase the caster sugar amount to 110 gms.
This dessert is not overly sweet. It was just perfect for our liking, but if youd like it sweeter then increase the caster sugar amount.
The best part of this pudding is that it can be prepared ahead and when ready to serve can be chucked into the oven to serve warm.
Stays fine covered in the refrigerator for up to 3 days.

Wednesday, 21 October 2015

Häagen-Dazs coffee ice cream - 2 ways

nn
I'm back after a short trip and jumped straight into work without having any time to brood over the holiday getting over. Deadlines, macaron orders, supper clubs and pop-ups fill my time for the next couple of weeks and then the much awaited trip to India end of December. While I was away Haagen Dazs sent me a gorgeous parcel (the husband kept sending me pictures of the package) and I couldn't wait to get back and check it out. In my gift pack was a Nespresso Inissia, a personalised silver plated spoon, a really nice OXO ice cream scoop, an egg timer and of course vouchers and the new Haagen Dazs coffee ice cream.

We don't do ice creams that often but when we do its always Haagen Dazs. I'm sure its a brand we are all familiar with and we all have that one flavour we are addicted to. Mine was the dulce de leche and it was a struggle getting over it. I had attended the launch of the Haagen Dazs Master Ice Cream Academy a couple of months ago and learnt a thing or two about how sounds and sights affect taste and of course got to taste a fabulous strawberry ice cream. Dan Doherty from Duck & Waffle made us an interesting ice cream float, one that I've been meaning to try at home, but before the blink of an eye summer whisked by without any warning.
IMG_8545
That said, there is no rule you can have ice cream only in summer. Which brings me to these 2 desserts i whipped up with the new coffee flavour, so intensely coffee and perfect for an addict like me. I broke my head trying to decide what to make and I wanted to do something different than the usual pairing of the coffee ice cream with a cake or brownie. Cookie dough slices sandwiched with coffee ice cream and an affogato were the two easy to do options i came up with.

Haagen Dazs coffee ice cream Affogato (makes 1)
IMG_8566
The Affogato happened quite by fluke and i ended up enjoying that much more than the slices. I could also put the Nespresso machine to good use, making a kick ass espresso for the affpgato and I'm hooked. You can whip it up in no time and tastes absolutely delicious. I added a dash of Amaretto for some good measure. No regrets.

Strong espresso coffee- 1 espresso cup
Amaretto (or any liqueur of choice)- 1 tbsp
Haagen Dazs coffee ice cream- 2 scoops
Praline- 2 tsp (recipe below)
IMG_8547
Use your favourite coffee beans to make a strong shot of espresso.
Scoop the ice cream into the serving glasses and pour over the Amaretto.
Top with the steaming hot espresso by pouring it gently over the ice cream.
Sprinkle praline over the ice cream and enjoy.

Praline (recipe adapted from here)
Granulated sugar- 3 tbsp
Plain cashew nuts- 10 whole
Butter- 1/2 tsp
IMG_8571
Melt the sugar in a non stick pan on low heat till it starts to caramelise and turns a light golden brown in colour.
Add the cashew nuts and butter and stir till it turns darker, but make sure you don't burn it.
Remove from heat once the cashew nuts look roasted,and pour on to a tray lined with baking paper.
Leave to cool completely and then break into smaller pieces or pulse it in your processor for a couple of seconds to get a coarse mix.

Haagen Dazs coffee ice cream and cookie dough slices (recipe adapted from here)
IMG_8538 
Cookie dough slices were a unique choice, and I could imagine what a strong coffee flavour would do to a vanilla-y cookie dough. I decided to keep the filling and the dough thin so we could just hold it in our hands and eat as opposed to having it as a formal dessert with a plate and such.

Unsalted butter- 1/2 cup
Dark brown sugar- 1/3 cup
Granulated sugar- 1/4 cup
Milk- 2 tbsp
Vanilla extract- 1/2 tsp
Salt- 1.2 tsp
Plain flour- 1 1/4 cup
Chocolate chips- a generous handful
Haagen Dazs coffee ice cream- 1/2 a tub, spreadable consistency
IMG_8527
Melt the butter and both sugars in a saucepan, stir till the sugar has completely melted.
Take it off the heat and pour in the milk, vanilla and salt.
Stir in the plain flour till well combined and you get a smooth mix without traces of flour.
Keep aside to cool and then fold in the chocolate chips. Its ok if it starts to melt, but stop before it completely does so.

Have a tray ready with 3 sheets of baking paper.
Place one sheet on the tray and spread out or roll half of the dough on to the sheet, around 1/2 inch thick (or thicker or thinner if you prefer it that way)
Top with another baking paper and roll out the second half of the cookie dough into the same thickness as before.
Press the third sheet on top of the rolled out dough and freeze for about half an hour.
IMG_8538
Remove the top cookie dough layer and spread the coffee ice cream as evenly as possible.
Top with the second cookie dough layer, gently press down, cover with baking paper and refreeze till ready to use.
Let it sit at room temperature for a couple of minutes to make slicing easier.
Slice into squares and eat immediately.

This is a sponsored post for Haagen Dazs in association with Great British Chefs. Thanks for the gift pack that was sent to put together the recipes.

Friday, 20 March 2015

Lemon Griestorte

IMG_5668 
So... we are moving! No not moving to another country, although at this point that's how i feel. Ro has been wanting to move out of central London into the suburbs for, well, bigger house, more space, not wanting to stare into the neighbours rooms, countryside a stones throw away and so on. I on the other hand have been clinging on to our conveniently located apartment and every time Ro brought up moving I'd retaliate and it would end up in a fight. And then it happened. The owners decided to sell the apartment and in 4 days it got sold. So we had no choice but to take that decision to finally move out. On one hand i want a bigger house, more space to store my junk etc etc, but on the other i really don't care about a larger place..its just more difficult to maintain and I'm so not a suburb girl, im a hard core city girl..which makes me realise after 9 years how different Ro and I are. Why did we not talk about things like this when we were courting?

So yes, we are moving to the other end of London (well, if i can still call it London), to Amersham. It is a beautiful lil place, the kind i love- quaint cafes, nice shops, no high street brands etc etc. But its on the last possible stop on the Metropolitan line, is an easy 45 minute to an hour trek into c. London and worse of all, i have to start driving. I have been so used to hopping on a bus from right in front of my apartment and now with this move i have to drive and do all the formalities that come with it. I thought i'd left behind driving and traffic back in India!
IMG_5612 (1) 
Ro and I have been arguing ever since this move has come up because unlike all other men, Ro needs to have an opinion about every thing. Even what frikking colour the table cloth should be. We have been looking at houses to buy and have given us till end of the year to settle on something. I have been pinning things for 'the' home right from when Pinterest came into existence and Ro (being all technical and practical and bloody irritating to the core) has just taken all the fun out of setting up a new home. I know, its a long way off, so i have, for the moment decided to back off and cross the bridge when i get to it. Unfortunately, he doesn't seem to notice I'm upset and angry and has conveniently gone about figuring things out on his own!!!!

Anyhoo, we move end of the month and it takes 3 weeks to get a darn Internet connection, so this is going to be my last post for a while. I baked this cake to take to a friends and it was well received. It screams of summer (wishful thinking) and takes absolutely no time to bake. Its apparently a German cake and gries means semolina. I baked it twice in a weeks time and that says a lot about the cake. Its quite versatile in the sense you can change the flavours from lemon to orange to passion fruit to plain vanilla, fill with fruits of choice, and end up with a gorgeous cake. There is no rising agent or oil or butter, its purely the eggs that give it the light and airy texture. Don't deflate the eggs and more importantly, don't over cook. If you feel that the cake springs back to the touch, just take it out of the oven irrespective of the time.

Recipe adapted from here
IMG_5693 
Eggs- 3 large, separated
Caster sugar- 110 gms
Lemon juice- of half a large lemon
Vanilla extract- 1/4 tsp (optional)
Lemon zest- of one large lime
Fine semolina- 50 gms
Powdered almonds- 1 tbsp

Double cream- 150 ml
Icing sugar- 1 tbsp 
Vanilla extract- 1/4 tsp
Lemon curd- 3 tbsp
IMG_5712
Pre-heat oven to 180C, grease and line a 9 x 2 inch jelly roll pan (or 2 6 inch cake pans) with baking paper
Place the separated egg yolk into a large bowl and whisk well with the caster sugar, lemon juice and vanilla extract till they turn pale and thick. I just whisked using a wire whisk but feel free to use a hand blender or free standing mixer.
Fold in the lemon zest, semolina and powdered almonds gently and keep aside. A spatula makes this easier.
Whisk the egg whites in a clean bowl until soft peaks form. A hand blender or a free standing mixer with whisk attachment is advised or else you'd just end up with aching arms. That said, I've done it a few times before and its not as bad as it sounds.
Using a spatula fold the egg white into the yolk mix gently, making sure you don't deflate the batter.
Transfer the batter into the prepared cake pans and bake in the centre rack of the oven for about 17 minutes for the jelly roll pan and about 20 minutes for the 6 inch cake pans. Make sure you don't over cook or it becomes tough. 
Its done when you gently press down the cake with your finger and it springs right back.
Take out of the oven and let it sit for about 10 minutes after which you can turn it out on to a cooling rack, peel off the baking paper and leave to cool completely.
Use a round cutter to cut out mini cakes of your choice and assemble. 

For the filling, whip the double cream with icing sugar and vanilla extract till peaks form, again make sure you don't over do this or it will start to curdle.
Place the cake on a plate and spread the lemon curd generously.
Top with the whipped cream, spread it around, it really doesn't need to be all even.
Top with the second cake, sift some icing sugar on top and serve.
IMG_5681
Notes: The cake can be refrigerated for up to 2 days. Bring it to room temperature before serving (if its not too warm) if possible.
The sponge can be made a day or two ahead , cooled, cling wrapped and kept in a container till ready to assemble.
Cooking time is crucial for a sponge cake. I  took mine out in about 18 minutes and it had cooked a bit too much already. However, when i did the layer cake the first time, it took me 20 minutes and it was perfect consistency.
From the above measurement you'd get only around 3 cakes, and the rest of the cake was eaten up on its own. I suggest you double the recipe if you wanted to serve it as a dessert for a larger group. I did this method for some variety, but i strongly suggest the layer cake if you wanted to serve at a party. It would serve 6 to 7 people.
Replace the lemon curd with any curd of choice- mango, passion fruit etc.

Sunday, 21 December 2014

Christmas morning macarons: hazelnut macarons with spiced coffee and chocolate ganache

IMG_514h4 
I once tried making hazelnut macarons, quite arrogant of me really, because it was the second time i was ever trying out macarons. I hadnt even perfected normal almond macarons, so its no surprise that the hazelnut ones didnt turn out nice. So without even trying to figure out what went wrong, that was put to rest.

Now that i eat, breathe, live macarons, I thought i should try the hazelnut ones a go, also because i was getting a bit bored of serving the almond ones to friends and family and before they started complaining about it, thought I should play around with the recipe a bit. Macarons are so temperamental, and fails with the slightest of changes, so technically I should have gone with a recipe using powdered hazelnut, but I couldn't find one that follows the French meringue method, hence I just sub'ed the almond measurement in my regular recipe with hazelnut. Of course my heart was in my mouth till i saw the feet, but it all worked out well in the end.
IMG_5188
When its baking it smells just like nutella and taste wise, its not as neutral as the almond ones, so you need to be quite careful with the filling flavour. They are obviously nuttier and if you didn't know its hazelnut, you would be a bit confused as to what the taste is. I loved it, but Ro was not too sure, he said I should stick to almonds, how boring! Anyways, to play it safe I filled them with my spiced coffee stash (from my Harrods Hamper- yes i know eons back, but its only taken out every Christmas), perfect for Christmas morning and since hazelnut and coffee is a gorgeous match it went down very well with me :)

Talking about Christmas, have you all planned your feast yet? My house is all decorated (yes, as you can see, this year i went a bit crazy with diy christmas decorations), presents are all wrapped and i am all ready for my huge Christmas feast. I have invited a couple of friends over and have already planned my menu starting with cocktails and champagne all the way to cheese, dessert and coffee. Hopefully I'd be able to post one more recipe before the year ends, but if I don't come back, here's wishing My Kitchen Antics' readers a very merry Christmas and a kick ass New Year.

Makes 22 medium size macarons
IMG_5143 
Ground hazelnuts- 60 gms, after sifting
Powdered/ icing sugar- 100 gms
Egg whites- 60 gms
Caster sugar- 40 gms
Vanilla bean paste- 1/4 tsp (optional)

For a detailed macaron making process, check out this post of mine.
Get the baking tray with baking paper ready. Make sure you cut them exactly to fit the size of your pan without any folds or dents, because this will affect the shape of your macaron. You would need 2 trays for this quantity.
Sift the ground hazelnut with the icing sugar to remove any lumps.
Using a free standing mixer with whisk attachment or hand mixer, whisk the egg whites till frothy.
Add the caster sugar bit by bit, while continuously beating the egg white, till soft peaks form. (When in doubt, beat till still peaks form, so you don't deflate the meringue too soon)
Into the meringue mix add the sifted hazelnut-sugar mix and vanilla bean paste and fold gently using a spatula, starting from the bottom and continuing to the top till you get a smooth even mixture, with no meringue visible.
Go really easy on the folding because if you over do it, you could end up with disfigured macarons when you pipe them out. To test of the batter is of correct consistency the batter should fall back in ribbons when you life the spatula and the ribbons should have disappeared in about a minute or so. If it doesn't, then give a couple more gentle strokes and test again.
IMG_5207 
Pour the batter into piping bag with a plain round tip and pipe small round, leaving about 2 inches gap between the shells for them to spread and expand.
Leave aside to dry for 20 to 30 minutes. Again, this completely varies, If the batter is towards the looser side, it would take longer to dry, if it is humid it would take longer to dry and sometimes with no particular reason it just takes forever. If you don't leave it to dry enough, you wont get a proper developed feet.
Lightly touch the piped batter with your finger and if it doesn't stick them it means you are good to go.
When the batter is drying pre heat the oven to 140C and once ready place the tray in the middle rack and bake for 13 to 15 mins.
If your macarons are undercooked, it becomes crinkled and hollow. It also becomes too delicate to handle as well. So when it doubt, bake a little longer, but make sure you don't burn them.
Once done, cool completely in the tray itself before filling.

Spiced coffee and chocolate ganache
IMG_5212
Dark chocolate- 1/2 cup
Double cream- 1/4 cup
Spiced coffee- 1/4 cup (brewed with 2 heaped teaspoons of spiced coffee)

Melt together the chocolate and cream in the microwave, in bursts of 30 to 45 seconds.
Stir in the spiced coffee and make sure its all mixed together.
Pour into a piping bag and place in the fridge to firm up, and till ready to use.
IMG_5180 
When ready to fill, pair the macarons with similar sized ones and pipe the filling on to the shells.
Sandwich them and store in an air tight container till ready to serve.
They taste better when the flavours have mixed well and has moistened in the fridge for a couple of hours.
If you leave it in the fridge for a long time, it would moisten too much leaving you with soggy shells.

Notes: If you want to do your own spiced coffee, add a 1/4 tsp cinnamon, 1/4 tsp all spice and a pinch of nutmeg
Of course, just replace the 60gms of ground hazelnuts with ground almonds and you'll get the original almond macarons

Thursday, 25 September 2014

Brownie butter cake

IMG_4534 (2)
Brownie and a butter cake together. Need i say more? Yeah, didn't think so. Every other day Ro asks me, whats for dessert, do we have cake, whats for tea and the answer to this most of the time is, er chocolates? fruit? He gets distracted with those options most of the time, but otherwise he makes a face and pretends like I've deprived him of his basic necessities.

I made my custard cake sometime last month on a whim, (mostly to finish off the last of the custard powder and baking soda that had gone past expiry) and I wasn't sure it would work because expired baking soda fetches the most horrid cakes. To my surprise however, this one turned out so so good, much better than the first time and it stayed perfectly moist at room temperature for about 5 days- all i did was cover the cake pan with foil.
IMG_4508 (1) 
I put Ro through the torture of watching Great British Bake Off and about 2 weeks back on a Sunday evening he wanted to eat cake and trying to get me off the couch challenged me to bake a cake in 1 hr. He did the whole GBBO intro line and all, and me like an idiot fell for it. So i got around baking my mums beat and bake chocolate cake- a cake id grown up with, but never managed to get right for some strange reason. This time I was so hasty with the recipe and couldn't care if it turned out nice or not cos 1- I'm not a chocolate cake fan and 2- Ro would eat anything with chocolate, no matter how it turns out. Surprise, surprise I'd made the most perfect chocolate cake in less than an hour. I was so proud of myself, not because i did it in time, but because i managed to get the taste bang on- the taste of the cake just as i remember from my childhood. Needless to say, the husband polished it all off in no time.

Since the cake luck was prevailing right now, I decided to bake a cake again, today. When I'm in the cake baking mood, its almost always a new recipe I put to test (along with my patience). I'd bookmarked Bee's brownie butter cake ages back and had completely forgotten about it till this morning when i was scouting my bookmarked list. I checked if i had all the ingredients, and except for brown sugar, i had all the other things needed. I still decided to go ahead, substituting brown sugar for demerara sugar.

I initially thought it was going to take time, but nope, had it all done in under an hour again and its a cake that can actually make someone say wow. I am not a big fan of brownies, so i really didn't care too much for that layer, but omg the butter cake was so so good. Moist like nobody's business and so darn tasty. I must remember to make just that one of these days.

Recipe adapted from here
IMG_4517 (1) 
For the brownie base
Dark chocolate- 140 gms, chopped into small pieces
Unsalted butter- 50 gms
Demerera sugar- 50 gms
Egg- 1, at room temperature
Plain flour- 35 gms

For the butter cake
Unsalted butter- 120 gms, at room temperature
Granulated sugar- 100 gms
Vanilla extract- 1/2 tsp
Eggs- 2, at room temperature
Plain flour- 120 gms
Baking powder- 1/2 tsp
Milk- 50 ml
IMG_4525 (1)
Preheat the oven to 180C and line a 20 x 10 cm loaf pan with baking paper.
On a bain marie melt the chocolate and butter till nice and smooth.
Take it off heat, leave aside for a couple of minutes and into it add the sugar. Whisk well
Break the egg into it, and beat till well combined.
Pour into the greased and lined loaf pan and chuck into the oven.
Bake for 15 minutes

While the brownie is baking, get on with the butter cake.
Cream together the butter and sugar in a mixing bowl till light and fluffy. You can either use a hand held blender or a spatula. I wanted it to be as simple as possible, so i didn't use my free standing mixer. Feel free to do so.
In goes the vanilla extract followed by eggs one after the other, beating well after each addition. The mix may look a bit curdled, but don't worry, the flour would sort this out.
Whisk together the plain flour and baking powder in a separate bowl and add it to the batter, alternating with the milk. 
Once the brownie comes out of the oven, reduce heat to 160C and pour the cake batter on top and immediately even it out with a spatula.
Chuck it back into the oven and bake for a further 30 minutes or till a skewer inserted into the centre of the cake comes out clean.
Once done, cool the cake on a rack and let the cake settle before slicing.
IMG_4530 (1)
Notes: Like i mentioned earlier i didn't have brown sugar, so used demerara instead. Please use brown sugar if you have it.
The brownie bit was still very gooey when i cut into it around 15 minutes later. But was fine when i went back to slice it around an hour later. Yes it was torture waiting to dig in. Using a serrated knife helps.
The cake batter when poured on top of the hot brownie melts immediately. Don't panic, just don't wait but try and do the deed as quickly as possible.

Wednesday, 12 March 2014

Macarons for grown ups- Cosmopolitan and Mojito macarons

IMG_2883-1
OK! I'm super duper excited about these macaron flavours and even more about the photographs, that turned out exactly the way i imagined. It was a crazy week of baking for us at Bobo Macarons. More than 1000 macarons baked, printed, filled and packed for a wedding and I was beyond exhausted. I did not want to do any baking for a really long time, or so I thought, until this fabulous idea for flavours developed in my head. I HAD to make it immediately. And so I did.
IMG_2844
I decided to go with two of my favourite cocktails- Mojito and Cosmopolitan. I make these at home quite often and I'm soooo in love with the flavours, it HAD to work in a macaron. I must admit though, it wasn't easy. I wasn't sure how to make the flavours pop and if adding liquid to the filling was a good idea, but I had to give it a go to see if it was feasible...and well, here they are...spot on with the cocktail flavours. Next on the list is margarita and sangria and maybe even a pink champagne one ;)

I have a basic macaron recipe that I fall back on and it fetches me perfect results. I halved the batter and added hot pink to one set and kiwi green to the other. I got 12 macarons in each colour. For the mojito macarons, I grated some lime zest and sprinkled over the shells about 10 minutes after I piped them out. This totally made a difference.

Mojito Macarons
IMG_2889
The mojito ones- lime, mint and rum being the main ingredients, were easy to put together. I mean I decided to do a white chocolate ganache filling and incorporate these flavours into it, keeping the base simple. I would however increase the alcohol a bit more the next time, as the lime was overpowering (in a good way, of course) with this batch. I'm so kicked about how the styling for this came through and its one of my favourite shoots till date.

Double cream- 45ml + 1/4 to 1/3rd cup to whip
White chocolate- 2 oz, roughly chopped
White rum- 1 tbsp
Lime juice- 3 tbsp
Lime zest- of one lime
Mint leaves- 2 to 3, finely chopped
IMG_2877
Gently heat the double cream, either in a sauce pan, or in the microwave and pour over the chopped up white chocolate. Keep aside for a couple of minutes.
Gently stir, without incorporating air into it, till you get a smooth mix. Keep aside to cool.
Add the rum, lime juice, lime zest and chopped up mint leaves and mix it in well.
Keep refrigerated till ready to use.

When ready to pipe, whip the ganache with 1/4 to 1/3rd cup of double cream with a hand held blender or in a free standing mixes with whisk attachment, till stiff peaks form. Make sure you don't over do this, or you'll end up with split cream.
Transfer into piping bags and pipe on to macarons and sandwich them.
Keep refrigerated in an air tight container till ready to use.

Cosmopolitan Macarons
IMG_2839
These - taste wise- were spot on but I did have a bit of trouble getting the right consistency. I used a butter cream filling for the macs and the amount of liquid that went into it, made it a lot difficult. I know that vodka is an important component in a cosmo, but i shied away from it because of the Cointreau and cran juice that was already making it quite fluid. I had to keep adding icing sugar to reach the desired consistency, which meant, the filling was a bit too sweet for my liking. I will find a way to work around that, but for now here's the recipe. 

Unsalted butter- 55 gms, at room temperature
Icing sugar- 6 tbsp
Cointreau- 1 tbsp
Cranberry juice- 1 tbsp
Orange zest- 1/4 tsp (optional)
IMG_2853
Beat together the butter and icing sugar till light and fluffy.
Add all the liquid ingredients plus zest and continue beating till they all come together.
If the mix looks like its curdled, add some more icing sugar to bring it back to desired consistency.

Sunday, 1 December 2013

Christmas pudding ice cream

IMG_2250  
Last week, a bunch of us had a cook-along session on Google+ Hangout hosted by Great British Chefs and Tesco Real Food. We were cooking along with award winning Chef Galton Blackiston who runs Morston Hall, up at the Norfolk coast, and making Christmas pudding ice cream was on the agenda. It was my first time doing a hangout session like this and so was a wee bit nervous as to how it would churn out (pun intended).

We were asked to do a few preps before hand and jot down any relevant questions we wanted to ask Chef Galton during the session. It all went on extremely well and I'm completely amazed at how technology can just make things so much more convenient. I mean we were all in different parts of UK, in the comfort of our own kitchen and cooking along with so much ease. Except for a few glitches with the audio at times, it was an absolutely well thought out session. Thanks to GBC for this fantastic opportunity and to Chef Galston for the demo. You can watch it here.
IMG_2229
Now, I know its not the perfect weather for ice cream, but really this one needs to be made this Christmas y'all. We are all going to od on Christmas pudding and even worse, have tonnes of it left over. Chucking them into a custard base and churning them to make fabulous ice cream is THE way to go about using whats left over. I am not a big pudding fan or for that matter an ice cream fan, meaning I can just about have a slice or scoop of each, but when the two come together it just makes it so much better.

I had to try hard to not keep eating spoonfuls of custard while it was cooling down. So the ice cream base is a really good one, to experiment with. You can use it as it is with a kick ass sauce, chuck in some candied fruits, or add some nuts and such to make it appealing. Its pretty basic and except for the whisking bit, doesn't really take too much time. Those in India, remember the rum and raisin ice creams we get..well this ones sort of like that.. but a whole lot boozier..who's complaining about that now? :)

Recipe adapted from Great British Chefs (serves 5 to 6)
Single cream- 300ml
Milk- 150ml
Vanilla pod- 1/2, split length ways
Egg yolks- 3
Caster sugar- 62 gms
Christmas pudding- 125 gms, crumbled into pieces
IMG_2241
Add the cream and milk to a sauce pan and scrape in the vanilla seeds along with the pod.
Place the pan over medium high heat and bring to a gentle simmer.
Remove from heat and set aside to infuse for about 30 minutes or so.
In a bowl whisk together the egg yolks and sugar till pale and smooth.
Bring the cream and milk mix back to a simmer.
While whisking the egg, slowly pour  in the cream.
Pour the mix back into a saucepan and place over low heat.
Keep stirring continuously till you have a thin layer of custard that coats the back of the spoon.
At this point, take the saucepan off heat and pass the custard through a sieve into a bowl.
Allow to cool completely. Lay cling film on top of the custard to prevent a skin from forming.
If you want to speed up this process, place the bowl over an ice bath and keep stirring till it turns cool. I actually chucked it into the refrigerator for a while.

Once cool, you can either churn it in an ice cream maker, stirring in the Christmas pudding once the mixture begins to thicken and then freeze till ready to use.
If you don't have an ice cream maker, then pour the custard into an air tight container and freeze for about 30 to 45 minutes or till just about set.
Take it out, whisk well and then fold in the Christmas pudding gently, to not break it up too much. 
IMG_2265
Notes: This is a halved recipe
My air tight container was really good and so i only had to whisk the custard twice, at 1hr intervals and it was perfect. I also added the pud into the custard the first time and kept whisking gently each time.
I may not infuse the cream for 30 mins next time. Couldn't really find much difference.

I was paid for the ingredients and the time. Thanks GBC

Friday, 16 August 2013

Chocolate and hazelnut laddoo (truffles)

IMG_0389
First of all a huuuuge thanks to all those who left comments on the ad post. I am a wee bit embarrassed and at the same time overwhelmed at the outcome. Its weird watching myself on telly and I hope I get used to it soon :)

Those who attended Bloggers' Buzz beginning of this year might remember Devnaa who sponsored a box of sweets for the goody bag? Or let me put it this way, those of you who attended BB will not forget Devnaa and that amazing box of Indian-inspired sweets in the goody bag. I remember a lot of you writing back and saying that was the best part of the goody bag- the well packaged, colourful box with delicate chocolates. Started by brother-sister duo Roopa and Jay Rawal, the journey of Devnaa began at their kitchen table with praises flowing in about Roopa's home made sweets. They decided to take this interest further by starting Devnaa, a collection of sweets and desserts combining authentic Indian recipes and artisan chocolate techniques. 

Now, I am not a big fan of Indian sweets and desserts, with maybe gulab jamun and gajjar ka halwa being an exception. So in all honesty I was not too excited about the box of chocolates. But of course I had to give it a try and must say I wasn't too disappointed. I mean i did have a few favourites like the saffron and pistachio caramel and the cinnamon praline, and my not so favourite were the ones with ginger. Ginger or not, I think the whole concept of Devnaa is quite interesting.
IMG_0477
They also sent me their cookbook and ingredients for two recipes. I have bookmarked a whole bunch of recipes from the book, but like a million other recipes I have bookmarked, God alone knows when they will actually make an appearance on the blog. The recipes are pretty descriptive, but being a big fan of food photography, I would have liked some better pictures. I mean desserts are so pretty to photograph and I would have loved to see some cool styling and stuff. 

These chocolate and hazelnut laddoos did not disappoint, but i would def try them with dark chocolate next time. Gave it to some friends at a party and they loved it. They are really easy to make a do a good job of being pretty, presentable and tasty. Do some cool packaging, and they would double up as return gifts for guests. 

IMG_0397 
Condensed milk- 200 gms
Cocoa powder- 1 tbsp
Milk- 2 tbsp
Milk powder- 100gms
Milk chocolate- 100 gms
Chocolate-hazelnut spread- 1 tbsp (say like Nutella or equivalent)
Hazelnuts- 60 gms, slightly roasted and crushed or chopped finely
Dessicated coconut- 20 to 25 gms (optional)
IMG_0383 
Mix together the condensed milk, cocoa powder and milk in a saucepan and heat gently. (It would make it a lot more easier if you sift the cocoa powder into the condensed milk, because it was a bit of a trouble for me with small bits of cocoa powder dotting the mix. I had to use my spatula to break them down and still couldn't manage to do it all. So my mix was speckled with cocoa).
Keeping the heat on low-medium, add the milk powder and stir until the mixture starts forming a smooth dough that comes away easily from the sides of the pan. This may take about 4 to 5 minutes. Make sure you don't leave it unattended and that you keep stirring till you get the desired consistency.
Take the mix off heat and leave aside to cool in the refrigerator. The recipe called for just leaving it aside to cool, but still warm and pliable. I did as mentioned, but the dough was just too loose to work with. So I chucked it into the refrigerator for about 15 minutes, and waited for it to become completely cold (like with truffles) and then it was easier to handle.
Scoop out 1 tbsp of the dough at a time and roll into a smooth ball. Mine were slightly bigger in size so I got a total of 12. Leave on a tray lined with baking paper.
Meanwhile, melt the chocolate in a microwave.
Stir in the chocolate-hazelnut spread and make sure that the mix is not too hot, but warm and runny. If it hardens up when you are ready to dip, then just give a burst or two in the microwave and stir again to mix well.
Arrange the chopped/crushed hazelnuts on a plate.
Dip the rolled dough balls into the melted chocolate, trying to coat them evenly on all sides, followed by generously rolling them in the chopped hazelnuts.
Carefully place them back on the same lined baking tray. Continue with all the dough balls and chuck the tray back into the refrigerator till the chocolate hardens, say about 30 minutes.
Serve them at room temperature.
IMG_0429
Notes: I generously rolled the dough balls in hazelnuts, so I didn't have enough to roll the entire batch. So i used dessicated coconut and did the same rolling process.
Feel free to use chocolate of any type for the dipping...dark, white, flavoured etc.

With thanks to Devnaa for sending me the book and the ingredients to make two recipes from the book.

Wednesday, 15 May 2013

Pin it Forward UK and the 1-minute chocolate chip cookie (in a mug)

I'm assuming most of you know about Pinterest already? For those of you who don't, its this amazing platform for collecting and organising the things you love, or are interested in by "pinning" them. I first came across Pinterest on one of my random blog stats check where I saw a lot of traffic form the site. Suspicious and a bit worried really, I checked out the site and couldn't make head or tail of it at one look. Spent a couple of hours reading up and doing some research and I was hooked. Got myself an account and was soon spending hours on the site pinning the things I love. 
Now its become such a part of my research that I have this tendency to search for anything on Pinterest first, rather than Google. I mostly pin recipes, both from my blog and otherwise, and fabulous food photography from where I derive a lot of my inspiration from. Other than these boards, I totally love the DIY, fashion & beauty and home décor information and inspiration I find from all the fabulous pinners. The advantage here is that these pins are linked back to the original source and so you don't need to worry about stuff being copied. 

Pinterest has officially launched in UK and they had this fabulous party to celebrate that. We all got to meet fellow pinners and it was a fun night with loads of food and drinks. If you are already on Pinterest then do follow me here or if you aren't hooked on as yet, then register on Pinterest here. Just a warning, its frikking addictive, but you'd love, love, love it :)

I would also like to introduce two amazing fellow pinners and food bloggers, Michelle of Greedy Gourmet who has an amazing array of recipes, reviews and giveaways on her blog, not to mention her beautiful food photography, and Emma of Poires au Chocolat who completely got me hooked on her beautiful cakes and treats.
IMG_8810
The recipe below is one I got from Pinterest. Its been pinned some 3000 odd times (yes, there is every reason to trust this recipe) and its as easy as it can get to make a cookie. When the whole mug cake recipe was a rage in the blog world, I didn't fall prey to it because, truth be told, I hate microwave cakes.  This happened out of desperation, on a day I was sugar starved and HAD to have a cookie, yes just one would have made me happy. As usual Pinterest came to my rescue and I had a chewy chocolate chip cookie in under a minute. In fact, if it wasnt for the egg yolk, I would have had the batter on its own :)

You will most certainly have all these ingredients in your pantry at any given time and so there is no excuse to not make it. So immediately after reading this, please do yourself a favour and check if it works, if not for the cookie craving (which usually for me is after mid night) :)

1-minute chocolate chip cookie (in a mug). Recipe adapted from here
IMG_8824
Butter- 1 tbsp
Granulated white sugar- 1 tbsp
Dark brown sugar- 1 tbsp, firmly packed
Vanilla extract- 3 splashes
Salt- a pinch
Egg yolk- 1
Plain flour- 3 tbsp
Chocolate chips- 2 tbsp ( I used dark choc. chips)

Melt butter in the microwave, preferably in the same cup you are planning to make the cookie in (to make it mess free and simpler). The butter should not boil, it should be just melted.
Add the white and brown sugars, vanilla and salt and mix well to combine, using a spoon.
In goes the egg yolk. Mix it in properly till no traces of the yolk is seen.
Mix in the flour properly and then fold the chocolate chips.
Cook on high in the microwave for 40 seconds, or a maximum of 50 seconds.
Serve warm (maybe even with a dollop of ice cream).
IMG_8816
Note: If you over cook it, the cookie starts drying and is awful (yes it has happened). So reduce cooking time if that happens to you
Like most cookies, this once will continue to cook as it cools.
Feel free to double it, in case your partner longingly looks at you gobbling it all up :)
I used a small espresso cup which was about 3/4th full. The dough rises a bit so make sure you dont fill it to the brim.
Feel free to use a ramekin, coffee cup or any small dish.

I was invited to be part of the Pin it Forward campaign by Pinterest, but was not compensated in any way for the same. All thoughts on Pinterest are my own.

Sunday, 10 March 2013

Apple pie pancakes and OXO pancake kit review

IMG_7230
I have a love hate relationship with apples. I mean I love apple pie and apple turnover and apple cakes and stuff, but biting into an apple as a snack or so is not preferred. That said, if I'm given a slice or two, I'd eat it without complaint. Ro has taken a liking towards apples (????!!!) and we now have apples lying around all the time. He will soon get over it, I know! ...its like his pear phase, or green tea phase. But till then, I have to play along. 

I guess a whole lot of you know about Shrove Tuesday or Pancake day as its more commonly referred to as? It was on the 12th of Feb and I was sent the OXO pancake kit to review. Due to busy schedules, I could not post it on the day or after the day or even a week after, but finally got around to doing it today. Almost a month later, but better late than never right?
IMG_7204-1
Anyways, talking about OXO. Its one of my favourite brands and I have quite a few OXO products in my kitchen. The pancake kit which comprises of a batter bowl, whisk and pancake turner is a welcome addition to my already existing collection. I have had terrible luck with whisks, it breaks on me or is too flimsy to do its job properly and just when I was ready to give up, the OXO Good Grips Balloon Whisk makes its appearance. Its so sturdy that I can whisk the hell out of a batter or sauce and it doesn't give up. Heck, I even whisked cream to stiff peaks using the whisk. The silicone flexible pancake turner is another fabulous piece. The size makes flipping pancakes a treat and since I don't make pancakes that often, I have been using it for omelettes and rotis and anything that needs to be flipped (pun intended). The batter bowl looks different from all the mixing bowls I own, and has a handle which I thought was a fabulous addition. Its so much more easy to handle a bowl when you can hold it properly, trust me! It has a beak which makes pouring out batter easy as well. Although I must admit, I tried to pour out the pancake batter on to the pan and it was a bit of a disaster. But that could also be because I am, in general, clumsy.

I decided to put the pancake kit to full use by making apple pie pancakes. Its a wee bit time consuming, especially if you don't have apple sauce ready but it tastes fab nonetheless. I doubt this would make it to a breakfast table, but certainly for brunch if you ask me. The apple sauce makes the pancakes super moist and well, apple-like and the cinnamon is what takes it to a whole different level. Try these for your next brunch session and your husband, kids, boyfriend, parents... would thank you :)

Recipe adapted from here (serves 2 to 3)
IMG_7235 
Plain flour- 2 cups
Sugar- 1/4 cup
Baking powder- 1 tsp
Baking soda- 1/2 tsp
Salt- 1/2 tsp
Cinnamon powder- 2 tsp
Grated nutmeg- 1/4 tsp
Buttermilk- 2 cups
Apple sauce- 1/4 cup (recipe follows)
Eggs- 2, medium
Milk- 1/4 cup (give or take a tsp or so)

Apple sauce (recipe adapted from here)
Apples- 2 medium, peeled, cored and cut into cubes
Cinnamon- 1/4 tsp (optional)
Lemon juice- 1 tsp
Brown sugar- 1 tbsp
Water- 2 to 3 tbsp

Topping
Apples- 2 small, peeled, cored and sliced into thin wedges
Brown sugar- 1 tbsp
Butter- 1/2 tbsp
Maple syrup- to drizzle

IMG_7227
In a sauce pan mix together all the ingredients for the apple sauce.
Bring to a boil and then simmer for about 10 to 12 minutes, or till the apples become soft and of mashable consistency.
Keep aside to cool a bit and then blend to a purée using an immersion blender or food processor.

For the topping, melt the butter and sugar in a sauce pan.
Add the apples to the mix and toss around, making sure its all well coated.
Cook till you see bubbles around the edges.
Don't over cook the apples, they should still be a bit crunchy.
When done, take off heat and keep aside.
28-1
Whisk together all the dry ingredients (from the pancake section), basically the first 7 ingredients, in the batter bowl.
In another bowl mix the buttermilk, apple sauce and eggs till just combined.
Pour the wet ingredients into the dry ingredients and whisk till the batter comes together. Make sure there are no lumps of flour. It wont be a smooth batter, though.
Add milk bit by bit just until you get that pourable consistency, making sure you don't over whisk the batter.
Heat a frying pan and when hot pour a ladle full of batter on to the pan.
Wait for small bubbles to appear on top and when they just start popping (in around 2 to 3 mins), you are ready to flip.
Cook for a further 2 minutes or so and then take it off the heat.
Continue till all of the batter is used up.
If you are not having them immediately, don't stack them up, instead, place them side by side on baking paper. 
When ready to serve, gently warm them up in a preheated oven (at 90C) for around 15 to 20 minutes.

To assemble, stack two to three pancakes on top of each other and add a layer of the apple topping and a generous drizzle of maple syrup.  
Continue till your pancakes are all used up, but make sure the top most layer is apple.
Give a dusting of powdered sugar or even cinnamon and you are good to go.
IMG_7256
Notes: You can also use a potato masher to mash the apple sauce, but i feel small chunks would remain, which of course is not an issue.
Add chunks of apples to the batter if you prefer that instead of the apple sauce.
I love cinnamon, but if its not your thing then reduce the quantity used.
You can do the same with any firm fruit of choice- nectarines, pears, apricots etc.

With thanks to OXO for sending me the pancake kit to review.