Showing posts with label microwave cooking. Show all posts

Wednesday, 15 May 2013

Pin it Forward UK and the 1-minute chocolate chip cookie (in a mug)

I'm assuming most of you know about Pinterest already? For those of you who don't, its this amazing platform for collecting and organising the things you love, or are interested in by "pinning" them. I first came across Pinterest on one of my random blog stats check where I saw a lot of traffic form the site. Suspicious and a bit worried really, I checked out the site and couldn't make head or tail of it at one look. Spent a couple of hours reading up and doing some research and I was hooked. Got myself an account and was soon spending hours on the site pinning the things I love. 
Now its become such a part of my research that I have this tendency to search for anything on Pinterest first, rather than Google. I mostly pin recipes, both from my blog and otherwise, and fabulous food photography from where I derive a lot of my inspiration from. Other than these boards, I totally love the DIY, fashion & beauty and home décor information and inspiration I find from all the fabulous pinners. The advantage here is that these pins are linked back to the original source and so you don't need to worry about stuff being copied. 

Pinterest has officially launched in UK and they had this fabulous party to celebrate that. We all got to meet fellow pinners and it was a fun night with loads of food and drinks. If you are already on Pinterest then do follow me here or if you aren't hooked on as yet, then register on Pinterest here. Just a warning, its frikking addictive, but you'd love, love, love it :)

I would also like to introduce two amazing fellow pinners and food bloggers, Michelle of Greedy Gourmet who has an amazing array of recipes, reviews and giveaways on her blog, not to mention her beautiful food photography, and Emma of Poires au Chocolat who completely got me hooked on her beautiful cakes and treats.
IMG_8810
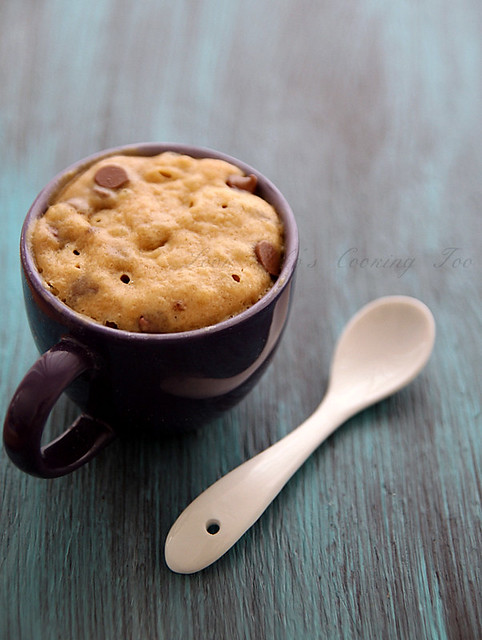
The recipe below is one I got from Pinterest. Its been pinned some 3000 odd times (yes, there is every reason to trust this recipe) and its as easy as it can get to make a cookie. When the whole mug cake recipe was a rage in the blog world, I didn't fall prey to it because, truth be told, I hate microwave cakes.  This happened out of desperation, on a day I was sugar starved and HAD to have a cookie, yes just one would have made me happy. As usual Pinterest came to my rescue and I had a chewy chocolate chip cookie in under a minute. In fact, if it wasnt for the egg yolk, I would have had the batter on its own :)

You will most certainly have all these ingredients in your pantry at any given time and so there is no excuse to not make it. So immediately after reading this, please do yourself a favour and check if it works, if not for the cookie craving (which usually for me is after mid night) :)

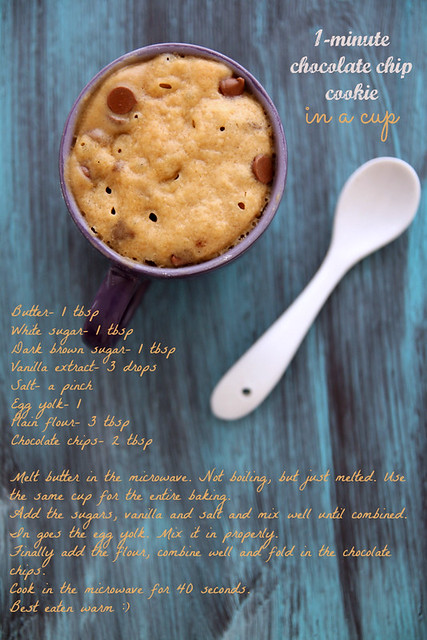
1-minute chocolate chip cookie (in a mug). Recipe adapted from here
IMG_8824
Butter- 1 tbsp
Granulated white sugar- 1 tbsp
Dark brown sugar- 1 tbsp, firmly packed
Vanilla extract- 3 splashes
Salt- a pinch
Egg yolk- 1
Plain flour- 3 tbsp
Chocolate chips- 2 tbsp ( I used dark choc. chips)

Melt butter in the microwave, preferably in the same cup you are planning to make the cookie in (to make it mess free and simpler). The butter should not boil, it should be just melted.
Add the white and brown sugars, vanilla and salt and mix well to combine, using a spoon.
In goes the egg yolk. Mix it in properly till no traces of the yolk is seen.
Mix in the flour properly and then fold the chocolate chips.
Cook on high in the microwave for 40 seconds, or a maximum of 50 seconds.
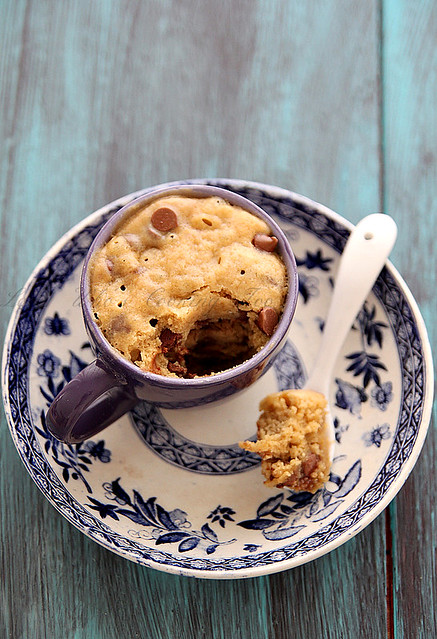
Serve warm (maybe even with a dollop of ice cream).
IMG_8816
Note: If you over cook it, the cookie starts drying and is awful (yes it has happened). So reduce cooking time if that happens to you
Like most cookies, this once will continue to cook as it cools.
Feel free to double it, in case your partner longingly looks at you gobbling it all up :)
I used a small espresso cup which was about 3/4th full. The dough rises a bit so make sure you dont fill it to the brim.
Feel free to use a ramekin, coffee cup or any small dish.

I was invited to be part of the Pin it Forward campaign by Pinterest, but was not compensated in any way for the same. All thoughts on Pinterest are my own.

Thursday, 24 January 2013

Coconut milk pulao

IMG_6378 
We had some friends staying over last weekend and it was a hell of a lot of fun. On Monday, after a day out shopping, we got back home exhausted. With the plan of ordering food from outside, we sat down and relaxed with a cup of tea for more gossip sessions. At around 5pm this sudden enthusiasm to cook came over me (and let me warn you, that's not something that happens often, or let me say ever). So I got up and said I was gonna make dinner.

This friend of mine said she would help and we got around to chopping and peeling. Pulao and a beef curry was on the cards and we started prepping. Half way through, the conversation went on to Thai and jasmine rice and coconut milk and my friend said she makes a pulao with coconut milk. She was explaining the procedure and it sounded too good to pass. Turned the whole thing around and decided to make that pilaf instead. 

It was so easy to make and absolutely delish. The whole credit for this dish goes to her and it would be one of those rice preps that will make its way through to my table more often. As I have said before, making rice in the microwave is a revelation to me and again its proved satisfactory. The recipe is quite versatile and you can add whatever veggies you please- it was my first time using potato in a pilaf but it was worth it, its a pretty nice addition. It serves 4 generously and I paired it with a side of beef and spinach curry, pickle and raita.
IMG_6394 
Rice- 1 1/2 cups (washed and soaked for at least 15 minutes)
Water- 3 cups
Ghee- 1 tbsp
Onion- 1 small, finely chopped
Green chilli- 1, finely chopped
Garlic paste- 1 tsp
Carrots- 1/2 cup, finely chopped
Beans- 1/2 cup, finely chopped
Potato- 1/4 cup, cut into small cubes
Turmeric powder- 1/2 tsp
Thick coconut milk- 1/3rd cup 
Salt- to taste
Lemon juice- 1/2 tbsp
Coriander leaves- to garnish (optional)
IMG_6377 
Melt the ghee in a frying pan and add sauté the onions and chilli till glossy, about 3 to 4 minutes. No need to brown it.
Add the garlic paste and sauté till the raw smell disappears.
In goes the diced carrots, beans and potato. Add salt and turmeric powder, stir well, close the pan with a lid and let it cook for about 5 to 6 minutes on medium heat. Make sure it doesn't char.
Open the lid and add the coconut milk, making sure the veggies are all coated well. Continue cooking with the lid open for a few more minutes, till the veggies are cooked.
Drain the rice and add it to the coconut milk mix. Stir continuously for about 2 to 3 minutes, coating the rice with the mix.
Meanwhile, boil 3 cups of water in the kettle.
Transfer the rice mix to a microwave safe bowl, add the boiling water, lemon juice and more salt and place in the microwave, uncovered.
Cook on high (mine was a 750 wts) for 20 minutes.
Once time is up, take the bowl out to see if all the water has been absorbed. If not, put it back into the microwave and cook for another 3 minutes or so.
Leave the bowl covered for about 10 minutes (this is completely optional) and then fluff well using a fork. The grains would all be separate if cooked perfectly.
Garnish with coriander leaves and serve warm
IMG_6387
Notes: Do different versions with frozen peas, corn kernels, mushrooms and so on to make it more interesting.
The coconut milk taste is very distinct, think it out with water if you are not a big fan and reduce the water used accordingly. For example if using 1/2 cup think coconut milk, then use only 2 3/4 cups of boiling water. 
You can also stir in the coconut milk along with the boiling water and add to the rice so the rice gets cooked in the coconut milk. Shall try that method next time and update with results.

Tuesday, 18 December 2012

Turkey and chickpea pilaf

IMG_5920-1
There are some things in life you need to do once. Roasting a turkey is definitely one of them :)
And that's exactly what we did. 

I have never cooked a whole chicken (poussin exempted), leave alone a 5kg turkey. So when Asda asked if I would like to review a Turkey from their Butchers selection, I was a bit sceptical, but the husband was 100 percent confident he could handle it and so I said yes, why not! I decided to give him full responsibility of handling and cooking the turkey and I must say he did a really good job.
141-1
We did some research and decided to do a turkey roast- Indian style and boy are we glad we did so. Most of the turkey roasts I've had are bland, but doing an Indian prep took care of that. The marinade was a basic chilli powder, lime juice, salt, pepper, ginger-garlic paste one and Ro made sure he got the marinade under the skin all throughout the turkey. He also put some onions, lemon wedges, bay leaves, garlic pods and carrots into the cavity for the flavours to catch on. He then nicely doused olive oil over the bird and rubbed it in, followed by seasoning generously with salt and pepper. The cooking method we followed was from here and we managed to get a golden, crispy roast turkey, but the last 10 minutes of cooking on high heat somehow burnt it a wee bit, but no complaints there as we loved the flavours.

We were only a few of us for lunch when we did the roast turkey and so had tonnes left over. After packing off some to friends and relatives, the remaining batch was divided into two. One went into the freezer for future use, and I made this turkey and chickpea pilaf with the remaining. This is a very quick lunch preparation if you have all the ingredients at home and can actually be a one pot meal if you are not obsessed with precooking the onions before hand. Either ways, we loved it. I am hooked on to cooking rice in the microwave now and cant think of doing it any other way. Try this easy peacy pilaf with your left over Chritstmas turkey, and you wont be disappointed..seriously!!!

Recipe adapted from here
IMG_5923
> Olive oil- 2 tbsp
Onion- 1 small, finely chopped
Garlic- 1 tbsp, finely chopped
Ginger- 1 tbsp, finely chopped
Green chilli- 1, slit
Curry paste- 1 heaped tbsp (I used Sharwoods korma paste)
Chickpeas- 150gms (from a 400gm can. Drain and use 150 gms)
Turkey- 150 gms, shredded
Basmati rice- 1 cup, washed and soaked in cold water for 15 minutes
Stock*- 2 1/4 cups (I used chicken stock, feel free to use vegetable stock as well) 
Lime juice- from half a line
Coriander leaves- to garnish
Salt- to taste
IMG_5908
Heat the oil in a large frying pan and saute the onions till they turn light brown.
Add the garlic, ginger and green chilli and continue frying for 2 to 3 minutes till their raw smell disappears.
Add the curry paste and cook for a further 1 minute.
In goes the chickpeas and shredded turkey. Saute till all the masala gets coated well.
Drain the rice and add to the pan, fry for 2 to 3 minutes, stirring continuously. 
Add salt (remember, the stock will have enough salt, so add accordingly), give a final stir and transfer the mix into a microwave safe bowl.
Pour in the stock and lemon juice, give a stir and place in the microwave.
Cook on high (700W) for 15 minutes.
Once done, check if all the water has been absorbed and then cover and leave aside for 10 minutes.
Fluff well using a fork and garnish with coriander leaves just before serving.
Make a meal of it with a side of yoghurt, pickle and poppadoms.
IMG_5938
Notes: Replace the turkey with shredded chicken
I use a stock cube. I dilute it in the required amount of boiling water and use that.
If you don't have curry paste, then use a meat masala or curry powder in its place.

With thanks to Asda for the turkey and gift voucher.

Monday, 19 November 2012

Keralan prawn biryani

IMG_5119
As I have said numerous time before, I am a sucker for biryani, good or bad. I can thoroughly enjoy it without an issue. That said, I completely suck at making biryani the proper way and so cant flaunt it when I have guests over. I do experiment with different types of biryani when its just us at home and sometimes it comes out ok, but most of the time, not good.

When the lovely people over at Flora asked me if I wanted to try making the Keralan Prawn Biryani recipe from their new cookbook called 'Let's Get Cooking,' I jumped at it. With around 30 odd recipes contributed by mums (and dads), the cookbook was put together by Jean-Christophe Novelli and has an array of easy recipes you can whip up in no time. You can view all the recipes in the cookbook here. It was also my first time using Flora Cuisine, and I must say I'm pretty impressed with it. Its a much healthier cooking oil which can be used in place of any oil or butter and used for baking, frying, greasing, sauteing and what not. I have been regularly using it for my cooking now and I love it.
IMG_5103
Coming to the recipe. One look at it and you will instantly realise its an easy peacy one, with no complications of a biryani. That said, its not the traditional biryani. So scoot if its what you are looking for. The rice here is cooked in a microwave, the prawn masala made separately and then both mixed together and served. Not the authentic biryani flavour you would get with this, but would suffice for one of those days you don't want to slog it out in the kitchen, but want something fancy and tasty. I had never cooked rice in a microwave and was wary about doing so, especially because it involved a huge quantity of ingredients and you definitely don't want to waste it by screwing it up. So I did a couple of Google searches, asked the contributor of the recipe (who btw has her own food blog) and some other friends and they all assured me it would turn out well as they regularly did it. 

I was still too chicken to do it and so tried it out with a small quantity of plain rice the previous day. All I have to say is, I'm hooked. I'm kicking myself for not discovering microwave cooking earlier. Its so easy and convenient and the best part, individual grains of rice which are perfectly cooked and fluffy. I now make different types of pulao and stuff in the microwave, which I shall blog about later. So anyways, the whole thing doesn't take any time to put together especially if you make the prawn masala a day or two ahead. Which is what I did and all I had to do was make the rice, garnish and assemble it on THE day. Taste-wise, I thought it was more like a prawn pulao than a biryani, but who cares, it tasted good nonetheless. 

Recipe adapted from Flora's Let's Get Cooking
IMG_5086
To marinate
Tiger prawns- 500 gms, peeled and cleaned
Chilli powder- 1 tsp
Turmeric powder- 1/2 tsp
Salt- to taste

For the masala
Flora Cuisine- 2 tbsp
Onion- 1 large, thinly sliced
Ginger paste- 2 tbsp
Garlic paste- 2 tbsp
Green chillies- 2, slit
Coriander powder- 2 tsp
Mint leaves- 1/4 cup, cleaned and roughly chopped
Coriander leaves- 1/3rd cup, cleaned and roughly chopped
Garam masala- 1 1/2 tsp
Salt- to taste
Water- 1/2 to 3/4th cup
Lemon juice- 1 tbsp

For the rice
Basmati rice- 2 cups, cleaned and soaked in water for around 15 to 20 minutes and then drained.
Flora Cuisine- 1 tbsp
Onion- 1 large, thinly sliced
Boiling water- 4 1/4 cups
Salt- to taste

Garnish (optional)
Cashewnuts- 3 tbsp
Onion- 1 half, julienned
Raisins- 1 tbsp
IMG_5095 
Marinate the cleaned prawns with all the ingredients under the marinate section and keep aside for about 15 to 20 minutes. This is purely optional. Skip the step if time constrained.
Once the marinating time is over, you can start with the masala.
Place a large pan over medium heat and add the Flora Cuisine. Once hot, saute the onions till they turn soft and a light brown in colour.
Add the ginger, garlic pastes and green chilli and continue sauteing till the raw smell disappears, around 2 to 3 minutes.
Throw in the coriander powder, chopped mint and coriander leaves', garam masala and salt and mix it all in, stirring for about a minute or so.
Add the marinated prawns, water and lemon juice and simmer on medium heat till the prawns are cooked through and the masala is in semi-gravy form. Keep aside.
This can be made the previous day or 2 days in advance and refrigerated.
IMG_5102 
Add the boiling water into a large (big enough to comfortably hold the rice once it expands) microwave safe bowl and add the drained rice.
Season with enough salt, give a stir and cook without a lid in the microwave for about 10 minutes.
Simultaneously, heat 1 tbsp of the Flora Cuisine in a frying pan and sauté the onions for the rice till soft and light brown. 
After 10 minutes, remove the rice from the microwave (carefully, bowl might be hot) and add the sauteed onions to it. Give a thorough mix and continue cooking for about 12 minutes.
Once the time is up, check to see if all the water has been absorbed and if not, microwave for a further 2 to 3 minutes.
Take the bowl out, cover with a lid and leave aside for 10 minutes. You will then notice that the rice is perfectly cooked, and no water remains.

To assemble, fluff the rice gently using a fork and mix it with with the prawn masala. Make sure you don't over do the mixing and break the rice.
If using garnish, then heat 2 tbsp of Flora cuisine in a frying pan and fry the cashew nuts, onions and raisins separately till lightly crisp, drain on paper towels and when ready to serve garnish with the same.
Serve with pappad, pickle and raita.
IMG_5104 
Notes: The original recipe calls for frying the marinated prawns for around 4 minutes on each side and adding that to the masala. I omitted this step because I used pre-cooked prawns and doing so would have made it tough when cooked again in the masala. If using fresh prawns, then this step is highly recommended.
Quantities have been altered a bit to suit our taste.
I cooked the rice on full power (700Watts) for 22 minutes. Times vary according to your microwave power.
You can of course layer the biryani the traditional way and cook in the oven or on the hob top to get the 'dum' effect. But the whole point of this biryani is the simplicity and so I followed the above mentioned procedure
I froze the remaining biryani in an air tight container. Just take it out and let it thaw at room temperature before using and finally warm in a microwave before serving.

With thanks to Flora Cuisine for sending me all the ingredients to make this tasty Prawn Biryani.