Showing posts with label cake. Show all posts

Friday, 28 April 2023

One bowl blueberry buckle

Recipe adapted from here

Unsalted butter- 113 gms, roughly sliced
Plain flour- 1cup
Baking powder- 1 1/2 tsp
Salt- 3/4th tsp
Granulated sugar- 1 cup
Whole milk- 1 cup
Vanilla extract- 1 tsp
Blueberries- 3/4th cup (frozen or fresh)

Preheat the oven to 190c.
Put the sliced butter into a 9x5inch loaf pan and place in the oven to melt.
Once fully melted, remove from the oven and keep aside. 
Whisk together all the remaining ingredients, except blueberries, till you get a smooth batter. (I first mix the dry ingredients and then mix in the milk and vanilla, but totally not needed. I do it out of practise)
Pour the mix into the loaf pan and roughly mix it with the whisk itself. Dont go crazy whisking it, there should still be large traces of butter visible, which is what gives fabulous buttery edges to the buckle.
Place it back into the oven and bake for about 50 to 55 minutes, or till a skewer inserted into the centre comes out clean. It should be nice and brown all over.
Place on a cooling rack and serve as slices or scoop it out and serve with ice cream.

Notes: The original recipe calls for self-raising flour, so omit baking powder in which case.
The buckle does buckle a bit once it cools down, so dont be alarmed.
Once my 50 minutes was up, i did reduce the temp to 170 and bake for another 5 more minutes, but i didnt think it was actually needed. So 50 minutes at 190 was the perfect timing for me
This is a stupidly easy recipe, everything prepped and cooked in under an hr really.
I like to serve it slightly warm. The caramelised buttery edges are really tasty.

Tuesday, 21 September 2021

Bahama Mama banana rum cake

Recipe adapted from here
For the cake
Pecans- 3/4th cup
Butter, unsalted- 1 1/2 cups, at room temperature
Caster sugar- 1 3/4 cups
Brown sugar- 3/4th cup
Eggs- 5 medium
Banana- 1 cup, mashed (very ripe)
Vanilla extract- 2 tsp
Dark rum- 3 tbsp
Plain flour- 3 cups
Baking soda- 1 tsp
Baking powder- 1 tsp
Salt- 1 tsp
Yoghurt- 3/4th cup

Rum glaze
Butter- 1/2 cup
Water- 1/4 cup
Brown sugar- 1/4 cup
Caster sugar- 1/4 cup
Dark rum- 1/2 cup

Preheat oven to 175C and generously grease a large bundt pan with cooking spray or butter. Make sure you get it into the creases if its not the basic tube bundt.
Lightly toast the pecans in a pan over medium heat.  Roughly chop and sprinkle at the bottom of the bundt pan. Keep aside
In a large bowl, using a hand held mixer, cream together the butter and both sugars till light and fluffy.
Add the eggs one at a time, beating well after each addition followed by mashed bananas, vanilla and rum. Mix well.
Sift in the flour, baking powder, baking soda and salt and using the lowest setting on the mixer mix well till no traces of flour is seen.
Finally beat in the yoghurt and pour the batter into the cake pan, and bake in the centre rack of the oven for about 60 to 80 minutes, or till a skewer inserted into the cake comes out clean.
While the cake is baking, make the rum glaze.
Mix all the ingredients for the glaze in a saucepan on medium high heat and bring to a boil.
Reduce heat to medium and simmer for about 5 minutes.
Remove from heat and keep warm.

Once the cake is done, transfer to a wire rack and cool for about five minutes.
Poke holes in the cake and pour half the glaze all over as evenly as possible.
Cool for a further five minutes and then invert on to a serving plate.
Spoon the remaining glaze on to the cake, bit by bit and let it stand till all the glaze has been absorbed. 
Wait till the cake cools completely to slice and serve.

Notes: The cake has a really strong flavour of rum. Omit the rum in the glaze if you are not a rum fan.
Use good, ripe bananas and this cake will be fabulous. I used the Indian bananas as opposed to the ones you get in the supermarkets here.

Friday, 30 April 2021

Cardamom cake with crackly almonds and sugar

Recipe adapted from here
Butter- to grease the cake tin
Caster sugar- around 2 tbsp
Almond flakes-  1/2 cup

Caster sugar- 264 gms
Eggs- 4 large
Plain flour- 160 gms
Salt- 1/4 tsp
Cardamom seeds- 1/2 tbsp (powdered)
Butter- 150 gms, melted
Vanilla extract- 1/2 tsp

Preheat oven to 170c (fan assisted) and grease a 9 inch pan using the butter. Make sure you generously do this.
Also line the base of the pan with grease proof paper.
Put the 2 tbsp sugar into the cake pan and swirl around/shake/tap to coat the side and base of the pan, as evenly as possible. Leave the remaining sugar if any at the base of the pan.
Cover the bottom of the pan with almond flakes. keep aside.
In a bowl whisk together the caster sugar and eggs using a hand held blender or in a free standing mixer., till it becomes pale and double in volume. This step is important so dont skimp it. It took me around 6 minutes.
Slowly fold in the flour and salt without deflating the batter.
Pour in melted butter, vanilla extract and cardamom powder and give a good mix, again without deflating the batter too much. The melted butter may go right to the bottom, so do scrape well and fold.
Pour slowly into the prepared cake tin, give a good tap on the counter and put into the oven.
Bake for about 45 minutes or till a skewer inserted into the centre of the cake comes out clean (original recipe said to bake at 35 minutes, but it just wasnt done, so mine took about 45 minutes. Start checking at 35 minutes and keep increasing just 5 minutes at a time.)
Remove from oven and leave on the counter.
After five minutes run a knife around the sides of the pan and invert onto a cooling rack (i inverted it directly on to a serving plate)
Peel off the grease proof paper slowly, while the cake is still warm and leave to cool completely before cutting.

Tuesday, 30 July 2019

Mango mousse cake

Serves 13 to 16
For the sponge cake follow this recipe 
Double it and make 2 cakes.

Sugar syrup
Caster sugar- 1/2 cup
Water- 1/2 cup 

Mango mousse
Mango puree- 2 cups
Powdered sugar- 1/4 cup (adjust as per the sourness of the puree)
Powdered gelatin- 3 tsp
Warm water- 7 tbsp
Double cream (whipping cream)- 600ml (around 2 cups)

Mango mirror glaze
Mango puree- 1/2 cup
Powdered sugar- 2 tbsp (adjust according to sourness)
Powdered gelatin- 3 tsp
Warm water- 5tbsp

Make the sugar syrup by mixing together the sugar and water and heating it in a microwave for about 30 to 45 seconds, just enough to melt the sugar completely. You can do this on the stove top as well.

For the mousse, mix the powdered sugar and mango puree together in a bowl and keep aside.
Mix the gelatin powder with 7 tbsp of hot water. Stir well to dissolve the gelatin completely.
Add this to the mango puree and mix well.
Whip double cream to a soft peak consistency using a hand beater or a free standing mixer with whisk attachment. 
Add the mango puree to the whipped cream and fold till well combined
When ready to assemble, place one sponge cake on a tray large enough to accommodate it and brush the sugar syrup over the entire cake. This is to moisten the cake. 
Pour over half of the mango mousse on to the cake and using an offset spatula spread it over the cake as evenly as possible. 
Top with the second cake and brush with the remaining sugar syrup.
Pour over the remaining mango mousse and smoothen it out as much possible.
Place in the refrigerator for a minimum of 4 hours or best overnight.

For the mango mirror glaze, add the mango puree and sugar together in a bowl.
Mix the gelatin powder with 5 tbsp of hot water. Stir well to dissolve the gelatin completely.
Add this to the mango puree and mix well.
Pour over the set mango mousse layer. Its ok if it spills over the sides, but make sure you cover the entire top of the mousse.
Keep in the refrigerator to set for at least 3 to 4 hours.

When ready to serve, slice off the edges to get neat servings.
Cut into squares, garnish with mango slices, berries and mint leaves and serve.

Monday, 26 June 2017

French yogurt cake with cardamom and pistachio

Makes 1 loaf cake (double the recipe for an 8inch round cake)

c05ed260-ae3b-442e-908f-c094490a28f4
Granulated sugar- 1/2 cup
Eggs- 1 large
Vanilla extract- 1/4 tsp
Plain yoghurt- 1/4 cup

All purpose flour- 1/2 cup + 2 tbsp
Baking powder- 1 tsp
Salt- a pinch
Ground cardamom- 3/4th tsp

Flavourless oil- 1/4 cup
Pistachio nuts- 1/2 cup, lightly crushed
2fdb8d0c-239f-42e0-bf30-c3625c22bcf0

Preheat oven to 175C and line a small loaf pan with baking paper.
In a mixing bowl whisk together the sugar, eggs, vanilla extract and yogurt till well combined and pale yellow..approx 3 to 4 minutes.
Add the dry ingredients (flour to cardamom) and mix well to combine.
Pour in the oil and fold lightly, don't have to whisk vigorously, but make sure its all mixed well
Pour the batter into the pan and top with the chopped nuts.
Bake for about 30 minutes or till a skewer comes out clean.
Take them out and leave to cool completely on a cooling rack.
Slice and have with a cuppa.

Monday, 21 September 2015

Butternut squash loaf cake

IMG_8286
I am part of The Happy Egg Co. Taste 100 Blogger network comprising of taste makers and I absolutely love it. They send us challenges every month with of course a winning prize, and its one of those emails i absolutely look forward to. In fact I won the May challenge which was photography and styling oriented and was pretty stoked to have Marte Marie Forsberg select my post as the winning entry. I won an 8 course tasting menu meal for two at the award winning L'Atelier de Joel Robuchon and i cant wait to check out the place (waiting for an occasion to celebrate to make a booking).
H-ZOD5M1JD9zHWBpjpRZ3LhM-b2GuEp6NgM903Ke8sI 
In July The Happy Egg Co. decided to rustle things up a bit and organised a baking masterclass for bloggers at the Central Street Cookery School. It was conducted by Bee Berrie of Bee's Bakery and it was an afternoon filled with baking. We made a sponge cake and went berserk flavouring it, layering it and decorating it, an Eton Mess, an easy version of puff pastry and Custard tarts. By the end of the evening we were all in a sugar coma, but absolutely satisfied with our work and went back home loaded with all the goodies.
IMG_8240 
The fact that i had to distribute my custard tarts on the bus back home and among friends that weekend is another thing (I would have ended up eating it all on my own if i hadn't done that). I now use only Happy Eggs at home (thanks for the vouchers) and love the sizes they come in. I had some left over butternut squash after the gnocchi expedition and I put it to good use in this super moist butternut squash loaf cake with all the flavours (and colours) of autumn, not to mention how easy it was to put this together.

Recipe adapted from here (makes 2 large loaves or 3 small loaves)
IMG_8308 
Plain flour- 1 3/4 cups
Baking powder- 1 tsp
Baking soda- 1/2 tsp
Salt- 1/2 tsp
Ground cinnamon- 1/2 tbsp
Ground nutmeg- 1/2 tsp
Ground allspice- 1/2 tsp
Granulated sugar- 1 1/4 cups
Eggs- 2 large
Vegetable oil- 1/2 cup (any flavourless oil can be used)
Milk- 2 tbsp (refer notes)
Vanilla extract- 1/2 tsp
Butternut squash purée- 7 1/2 oz ( a little less than 1 cup) (refer notes)
IMG_8264
Preheat oven to 175C and line your baking pans with baking paper.
Sift together the flour, baking powder, baking soda, salt, cinnamon, nutmeg and allspice together till well combined.
In another bowl whisk together the sugar, eggs, oil, milk and vanilla until well combined. This may need a bit of work, but absolutely achievable by hand and you don't need an electric mixer.
Add the squash puree and continue to mix well.
In batches, add the flour and fold until just combined, and no traces of flour is visible. Resist the urge to over mix.
Pour into the prepared cake tins and bake in the middle shelf of the oven for 35 to 40 minutes (for small loaves and around 1 hr for a large loaf) or till a skewer inserted into the centre comes out clean.
Cool completely on racks, after which you can wrap them in cling film and refrigerate for up to a week.
IMG_8304
Notes: The butternut squash can be replaced with pumpkin purée, mango puree or any fruit purée for a different flavoured cake.
To make butternut squash purée, slice the squash into two, apply some oil on each side and roast in a 200C oven for about an hour or until tender. Keep aside to cool and scoop the flesh into a food processor/blender and make into a purée.
If you find that your purée is quite watery, avoid adding the milk.

With thanks to The Happy Egg Co. for inviting me to the baking masterclass and for the vouchers to be redeemed at supermarkets.

Wednesday, 20 August 2014

Basic vanilla sponge cake- the best so far

IMG_3789
Its been ages since I've posted a cake recipe here. Truth is, i haven't baked a cake in ages. In spite of tempting Ro every now and then saying, I'll bake a cake, I never get around to doing it. I did bake once or twice in between, but fetched not so nice results- that and the lack of motivation to take pictures left me hanging.

This cake was baked way back in June. My sister in law and family were throwing a BBQ party at theirs and I was in charge of dessert. I decided to make Ria's Tropical Mango Pudding Cake, and after harassing her with numerous questions, I was confident enough to go ahead with the recipe. It was probably one of the best desserts I've made so far. Got really good reviews from all the guests and even though it was a bit time consuming, I'm so totally going to make it again, and blog it. Managed to take some pictures with the phone, just so you get an idea of what it looked like. 

Coming to the genoise cake. I suck at it. Like I've never ever got a sponge that is so so soft and spongy, but always managed to over bake it, over fold it, under fold it, under bake it and whatever can go wrong with it, it always used to happen to my sponge cakes. I love eating sponge cakes, and every time i try a new recipe, its a disaster, hence absolute deprivation of sponge cakes.
PicMonkey Collage
I was petrified about Ria's sponge cake recipe and since i was baking for a party, I couldn't afford to screw up. So i searched and searched and searched for a less intimidating one and the search led me to Jo Pastry website which i must say is a treasure trove of information on pastries. His recipe and description and comments on tackling the genoise put me at ease and i decided to go ahead with it. I was so so nervous while the cake was in the oven, but the moment i took it out, i knew id nailed it. It was soft, spongy, evenly/perfectly cooked and all what a sponge cake was supposed to be. There was a bit of left over batter that i used for 2 cupcakes and they were immediately consumed without any regret. 

I had to record this recipe for posterity and its certainly one I'm going to be fall back on for all my sponge cake bases. For those intimidated by the whole genoise cake making process, this is for you. Try it and I'm sure you wont need to look elsewhere.

PS. I baked 2 cakes with the above measurement. Didn't want to take a chance and double it.

Recipe adapted from here (Makes 1, 9x12" sheet cake) 
Milk- 1/4 cup
Butter- 3 tbsp
Vanilla extract- 1 tsp
Eggs- 3, at room temperature
Egg yolks- 3, at room temperature
Sugar- 6 oz (1 cup minus 2 tbsp)
Plain flour- 3/4th cup
IMG_3787
Preheat oven to 205C and grease a 9x12 inch jelly roll pan and line with baking paper.
Mix together the milk, butter and vanilla extract in a saucepan and bring to a simmer. 
Take off heat and keep aside.
Into the bowl of your free standing mixer, add the eggs, egg yolks and sugar and beat on high using your paddle attachment for about 8 minutes or till the mixture is really thick and when the paddle is lifted the batter falls down in ribbons and hold its shape for about 5 seconds before dissolving. This step is very very important, don't skip.
Slowly trickle the warm milk mix through the side of the bowl.
Sift in the flour in 3 additions, folding well after each. I did this using the slowest speed on my mixer, just until incorporated. But if you are not comfortable doing this in your mixer, do it by hand using a spatula.
Make sure you scrape the bottom of the bowl while folding, but not too harsh that you deflate the mix.
Pour into the prepared pan and using an offset spatula spread the batter around, making it into corners etc. Even the top so there is consistency in the baking
Bake in the middle shelf of your preheated oven for about 12 minutes till golden and springs back to your touch
Take it out of the oven and when still hot, loosen the sides using a blunt knife.
Turn it out into a wire rack carefully, cool completely and use as required.

Friday, 14 February 2014

Lemon madeleines

I know this post was supposed to go up a couple of weeks back, but that was me being optimistic about posting stuff on the blog from home. Horrible internet connection and working on a tablet is not really a favourite thing, and to add to it, blogger or flickr - one of these- were acting up, forbidding me to place images the way I want. Anyways, I had to have the post up and running because as part of my New Year resolution, at least a recipe post a week on the blog was a must. I actually don't have anything else in my drafts and if i need to keep with the resolution:
1. The weather must be significantly better for me to (want to) take pictures
2. I should get off my lazy ass and cook
3. I should unpack my bags and dig out the props i bought from India (really cool ones BTW)
4. I should get off my lazy ass and COOK!!!

After diving straight into work, today is my day off and I don't see any of the above happening. Its Valentine's day, and what I should actually be doing is to cook up a storm for Ro (who couldn't care less about VD) and then cuddle up and watch a movie or something. But all I'm thinking of is what cocktail I can make with the new bottle of Cointreau I picked up from duty free and how many varieties I can whip up with the mixers lying around home. (It's only 11.30am btw! Do I have a drinking problem??? No don't answer that). Its raining and unbelievably windy and I don't want to cant go out. Oh, and Ro is working from home and in about 15 minutes he's going to ask me 'what's for lunch.' I'm going to reply 'love and fresh air,' and then it might end up in an argument and we'd be the awesome couple who fights on every VD.
Ok so madeleines. When I visited Paris last September with my blog buds, one of the things on my 'to buy list' was a madeleine tray. We visited a couple of stores that sell cooking paraphernalia and they all had gorgeous madeleine trays, but bloody expensive. So I conveniently forgot about it and instead came back home with other rubbish.  

Imagine my excitement when I found a similar tray in TKMaxx for a third of the price. I had to pick it up and make madeleines immediately. So I did and they came out perfectly well. Its so easy to incorporate a flavour of choice into these and I chose lemon- i used my home made extract. Its just a basic sponge recipe and I'm sure you can make it without the molds, but then they wont be called madeleines, will they? I once saw a post trending on Pinterest where oven safe spoons replace the molds. They don't give you the bump, but they do look pretty madeleine like and is a substitute for the tray. 

Enjoy!

Recipe adapted from here (makes 18, 8cm madeleines)
Eggs- 3 large, at room temperature
Granulated sugar- 1/2 cup
Dark brown sugar- 2 tbsp
Butter- 1/2 cup
Plain flour- 1 cup
Baking powder- 1/2 tsp
Salt- a pinch
Vanilla extract- 1 tsp
Lemon extract- 1/2 tsp
Lemon zest- 1 tsp, freshly grated
Whisk together the flour, baking powder and salt in a bowl and keep aside.
Beat together the eggs and both the sugars on high speed, either in a free standing mixer with whisk attachment, or using a hand whisk, for about 5 to 8 minutes or till pale and thick.
While the egg mix is being whisked, melt the butter in a saucepan and keep aside. It should be warm to touch.
Into the egg mix add the vanilla and lemon extracts and the lemon zest and whisk till just combined.
Sift in the flour mix bit by bit, folding well after each addition. Do this slowly and carefully, as you don't want to deflate the egg mix. I used a silicone spatula to fold it in.
Take about 1 cup of this batter and mix it with the warm melted butter.
Whisk it in really well to make sure the butter has been nicely mixed in with the batter.
Add this to the remaining egg batter and gently fold it in till well mixed. (Its easier to mix a bit of the batter with the melted butter and then add that to the bigger batch. You also don't end up deflating the mix too much.)
Cover with a cling film and refrigerate for a minimum of 1 hour. You can also keep it up to 3 days in the fridge.
When ready to bake, preheat oven to 190C and generously grease a 2 12 mold madeleine trays with melted butter using a pastry brush. Also dust the molds with plain flour (tapping out the excess) to be on the safer side.
Drop a tbsp each of batter into each mold. It will be slightly domed in the centre which is precisely what you want.
Bake for about 9 to 11 minutes or just until the cake springs back when touched with a finger, or till the edges turn a light brown. Don't over bake it.
Take the pans out of the oven and immediately tap out the madeleines on to a wire rack.
Dust with some icing sugar and serve immediately with a cup of coffee.

Notes: I had only one 12 mold tray and so after i finished baking the first batch, i kept it aside for a few minutes to cool down and then repeated the greasing process. The dough was kept back in the fridge while the first batch was baking. The second batch also came out perfectly fine for me.
The madeleines are best had immediately, but it can also be stored up to 3 days in an air tight container in the fridge.

Tuesday, 29 January 2013

7 layer rainbow cake with mascarpone-whipped cream frosting

IMG_6421
We completed 7 years of marital bliss (if you can call it that anymore) last Saturday. I was, as usual, in a foul mood and then the husband surprises me with a gift, making me feel bad for not getting him anything in return. So to show my gratitude, I baked him a 7 layer rainbow cake to celebrate 7 colourful years of our lives. Actually I'm bull shitting, I baked the cake because I had to submit it to a magazine, and I just timed it right :)

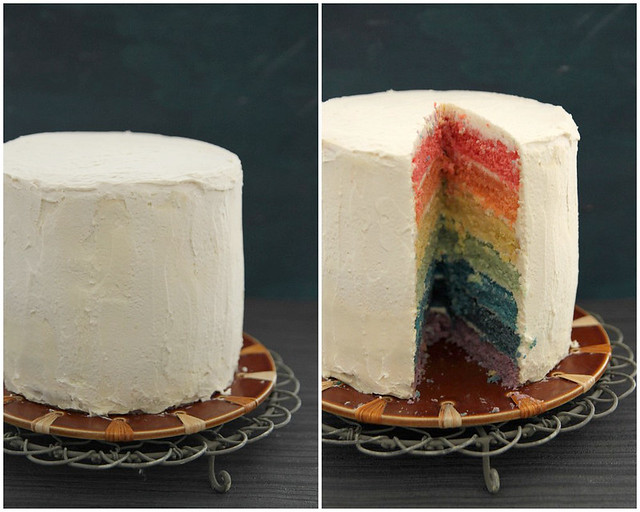
However, it was a good idea since Ro had no clue what was underneath the white exterior. I'd made the cake and frosted it all on Friday (more so because sat was supposedly a sunny day and I could take pics) but no I dint tell Ro that and made him believe it was an anniv cake. All the while he kept asking me if it was a 3 layer cake and how we were gonna cut it and I went with the flow. Came 26th and I cut into it (after saying a prayer because you have no clue what its gonna look like) and voila...a beautiful 7 layer cake with all the colours of the rainbow (well, almost). Showed it to Ro and the first thing that came out of his mouth was something I cant mention here, but if you are on my friends list on FB, some of you'd know what I'm talking about :) :) I have cousins and friends who cant keep their mouths shut!!!!

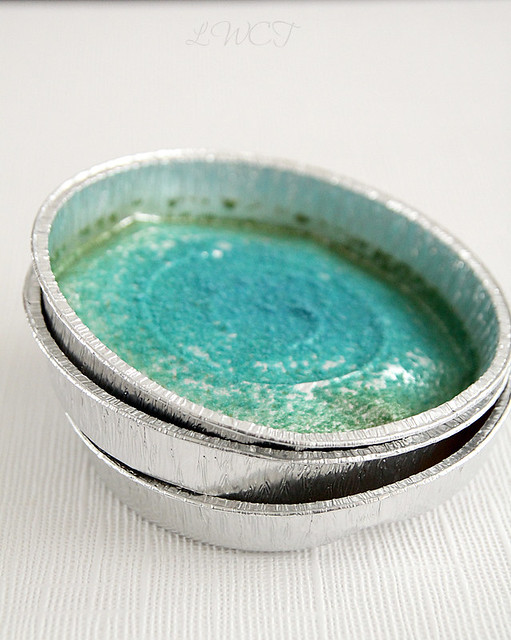
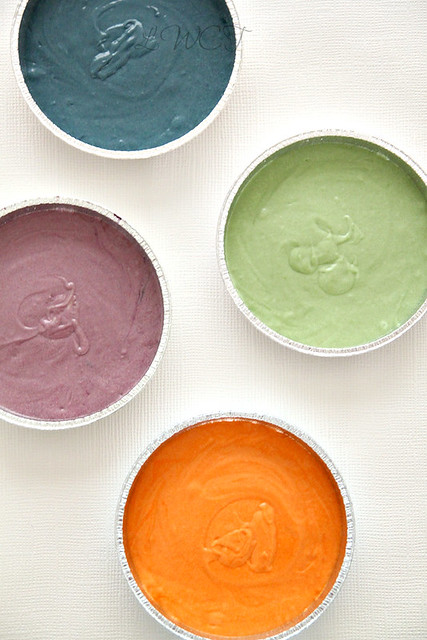
Anyhoo, the cake tasted fab and although it was all pretty and such, I shall not be doing something like this again (well, unless I'm being paid to do it). I did it all in a day and it was a bit too much. If I'd split it over 2 or even 3 days, it would have made matters easier but of course I suck at planning and organizing, which is why I had to hurry and do this all one day before the big day. I also got disposable aluminium foil flan containers which made it sooo much more easier since I could do all the 7 cakes at one go in my oven. But obviously, the photographer in me didn't agree, and so while the first 3 were in the oven I set about taking pics of the remaining 4. You really don't need disposable containers, I'm just lazy to clean and reuse cake pans, and hence chose this method.
IMG_6406
Talking about the cake, you can pretty much adapt it to whichever cake you want  (no not chocolate) and I stuck to a basic vanilla cake to not complicate matters. A lemon, coconut or orange flavoured one would work just fine. I did some major research before the expedition and all the recipes I came across had omitted the indigo shade and had only 6 layers. That meant, the cake batter measurement had to be reworked and recalculated to accommodate 7 layers. It was all too much work and so what I did was, took a normal vanilla cake recipe and made it into a 7 layer- 6 inch size cake. The trick to get even layers is to weigh the batter. I did some crazy calculations and decided my batter would be 215 odd grams per pan. I went wrong somewhere and ended up with more batter for the red layer (as you may have noticed). But by then, all you want to do is get the damn cakes baked and left aside to cool. So don't fret too much about the cake size..if you can manage to get an approximate weight into each, that's good enough.

I also wanted to keep the frosting fuss free and most importantly, butter free. I hate how much butter the butter cream and meringue frosting's take and my heart belongs to the cream frostings (not any better, I know!). So I stuck to a whipped cream frosting with some mascarpone thrown in and it was a great decision. I even got a lighter mascarpone version to justify the amount of stuff that went into the cake. Anyways, we loved the cake- its moist and does its job of being a vanilla flavoured cake beautifully. I would definitely be using this cake recipe in future experiments.

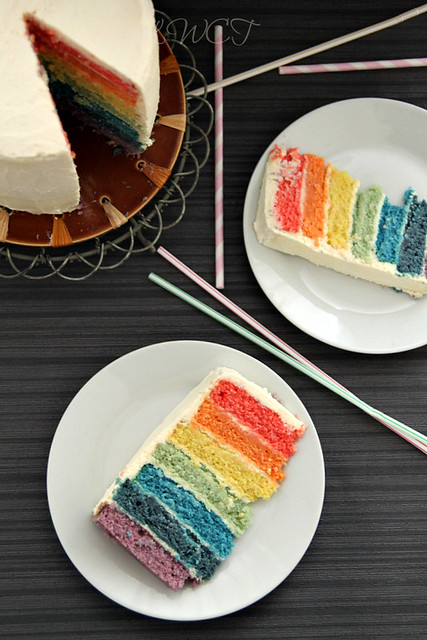
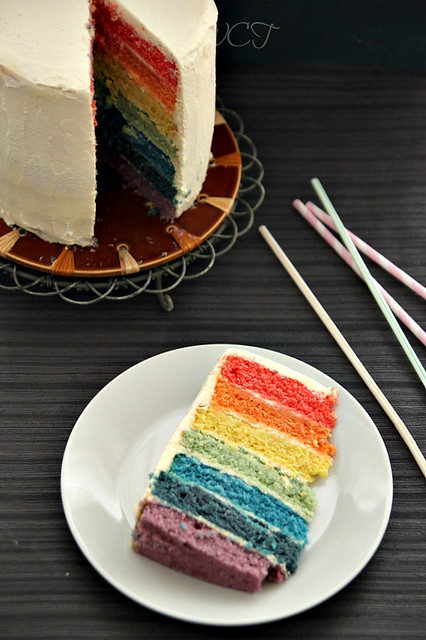
Without further rambling, here's the recipe for the gigantic rainbow cake

Moist vanilla cake (Recipe adapted from here- makes a 7 layer, 6 inch cake or 3 layer, 8 inch cake)
261
Butter- 1 cup, at room temperature
Granulated sugar- 2 cups
Eggs- 4 medium, at room temperature
Self-raising flour- 3 cups (*refer notes)
Whole milk- 1 cup
Vanilla extract- 1 tsp
Gel colours- all the 7 colours (I used a brand called Sugar Flair)
IMG_6409
Cream the butter till nice and fluffy, using the paddle attachment of your mixer or using a hand mixer.
Add sugar and continue to cream for about 4 minutes, till the mix is light and fluffy.
Add the eggs one at a time, beating well after each addition.
Throw in the flour, alternating between the milk, starting and ending with flour. Beat on low till the mix is well combined and no traces of flour is obvious.
Finally, add the vanilla extract and give one final mix
Get 7 bowls ready. Weigh the batter and transfer them into the bowls. (should be approximately of same weight)
Also preheat the oven to 175C.
Add the colours to the individual bowls. A little goes a long way when it comes to gel colours, so add bit by bit, mix and see if its the colour you are looking for. What you see is what you get as the final product.
Transfer the batter into cake pans (greased and lined if not using aluminium foil containers) and gently tap them on the counter a couple of times to pop the air bubbles.
If your oven cant take more than 2 at a time, that's perfectly fine. Just keep the other pans ready and you can bake them in batches.
Bake for about 15 to 17 minutes or till a skewer inserted into the centre comes out clean. The cake should slightly spring back when touched.
Transfer to a cooling rack and after about 10 minutes remove from container and leave aside to cool completely, after which you can wrap them in cling film and store in the refrigerator for a day or two till ready to frost.

Notes: *I didn't have self raising flour so I made my own by mixing 11/4 tsp baking powder and 1/4 tsp salt for every one cup of plain flour. So for the recipe, I sifted together 3 cups of plain flour with 3 3/4 tsps of baking powder and 3/4th tsp salt.
Butter flavouring was called for in the recipe. I have no clue what that is, so didn't use.
If the cakes have domed, slice off the dome using a serrated knife, only after they have cooled completely.

Mascarpone-whipped cream frosting
IMG_6429 
Mascarpone cheese- 250 gms, chilled (I used a lighter version)
Double cream- 2 cups, chilled (whipping cream as it is known elsewhere)
Powdered sugar- 3 tbsp (increase or reduce as preferred. I kept it at 3 tbsp since the cake was sweet enough)
Vanilla extract- 1 tsp

Using the paddle attachment of your free standing mixer (or hand mixer if that's what you have), beat the mascarpone cheese till smooth and fluffy, for about a minute.
Add the vanilla extract and sugar and continue mixing for another minute.
Change to the whisk attachment and start whipping, while gradually adding the double cream.
Keep whipping till you get stiff peaks and is of pipable consistency. Do this on high speed but keep a close watch as you don't want to over whip and cause the cream to separate.
Add more cream if you think its too loose. 
You can also replace the mascarpone cheese with cream cheese and you'd get an even better frosting.

Assembling
IMG_6438
Place the first layer on a serving plate- the violet layer in this case- and spread about 3 to 4 tbsp of frosting over it, using an off-set spatula. I chose to keep the frosting thin because I didn't want too much white separating the colours. 
Top with indigo layer and repeat the process till you reach orange. 
Once you have spread the frosting on the orange layer, turn the red cake upside down (top facing down) and place it on top of the orange cake. That way you have a smooth top to finish off.
Do a crumb coat by covering the cake with a thin coat of frosting, just to seal in all the crumbs, then do a generous coat of frosting and smoothen it out as much as possible.
Refrigerate till ready to use, and about 15 to 20 minutes before serving bring it to room temperature.

Notes: As you can see I did a rubbish job of frosting it. By the time the crumb coat was over, I was beyond exhaustion. I just wanted to finish it and go sleep or something. So like I mentioned before spread the entire process over a couple of days and you wont have a cake frosted like that
The whipped cream frosting does not hold well when its warm. Its starts melting, so keep in the refrigerator till ready to use.
That also means, the cake holds good only for about 4 to 5 days max. Store in the refrigerator at any cost
The frosting also starts to crack, I think because of temperature variations. I panicked, but don't worry, just whip up some more double cream and fill the cracks.

Thursday, 29 November 2012

Jan Ellis Pudding with a brandy-orange sauce

IMG_5687
I finally steamed my Christmas pudding two days back. The recipe said 10 to 12 hours but I just couldn't bear to carry on for that long and so after about 8 hours I checked it with a skewer, nothing stuck to it and so I decided it was time. While it was steaming, there was no divine smell of the soaked fruits in brandy or anything and I was disappointed. But once the cake was put aside to cool, the smells that filled my house was sooo good. It was like Christmas in a bowl. Ro on the other hand could have been a bit more enthusiastic about it..but instead he asked:
'cant we just buy a pud from M & S like we always do?' 
No we cant because I STIRRED this pud with aching arms and now I want to flambé it for Christmas. OK then this months electricity bill is coming out of your salary. 
Hmm, OK, screw the stirred pud, maybe we can actually just buy it from M & S

But then we agreed to still go ahead with this, with the bill situation still unresolved. But when those smells wafted through the house, I had a slight feeling it was thoroughly worth it. Its now well wrapped up and put in a cool, dark corner for the flavours to develop and then on Christmas day it has to steam for another 2 more house, after which it will be ready to be flambéed.
IMG_5676
Since I couldn't eat the pudding I steamed, I went and baked another pudding yesterday. I am a novice when it comes to steamed puddings and after the 8hr experiment, I didn't want another steamed one. So I opted for the Jan Ellis Pudding which is probably the simplest but tastiest pud I have had in a while. I made it in a 2 litre Mermaid pudding basin which was absolutely perfect for the deed. Made of hard anodised aluminium, the basin is extremely solid and durable and there is even heat distribution which is great for the pudding to cook all the way through. I did butter the basin a bit with fear of not being able to turn it out on to a plate easily, but I doubt that was necessary, as it came out nice and smooth and with no fuss. The only thing I noticed was that, about 10 minutes into the baking time the top started to brown severely. I don't know if it was because of the heat from the basin or just the oven, but it was solved by covering with a silver foil sheet.  

The pudding is traditionally South African and you can read more about it on Cook Sister where I saw the recipe a loong time back and had book marked it. The pudding on its own is pretty average, but the sauce that accompanies it just takes it to a whole different level. Soaked in the sauce, this dessert will definitely be a hit. Go on, try out something different for Christmas and I assure you wont be disappointed.

Recipe adapted from here and here (serves 4 to 6)
IMG_5711 IMG_5700
Milk- 1/2 cup
Baking soda- 1 tsp
Plain flour- 1 1/2 cups
Granulated sugar- 1/2 cup
Salt- 1/4 tsp
Apricot jam- 2 tbsp
Eggs- 2
Butter- 2 tbsp, melted
Cinnamon powder- 1/8th tsp (optional)

For the sauce
Double cream- 3/4 cup
Boiling water- 1/2 cup
Granulated sugar- 1/2 cup
Orange zest- 1/2 tbsp
Vanilla extract- 1/2 tsp
Brandy/ Cognac- a few splashes 
IMG_5660 
Dissolve the baking soda in the milk and keep aside.
Mix together the flour, sugar and salt in a large mixing bowl and into that add the remaining ingredients. Mix well using a strong wooden spoon, breaking down the apricot jam as you go.
Pour in the milk mix and continue stirring till all the ingredients come together and you get a smooth batter.
Pour into a lightly greased 2 litre pudding basin and bake in an oven preheat at 180C for about 40 to 45 minutes.
Once the skewer comes out clean, take the basin out of the oven and leave to cool for about 5 minutes after which you can turn it on to a wire rack to cool completely.

While the pudding is in the oven, you can get working on your sauce.
Mix together the cream, boiling water, sugar and orange zest in a sauce pan and bring to a boil over medium heat.
Take it off the heat and add in the vanilla and brandy, give a good stir and leave aside till your pud is ready.

When ready to serve, douse the pudding with enough syrup and have it hot or cold.
What I did was, I transferred the pud into a deep plate, warmed it up a wee bit in the microwave and poured over the some of the sauce. 
Left it aside for a couple of minutes and it had soaked up pretty well.
If you don't want to do this, then once you slice the pud, you can pour over the sauce then and serve. Not everyone might enjoy a soaked up pud. I sure did though :)
IMG_5707 
Notes: Feel free to halve the recipe, in which case you may need to reduce cooking time and also use a smaller pudding basin.
That said, you are free to bake this in any pan you like, a 9 inch cake pan would work perfectly well. But again watch out for cooking time.
I think i over baked my pud  a bit more than necessary and so it wasn't it soft soft. But once the sauce went over, it was no problem at all.
Jeanne of Cook Sister has used orange zest in her batter as well. Feel free to use about 2 tsp of zest if you please.
The cinnamon powder can be replaced with a pinch of nutmeg powder, or completely avoided. Your choice.
The brandy is purely optional. Avoid if not a fan.
I thought the apricot jam would lend a nice taste to the final product, but was disappointed I couldn't even taste it. I wonder why???

With thanks to Mermaid Bakeware for sending me the Pudding Basin for this challenge. All views expressed are my own.

Monday, 29 October 2012

Afternoon tea with Champagne at the Corus Hyde Park

IMG_4880
Some time around last week we turned 7 (OK fine, I don't know the exact date, but that's besides the point really). Yes! 7 years since we met each other in a small cafe in Chennai. Me, never wanting to get married, He, enthusiastic about getting married. Poles apart on a lot of things, but on the same page for a few other. Yet! we somehow have managed to make it this far. Its been a rough 7 years with me Ro would say, but I would shrug and say that's marriage. I think Ro's good husband material :)

After so long, we don't even bother wishing each other remembering 'petty' occasions like this. Although, the die hard romantic in me, sometimes do wish it wasn't so. I had been wanting to do an Afternoon Tea session for a long time and when an opportunity came up, I grabbed it thinking we will have a nice afternoon out together. But Ro of course had better things to do than spend an afternoon having 'tea' with me, and so had to change plans. Determined to not dampen my spirits, I grabbed a good ol' girlfriend of mine and headed out into Central London for a fun afternoon out. And boy, am I glad I did, because believe it or not, a day out with a girl friend can sometimes prove to be so much more therapeutic than a romantic afternoon out with the husband :)
IMG_4878
Afternoon Tea is such a big deal here its not funny. Some hotels like The Ritz and Inter Continental are soooo known for their Afternoon Tea deals, you have to book a table waaay in advance. Although that was the kind of afternoon tea I had in mind, this deal was good enough for me, and its Groupon that I have to thank for this fabulous offer. From hair cuts to restaurant deals to cooking classes to mini breaks I have done it all. In the initial days after signing up, it used to be a struggle to not pick up the amazing voucher deals.  Now I have a grip on myself and although I scout the website frequently, its only when I absolutely need something do I pick it up. The Afternoon Tea with Champagne for two was too good a deal to pass and I am glad I picked it, because it was so worth it.
IMG_4869 
Corus Hyde Park is located bang opposite the park (as the name suggests) and is a 3 min walk from Lancaster Gate tube station. We headed straight to Olio's Brasserie, just off the reception area, and waited a good 5 minutes for someone to come greet us (not a good start, if you ask me). So I asked at the reception and was politely told someone would be with me soon. No luck again but then I spotted a stewardess at the counter and she guided us to our table. When we were kept waiting, I thought we would be placed somewhere near the stairs or something, but was pleasantly surprised to be seated right next to the huge windows, with good views of the autumn colours of Hyde park (not to mention enough lighting for my pictures, although it was such a gloomy and rainy afternoon, they haven't turned out that great).
photography post1
We were dutifully given our menu's and asked to pick the tea of choice. There were quite a few interesting options- from the traditional blends like Winchester Breakfast, Darjeeling and Earl Grey to the more contemporary ones like Rooibos orange and eucalyptus, Milk oolong and if that's not fancy enough for you, then try the Lavender hibiscus, a Blooming Tea, which literally does the same in your tea cup. We were not too adventurous with this and so settled for the Winchester breakfast and Classic Chai. Both were brought to the table promptly and we enjoyed the steaming cups of tea while it was pouring cats and gods outside. Oh and we also had to figure out how to handle the two flutes of Baron de Marc Gobillard, Brut Champagne in between sips of tea. Needless to say, the Champagne was happily welcomed, and the tea left to go cold in the tea pots.
IMG_4883IMG_4871 
Then came the exciting bit, the array of tarts, cakes, scones and sandwiches. Arranged in traditional 3-tiered plates, they were a pretty sight. Taste-wise, however, we were a tad bit disappointed. The cupcakes were too dry and the brownie (I think it was a brownie) was anything but moist. The carrot cake was good, but it was not with cream cheese, but more like butter cream. The tartlets were teeny tiny pastry cups filled with something like butter cream with a blackberry perched on one and a raspberry on another. I don't think they can technically be called fruit tarts, but they were pretty cute and we liked it. That said, the scones were to die for and we smothered ours with clotted cream and jam and had a blast getting some extra calories into our bodies. The sandwiches were also pretty good, with the cucumber and cream cheese being my favourite and the ham and cheese a close second. The macarons also did their job of being all good looking with the perfect feet and stuff and the flavours- orange and coffee- were not disappointing either. 
27
Our tea session stretched on for about 2 hours, because you just cannot stuff everything into your mouth at one go (and also because we weren't shooed out of the restaurant) and its something you really need to enjoy at a slow pace. So the next time you are in London, or anywhere in UK, make sure you treat yourself to a good English Afternoon Tea session. Also, don't forget to check out Groupon for some good deals in your area and trust me, its a decision you wont regret.

Thanks to Groupon for a gift voucher with which I picked up this deal.

Monday, 30 July 2012

Banana and macadamia loaf

IMG_2560
It's been a while isn't it? It's been pretty chaotic around here with guests one after the other. On the other hand, I thoroughly enjoyed my 3 weeks with the sister-in-law. I cant begin to say how much fun it was shopping, gossipping, bitching, partying, lunching and sightseeing. Ro was going mad with two girls sitting and bickering about anything and everything that at the end of 3 weeks he even knew a tad too much about the reality show on telly 'real housewives of OC and NYC.' :)

I have exactly one week of rest before my in-laws get here for another 3 weeks of non stop sightseeing. I am slightly sick of London in general and cant handle any more touristy things, lucky for me Ro is on leave for 2 weeks and he can do the needful, I hope. To add to it, the Olympics has created major chaos for us, especially because we are in the midst of it all- 2 venues within 10 minutes of where I live...sigh!

I haven't cooked anything major in the past 1 month and I don't intend to do so in the coming weeks as well. Having gained a couple of extra kg's (thanks to all the binge eating) I am on a crash diet and has to reduce all that extra weight asap. Summer clothes look hideous on me and sadly all that extra fat cannot be hidden under jackets, thanks to the amazing weather we've been having.
IMG_2578
I don't think I will be able to visit all your gorgeous blogs in the coming weeks, but I am trying to update mine with a couple of scheduled posts and reviews which should take care of matters for at least 3 weeks. In the mean time, here is a banana loaf from my drafts, which I made a month back and was a hit breakfast item.

I must admit, although I'm a big big fan of bananas, I have not liked any banana based bakes I've made at home. Muffins, breads, cakes, nothing hit the spot for me, maybe because the bananas we get here are quite tasteless, not sweet at all and once they are out of the oven, the weird worm-like strings is somehow a total put off. So I resort to buying amazing organic banana loaves from the grocery store and its perhaps one of the moistest and best banana breads I've had.

This time however, in spite of the bananas not being over ripe, I decided to purée it instead of mash it and voila, I got the desired taste and consistency- incredibly moist with no weird black strings and the nuts added that extra crunch. If you are not a fan of nuts, you can very well omit it.

Recipe adapted from here
IMG_2574
Plain flour- 200 gms
Baking powder- 2 tsp
Salt- 1/2 tsp
Nutmeg- a generous pinch
Butter- 140 gms, unsalted and melted
Granulated sugar- 200 gms
Eggs- 2 large
Vanilla extract- 1 tsp (optional)
Bananas- 3, peeled
Milk- 125ml
Macadamia nuts- 70 gms, roughly chopped
IMG_2581 
Slice the bananas roughly and purée till you can no longer see any chunks. You should get a mix that is not too watery. Use milk, a tsp at a time, if you need to. I didn't need to use any.
In a large bowl whisk together the first four ingredients. Keep aside.
In another mixing bowl whisk together melted butter and sugar till well combined.
Add the eggs, one at a time, beating well after each addition.
Pour in vanilla extract and mix it all together.
Add the puréed banana and whisk continuously till they are well incorporated into the mix.
Tip in the nuts and milk and fold gently, but till everything's mixed well.
Finally, add the dry ingredients into the wet ingredients bit by bit, whisking after each addition.
Pour into a loaf pan which is buttered and lined with baking paper and bake in an oven pre-heated at 160C for about 50 minutes to an hour or when a wooden skewer inserted in the centre comes out clean.
Take the tin out of the oven and cool for about 10 minutes after which you tip the cake onto a cooling rack and cool completely.
You can then dust with some icing sugar, if required, or serve warm with a dollop of buttah. Its sinful!
IMG_2568 
Notes: The original recipe called for self raising flour. If so just replace the flour with that.
There was also 1/2 cup of rum added to the wet ingredients. We are both not rum drinkers and so didn't have any at hand. However, brandy was an after thought and it was too late by then. If using rum, omit the milk and add that instead. I would do a glaze with it next time though :)
Use any kind of nuts- walnuts, cashew, hazel.
If you are not grossed out by the brown string like thingies from the banana, then fell free to just mash it up using a fork, instead of puréeing it. Puréeing however, made the cake super duper moist.