Showing posts with label chocolate. Show all posts

Monday, 17 June 2013

Review: Hotel Chocolat.

Hotel Chocolat sent me a box of chocolates to review and I must say the box didn't last that long. Each time I get a box of chocolates to review, the first thing I do is take a picture because I know it wont last for more than 2 days after the husband gets his hands on them. He is the chocolate fan in the house and so this review is purely based on what he thinks of Hotel Chocolat.

I was given the option to choose from their H-Box Selection and it was a difficult one. The boxes are segregated into different chocolate types- caramel, boozy, fruity, nutty, milk, white and so on- and comes in a convenient size box. My initial choice was the H-Box Everything Selection which meant I could enjoy a bit of everything, but the husband had other plans and he convinced me to go for the H- Box Dark Selection, purely because he is such a big fan of dark chocolates. It was not a bad choice I presume, considering that the box was emptied in 2 days time.
That said, if you are not a dark chocolate fan, this selection is perhaps not the best option. I do like dark chocolate, but I found this a tad too bitter for my liking. I know, I know, its sacrilegious to say so, but I might go for another selection the next time. I know that my review doesn't count here, but if I were to select a few favourites from the lot, it would be the Pistachio Praline, Salted soft caramel and the Pecan Brownies. The Burnt Caramel was indeed burnt (in a good sort of way) and the Chilli Pralines had that heat when you took a bite, but it didn't do much for me. The husband claimed it was one of the best dark chocolate collection he ever had and some cousins and friends who tasted them agreed with him. What we both didn't enjoy that much was the Liquorice Caramels, but that's just cos we are not liquorice fans.

On the whole I think Hotel Chocolat has managed to bring in some variety in the 'dark chocolate' league, and every piece is distinctly different from the other. The box is a good gift idea and at GBP 12 is a steal.  

With thanks to Hotel Chocolat for sending me sample boxes to review. Opinions are honest.

Monday, 16 April 2012

Salted caramel swirl brownies

IMG_0870-1
I got this massive salted caramel Easter egg by Hotel Chocolat as an Easter gift, from a website I write for and I am in love with salted caramel. I mean initially I couldn't figure the saltiness, but a couple of bites later and I knew what the hype was all about. I went around in search of ready made salted caramel in some of the gourmet shops in London, but no luck there. Hell I couldn't even get my hands on some Fleur de Sel which is apparently a major ingredient in salted caramel. I could have picked it up online, but Ro not being a fan of anything caramel, butterscotch etc. made me wonder if it was worth spending that much money on sea salt.

Usually I would just shrug and say, oh then I shall just forget about salted caramel and not be tempted to make a batch on my own. Yes, that way I am a disgrace to the food blogger community. If I can buy something easily, I usually just do that without the thought making it at home. If it involves more than a couple of steps, then I just shrug and say, 'oh ok I don't think I'm that desperate to have xyz.'. Not what you had in mind about a food blogger right? Well, I am the lazy, blogging-only-so-I-can-take-pics kinda blogger with no qualms whatsoever in trying out ready made sauces, meals, mixes and hell, even whipped cream :)

But this time, I had other plans. I decided to make salted caramel at home (pat on the back for that). It was an easy peacy task and one that required no specific skill set. I keep digging into the caramel on and off and even use it as a spread on croissants and such for brekky. It is also perfect to gift friends and family. Do up a pretty little jar with labels and all the works and send it away with all the love (next Christmas I'll definitely do it!!!)
IMG_0855 
So since I had a jar of salted caramel ready, I decided to make use of it in every way possible (other than of course digging into it for a sugar rush after meals). Brownies were first on my mind and went around scouting the internet for recipes. I didn't come across many, so I just decided to adapt David Lebovitz's Dulce de Leche brownie recipe and make these salted caramel swirl brownies. It was a great idea because (I officially hate DdL now) caramel and chocolate is a match made in heaven. You bite into the absolutely chocolatey brownie and then reach the slightly sticky salted caramel centre and  there is no looking back. I also used the salted caramel for a fabulous brioche bread pudding (recipe to follow) which is on my dessert list the next time I have people over. Yes! it's that goooooood (cant stress it enough).

On another note, I don't know what happened while the brownies were baking, but my oven suddenly made this rattling sound and just conked. Thankfully the brownies were already done and Ro claims the caramel exploded inside the oven causing it to break down. I would just consider that as a dramatic proposition, since he wasn't too happy seeing the caramel swirls on the brownie. I halved the recipe because I wasn't sure how it would turn out, and now I'm kicking myself for not having baked more, especially since I'm oven-less for a while. I'm already having withdrawals

Recipe adapted/ halved from here
IMG_0894
Unsalted butter- 4 tbsp/ 58 gms
Dark chocolate- 3 oz/ 85 gms, finely chopped
Cocoa powder- 13 gms (Dutch processed)
Eggs- 2 small
Sugar- 1/2 cup/ 100 gms
Vanilla extract- 1/2 tsp
Plain flour- 1/2 cup/ 70 gms)
Salted caramel sauce- 1/4 cup (recipe follows)
IMG_1047 
Melt the butter in a saucepan over medium heat.
Reduce heat to low and add the chopped chocolate pieces into it. Stir until melted
Take the pan off fire and stir in the cocoa powder, followed by eggs, beating well after each addition.
In goes the sugar and vanilla extract, stir to combine.
Finally fold in the flour, making sure the batter is thoroughly mixed with no traces of flour.
Line a small baking pan with baking paper and pour half of the batter into it. Even it out with a spatula.
Drop spoonfuls of the salted caramel at intervals and run a knife through to create a swirling pattern (like how you would do for a marble cake)
Top with the remaining brownie batter and even that out as well.
Add the remaining salted caramel and follow the same swirling procedure as before.
Bake in an oven preheated at 175C for about 25 to 20 minutes or till a skewer comes out clean (more or less).
Cool on a wire rack after which you can slice them and store in a container at room temperature for about 2 days or in the refrigerator for a week.
IMG_0861 
Notes: If you don't want the salted caramel to be over powering, then don't do the middle layer, just do the swirling effect on the top layer alone.
Using salted butter is fine, in which case, reduce the salt in the salted caramel
The salted caramel will harden a bit, but that's really fine, it wont be annoyingly chewy or anything.
Under cook a bit if you want it absolutely gooey.
Add pecans or walnuts, if you prefer, to the batter after you fold in the flour.

Salted caramel sauce (makes a little less than 1 cup. Recipe adapted from here)
IMG_1122 
Granulated sugar- 1/2 cup
Water- 1 1/2 tbsp
Unsalted butter- 3 tbsp
Double cream- 1/4 cup
Sea salt- 3/4 tsp
IMG_0638
Heat together the sugar and water in a heavy bottomed pan. Stir to help the sugar dissolve but stop once it comes to a boil. You can swirl it around a bit if you want.
When all the sugar has melted and the colour become a deep amber add the butter. It will foam up a bit so stand back.
Whisk continuously till the butter has melted and then take it off the flame.
Whisk in the double cream (again it might foam up a bit) and then add the sea salt.
Continue whisking till the caramel is nice and smooth.
Let it completely cool and then store in clean containers which can then be stored away in the refrigerator for a couple of weeks.
Just before use, warm it up a wee bit to loosen.

IMG_1109 
Notes: Add a dash of brandy or Baileys for that extra kick.
Add Fleur de Sel if you have any and also adjust it according to your taste. Use only half tsp if you are not too much of a salt-sweet combo fan. 

Wednesday, 28 March 2012

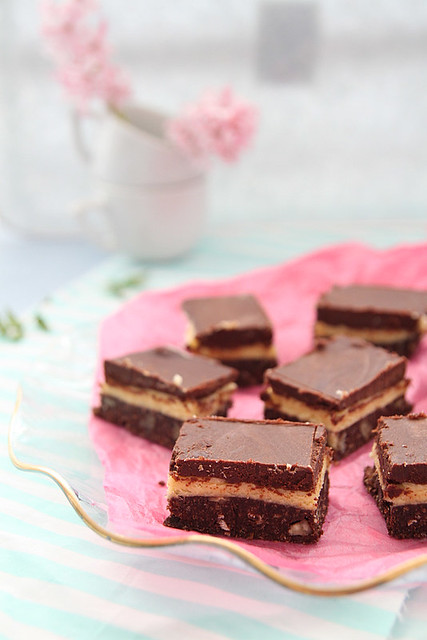
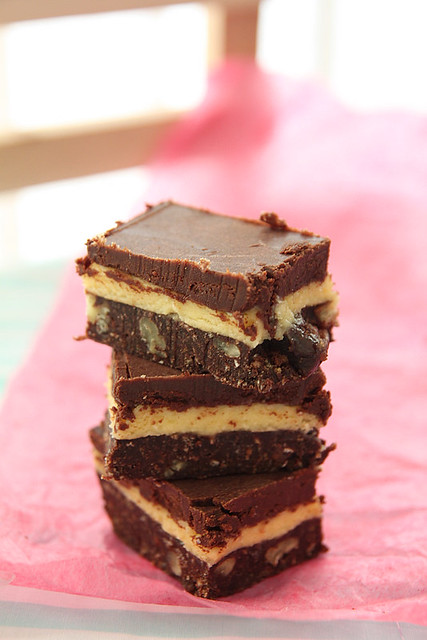
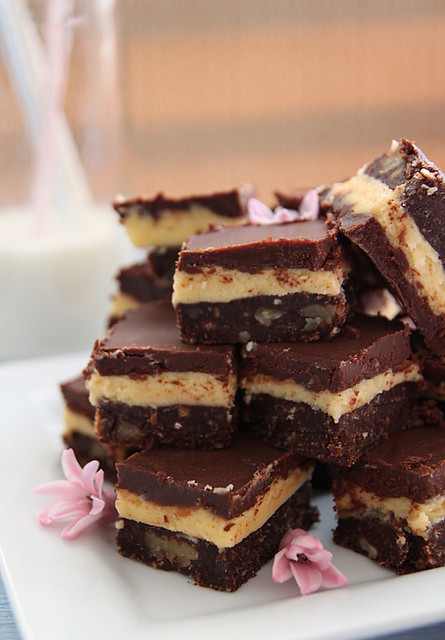
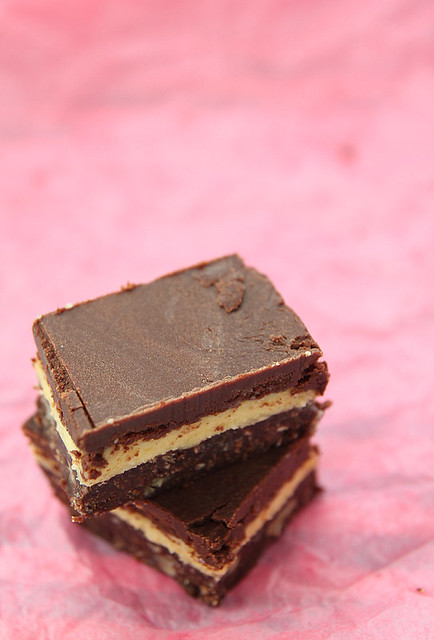
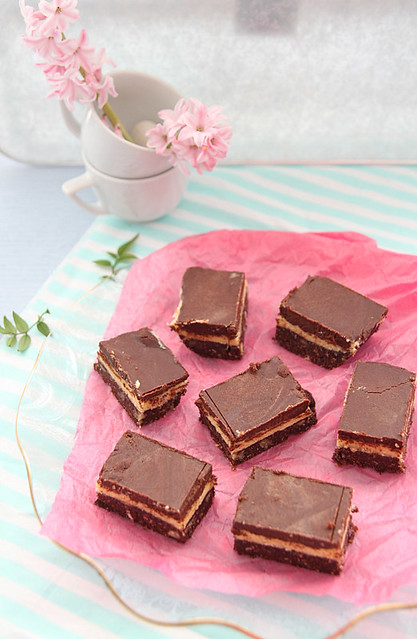
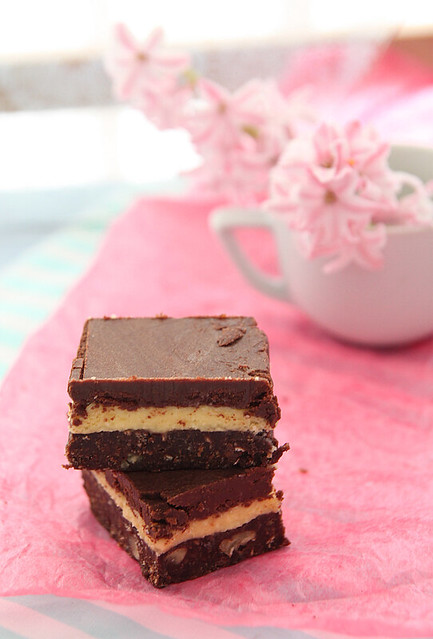
Nanaimo bars

IMG_0068
BBC2 airs a baking competition called 'The Great British Bake Off' and I love it. I have been religiously watching it since it started airing and wait for the cook book to come out after the season, just to gawk at all the pics and maybe try something if its not too complicated. The winner of the first series was food blogger Edd Kimber of The Boy Who Bakes. He, of course, came out with a book full of fabulous bakes and such. I picked it up from the library only to flip through it, but unlike all other cookbooks, this one actually inspired me to make quite a few things...well actually 2 things..which turned out perfectly well.

Nanaimo bars (you can read the history and all about it on Wikipedia) were one of them and although I have seen it cafe's and bakeries, I never bothered trying it for the simple reason it had chocolate in it. It also gave me the feeling of a super rich dessert, high in calories and the various recipes proved that. I didn't want to make a huge batch and end up throwing out most of it or even worse, eating it all up on our own. So when we were asked to a friends place for Sunday lunch, I thought I'll make some and take half of it there. Since its a setting process, I spread the entire procedure over a couple of days and had it ready 2 days before the party. I had sliced one piece to check if it tasted nice, and it did, but not in an 'oh my god why the hell did I wait so long to make this orgasmic dessert' way but more in a 'hmm its a nice thing to munch on' way.
IMG_0095
I left it in the refrigerator, nicely covered and headed to a movie during which time the husband got home and dug into it. Not one piece, but 3 squares he had, all in one go. I did not notice this because Ro does not have the habit of raiding the fridge and cupboards looking for things to eat (unlike me) and I didn't think I should warn him about NOT touching what's in the ceramic tray. Then the day before the party I take the tray out and half of it has disappeared. Greediness got the better of me and I tried one slice. At that point it was certainly an 'oh my god.....orgasmic dessert' moment. I decided to not take it to that friends place and we enjoyed it all to ourselves. Ro is even pleading to make another batch soon. I cant get myself to do so (considering the huge amounts of yumm stuff that went into it) but I shall sometime, or when I have another party I need to take something to :)

On a completely different note, I finally managed to get my recipe index intact. Its still in the work-in-progress state, but its well on its way to completion. Have updated the side bar with my fb, twitter, flicker accounts. So if you want to hear more of my brags and complaints and such please feel free to connect with me there. Phew! who said food blogging was child's play? No one? (I think I did when I initially started the blog) ;)
IMG_9757
Recipe adapted from The Boy Who Bakes (makes around 20 to 25 squares)
Bottom layer
Digestive biscuits- 150 gms (I used McVities, but any rich tea biscuits should do)
Butter- 85 gms
Caster sugar- 38 gms
Cocoa powder- 23 gms
Egg- 1 large
Vanilla extract- 1/2 tsp
Desiccated coconut- 50 gms
Pecans- 37 gms, roughly chopped

Middle layer
Butter- 50 gms
Icing sugar- 170 gms
Custard powder- 1 1/2 tbsp
Double cream- 50 ml

Top layer
Dark chocolate- 113 gms, finely chopped
Double cream- 50 ml
Unsalted butter- 20 gms, softened
IMG_0089
Get a large baking pan (I used a 23 x 13 rectangle casserole dish) ready and line the bottom and up the sides with aluminium foil. Leave some extra hanging over the sides, so its easy to take it out as a whole for convenience of slicing.
Place the biscuits in a plastic bag and use a rolling pin to crush them to resemble bread crumbs. If you have a food processor, then just pulse a couple of times to get the desired consistency. 
Transfer the biscuit crumbs into a mixing bowl and add the desiccated coconut and chopped pecans. Mix well and keep aside.
Melt the butter in a sauce pan over medium heat.
Then remove from heat and whisk in the sugar and cocoa powder, followed by the egg. Beat it into the mixture.
Place the pan back on heat and cook for about a minute, or until the mixture thickens, making sure to whisk constantly.
Remove from heat and stir in vanilla extract.
Pour this into the biscuit mixture and give it a good mix
Tip it into the baking tray, spread it out and press it in as evenly and tightly as possible, so it wont crumble when cut into.
Cover with a cling film and chill for a minimum of 1 hr.

While that's chilling, get the middle layer going.
Beat the butter, using a hand mixer or in a free standing mixer, until light and fluffy.
Gradually beat in the icing sugar until you get a smooth mix.
Add custard powder and cream and beat on low until just combined.
Then increase speed and beat well till you get a light and fluffy mixture.
Spread this evenly on top of the biscuit base.
Cover and chill for another hour or so.
IMG_0062
Finally, for the top layer, make a ganache.
Keep the chopped chocolate ready in a bowl.
Bring the double cream to a boil and pour over the chocolate pieces.
Leave to stand for about 2 minutes and then stir well until you get a smooth mix.
Add the melted butter and stir further to get a silky ganache.
Pour this over the butter cream layer and spread as evenly as possible.
Cover and chill until ready to serve.

To prevent the chocolate layer from cracking, take the baking pan out of the refrigerator about 10 minutes prior to slicing. Then run a clean, sharp knife under hot water, wipe dry and slice. It would be far easier and less messier.
IMG_0079
Notes: I used our Indian desiccated coconut for this. Was a bit wary about how it would turn out, but it worked out just fine. Feel free to use the one meant for baking.
The original recipe called for walnuts, but since I didn't have any, I used pecans. Any kind of nuts should be fine.
I made the base and chilled it for a whole night. I basically took my own sweet time to do the layers which was a very good idea, because patience is not my thing. I probably would have ruined it, if I made it all the same day.
I sliced them up and stored in a container for a week. It was absolutely fine. 
Make sure you slice them into small pieces, because this is super rich and you don't want to over do with a big piece.

Wednesday, 1 February 2012

Hot chocolate fudge cake

IMG_8288
Wow I think I hit a nerve with my previous post epiphanies. All those who wrote in with their opinions, good for you. I completely salute all you ladies out there who can get a frosting to stay as frosting and substitute ingredients with what's available, in India. But I love my convenience way too much than baking or cooking to oversee it, so I am gonna stick to what I said. 

Since that's out of the way, I shall get down to discussing my favourite subject, the weather. It finally feels like winter in London. Temperatures have gone down to 0 and although there is still no sign of snow, it does get a bit frosty in the mornings. I have always dreaded February (not just because I turn a year older), its the coldest, dreariest month, I feel. 

But the good thing is, I have discovered the benefits of drinking green tea. I mean I have tried it a couple of times in restaurants, but never really liked it, because, lets face, it has absolutely no taste. But then Twinings (the really popular tea brand) came out with their new Green Tea varieties like lemon, ginger, mint etc. and now I'm hooked. I was always a sucker for anything with lemon in it and oh to sip on it in this cold is absolutely soothing. Of course, the benefits like losing weight, reduced risk of heart disease, delaying signs of ageing (ooooh I like that one) are all added advantages, and if sipping on some delicious flavours of green tea is going to help me, why fight it right? So without wasting time, head on over to the Twinings Tea Shop and buy green tea to keep you going this winter.
IMG_8413
Coming to the recipe, this ones from my mother-in-law. For a chocolate hater like me, this pudding-like cake did wonders. And by that I mean, I could manage to eat a cup full, that's it. Mamma made it last year when we were in India for her chocolate obsessed son, but guess who enjoyed it more?- the daughter-in-law. The thing is, I enjoyed it way too much to not touch it for one whole year. I binge eat anything I like and then end up hating it with a vengeance. This recipe was jotted down and brought back with the hope of making it to my blog in 2011, but the thought of all that gooey chocolate put me off. Its only today that I had this craving for something warm (trust me, a brioche bread pudding topped the list), and since the ingredients for this chocolate fudge cake was readily available, I went ahead with it.

The technique and recipe is much different from the usual fudge cake and the outcome, absolutely marvellous. The batter layer rises to the top forming a cakey layer and then you dig into it to get the gooey topping which sinks to the bottom. You can either make it in a single casserole dish or in individual ramekins or mugs/cups and be more concerned about how it looks than tastes (like me). I had picked up a lot of prop for the blog from India and now I have this block when it comes to styling and photography. After 1 week there is some sun out here and I ended up with unattractive pictures. So till I get the photography mojo back, you will have to do with bleak, non-creative pictures. Enjoy!
IMG_8307
For the cake:
Flour- 1 cup
Baking powder- 2 tsp
Granulated sugar- 2/3rd cup
Cocoa powder- 2 tbsp
Salt- 1 tsp
Vanilla extract- 1 tsp
Milk- 1/2 cup
Oil- 2 tbsp

For the topping
Dark brown sugar- 1 cup
Cocoa powder- 1/4 cup
Boiling water- 1 3/4 cup
IMG_8329
Whisk together all the dry ingredients for the cake in a large mixing bowl.
In another smaller bowl, stir together the vanilla, milk, and oil.
Add the wet ingredients to the dry ingredients and mix well to combine. No traces of flour should be seen. I did this with a wire whisk. Beater is unnecessary.
Grease the dish you are using and pour the batter into it. If using individual ramekins/ cups, then fill each of it till about half full. Keep aside. 
Pre-heat the oven to 200C
Prepare the topping by mixing together the brown sugar and cocoa powder in a bowl.
Sprinkle this mixture over the cake batter as evenly as possible.
Then using the back of a spoon, slowly pour the boiling water over the batter. Do the same with all the ramekins till they are about 3/4th full.
Reduce the oven temperature to 150C and place the bowls inside.
Bake for 30 minutes. Do not over do it.
Take them out, keep aside to cool for a while and either dig in, or once they are completely cool, refrigerate for further use.
IMG_8295
Notes: I halved the recipe and got 4 mugs of pudding
The topping procedure mentioned above sounded a bit complicated to me and so mamma gave me an alternative. After you mix the brown sugar and cocoa powder, add a tbsp of hot water to it and mix it till you get a paste-like consistency. Into this add the boiling water slowly using the back of a spoon and mix it all in, Finally, use this mix to then pour on top of the cake batter. That way everything is evenly mixed and you have more control over how much to add in each ramekin.
Since brown sugar is not readily available in Kerala, mamma substitutes it with 3/4th cup of sharkara paani (jaggery syrup) or a cup of jaggery. If using the syrup, make sure you use 2 cups of boiling water instead on 1 3/4.
Add an oz of rum or brandy to the topping and it would be yummm.

Thursday, 29 December 2011

Nigella's triple chocolate cookies

IMG_7265
The husband came back one day after a conference at some fancy hotel and kept raving about the double chocolate cookies they served with tea. I didn't really care for it much, since I don't have the hots for chocolate. A couple of days later he brought home some chocolate cookies which he claimed came close to those he had, but still not there yet.

It lay on my kitchen counter till one day I got back after my swimming session so totally hungry and since there was nothing in the house I could eat (without preparation) I opened one cookie packet (they came in individual tiny packs) and popped into my mouth.
IMG_7285
It tasted good, not divine or absolutely awesome, but good. I thought, why not make some for Ro since he keeps begging for chocolatey things all the time. I scouted around the net for a while and landed on Nigella's recipe. Its weird that I say this, but somehow all Nigella's chocolate based recipes have turned out pretty decent for me. This one didn't fail me either. It was as chocolately as Ro wanted and disappeared in 2 days, like I wanted, win-win situation if u ask me.

I love any kinda cookie straight out of the oven and after that don't really care for it that much. This too made its way through to my stomach immediately after it was taken out of the oven and after that it was all left for Ro. Its not the crunchy cookies, its more like a cakey, slightly chewy cookies which are so easy to make and as per Nigella, you can even freeze the dough for later use. She says you get 12 large cookies out of the measurements, but I halved it and made smaller cookies which are much easier to handle. Feel free to double it and make huge chunky cookies if you please.

On another note, I'm thoroughly enjoying my time at home doing absolutely nothing. Tried to bake some cupcakes but i seriously had no patience. Hats off to you guys in India who manage to bake well. I hated the fact that there was no brown sugar available, no ready made confectioners sugar, hated the heat which caused the frosting melt etc...wayy too much trouble to go through for a batch of cake. So I just decided it I shall never be baking if at all I get back to India. The convenience of UK has spoilt me, there I said it.. :)
Hope you all have a fabulous New Year with your loved ones. I will NOT be spending NYE with the husband this year, instead we are heading to two different parties. What fun :)
IMG_7295
Recipe halved from here
Dark chocolate- 62 gms
Plain flour- 75 gms 
Cocoa powder- 15 gms
Baking soda- 1/2 tsp
Salt- 1/4 tsp
Butter- 62 gms (softened)
Dark brown sugar- 38 gms
Caster sugar- 25 gms
Vanilla extract- 1/2 tsp
Egg- 1 small
Dark chocolate chips- 125 gms
IMG_7280
Break the dark chocolate into smaller pieces and melt in a double boiler or in a heat proof bowl kept over simmering water.
Keep stirring till the chocolate has completely melted. Keep aside to cool a bit.
Meanwhile, whisk together the flour, cocoa powder, baking soda and salt in a large bowl.
Into another bowl add the butter and cream it along with both the sugars till light and fluffy. A good wire whisk would do the job with a bit of an effort.
Pour in the melted chocolate and stir well to combine evenly.
In goes the vanilla extract and egg and beat it in to combine well.
Tip in the dry ingredients and using a wooden spoon combine well, making sure there are no traces of flour seen.
Finally fold in the chocolate chips.
Line a baking tray with parchment paper and using an ice cream scoop, scoop out the dough and place at least 2 inches apart. (if you are making large ones, you would get about 6 of them).
Bake in an oven pre heated at 170C for about 10 minutes. 
Get a tooth pick and gently insert it into the centre of a cookie, if it comes out clean (without any wet batter sticking to it) then you are good to go. If you have accidentally punctured a chocolate chip, then try again in another part of the cookie.
leave to cool for about 5 minutes on the tray and then transfer to a rack and cool completely before storing in containers.
IMG_7298
Notes: The original recipe called for about 175 gms of chocolate chips, but I thought that was a tad too much, although next time I may try it out that way.
As per Nigella, make the dough as per instructions, scoop them into the baking tray as mentioned above and freeze just so they become hard enough. Then remove them from the tray, transfer to freezer bags and stash it back into the freezer till you are ready to use. I guess you can then bake directly from frozen, just that it might take a tad longer than usual.
Add some raspberry liqueur to the dough and I'm thinking it would be heavenly, or all spice for that matter.
Replace caster sugar with granulated sugar, I don't see that much of a problem there.
Kept them out for Santa on Christmas Eve and there was none left. He definitely loved these with his glass of milk, I hope you do too :)
Sending these to Forever Nigella: #10 Christmas Presence hosted by the lovely Sarah of Maison Cupcake

Tuesday, 19 July 2011

Super moist chocolate cake

IMG_3227
Sorry I have been MIA for a while. Work caught on pretty well and the fact that I was  am on a diet made me stay away from fancy cooking. Although I had tonnes of posts in my drafts, I wasn't in the mood to sit and pen down a whole blog post, edit the pics etc etc and it came to a point where I wasn't even signing into blogger and checking in on my fav bloggers. So if I haven't visited you guys in the near future, it is because of random stuff like this. 
IMG_3238
I hadn't baked in ages, and somehow wasn't even having any withdrawals this time. But yesterday, we had a lil something to celebrate and I fell prey to the husbands nagging for a chocolate cake. Like I have mentioned loads of times before, I actually don't like chocolate that much. And every time Ro bugs me for a choc cake, I bake my moms easy Beat & bake chocolate cake which takes no time and you get the desired effect.
IMG_3214
Was a bit in the experimenting mood yesterday, but not so much as to spend hours googling and grocery shopping, and so decided to head over to Marias Menu and borrow her recipe this time. Of course it was extremely moist like she said and pretty easy to put together as well. I didn't do the ganache or any frosting, since my love for plain cakes still rule. Even though I have restricted my in take to about one slice, the husband has been gorging on it non stop. So while I chew on those salads and fruit, you can go ahead and enjoy this yummilicious chocolate cake.
IMG_3226
Recipe adapted from here
Milk- 1 1/2 cups
Butter- 100 gms 
Oil- 1/4 cup
Cocoa powder- 1/2 cup 
All purpose flour- 1 cup
Baking soda- 1/2 tsp
Baking powder- 1/2 tsp
Granulated sugar- 250 gms
Egg- 1 large
Vanilla extract- 1 tsp
Salt- 1/4 tsp
IMG_3258
Pour into a sauce pan the milk, oil, butter and cocoa powder. Mix together on medium low heat till the butter completely melts. Keep aside to cool, stirring in between.
Into a mixing bowl throw in flour, baking powder, baking soda, sugar and salt. Whisk to combine.
Add the beaten egg and vanilla extract followed by the wet ingredients.
Whisk/ beat well to combine all the ingredients. There shouldn't be any traces of flour visible. The batter would be really loose, but not to worry.
Pour into a 9 inch pan lined with baking paper, and place in the middle shelf of an oven pre heated at 180C for 45 to 55 minutes.
If making cupcakes, then reduce time to about 15 to 20 minutes.
Do the skewer test at around 45 minutes and then continue if required.
Take it out of the oven, let it rest for about 10 minutes and then turn it onto a cooling rack and leave it there till it cools down completely.
Slice and serve with some vanilla ice cream or store in an air tight container.
IMG_3236
Notes: I added vanilla extract, because I like the vanilla taste in chocolate cakes.
Add self raising flour if you have it and omit the salt and baking powder from above.
The cake is not really sweet (for my liking at least) so it would pair really well with some ice cream. A ganache frosting would also be sufficient
The cake cracked a whole lot on top and since im used to it now, i didnt panic. I turned it over and sliced it. hence the neat surface :)

Tuesday, 10 May 2011

Toblerone cupcakes

My husband is such a sucker for anything chocolate, it makes me sick. He wont buy anything other than chocolate ice cream, chocolate cake, dark chocolate bars and even chocolate biscuits (????!!!). I on the other hand is slowly getting sick of chocolate. I mean I can have the occasional bite of a dark chocolate bar, but nothing more than that. In fact I'm thinking its a good thing and trying to appreciate it. There used to be a point in time where I had to have a bar of chocolate or something chocolatey after a meal, but now I detest the thought of it. I cant really explain where, when or why I started hating chocolate so much, but I sure seem to be OK with it, considering I have moved on to greener (no not the healthy green) pastures and have replaced my after meal chocolate bars with a nice big bite of the red velvet cake with cream cheese frosting or the date and walnut cake or the plain vanilla cakes (which I'm a sucker for). You see, I have replaced it with something more calorious (I just made up that word).

Ro, although he eats all the useless (exactly his words) desserts I make or buy, says he's being unfaithful to his first love (oh I'm waaaaay below in line, in case you were wondering). A loving wife who's born to make the husband happy will only make chocolate desserts henceforth, but me, as you all might already know, is not that wife and so haven't really made a chocolate cake in like FOREVER. I think my last chocolate cake was this one almost a year back and my last something chocolatey were the Nigella bars which I kinda liked because it had all those crunchy stuff in it and was not that chocolatey.
Ro's been nagging me to make chocolate cakes for so long, but it falls on deaf ears. But a couple of days ago, we decided to go for a walk through the English countryside and since the initial plan was to pack a picnic lunch I decided to bake some cupcakes. Was scouting around for recipes and I stumbled upon this beautiful blog What Katie Ate and the Toblerone muffins caught my eye. Now if there is one chocolate I don't mind once in a while, its Toblerone...the original that too. So I decided to give it a go and I admit I was excited at having baked a choc-something, but it didn't last that long....I screwed it up royally.

I have no idea why, but all the cakes Ive baked recently have been disastrous. This one was sooo easy to follow, but I managed to ruin it. I don't know where I went wrong, but it was dry and the only part that was worth eating was the Toblerone spotted areas. Even Ro, the chocolate addict, was like 'hmm its a bit too dry." I was disappointed and had to chuck the plan of taking it to the picnic. Instead I piled it into an air tight container and kept it thinking Ro might eat it anyway, after all its chocolate.
A couple of days later, it still was there untouched and I was just about to throw it when I decided to take a few pics anyway..and blog it because the recipe is such an easy-to-follow but unique one that I had to keep it...just in case I decide to try it another day. I would like to blame the cocoa powder used, for the colour and for not getting the double choc effect. Next time I'm definitely buying Dutch processed cocoa powder even if its gonna cost an arm and a leg. Considering that I don't use it on a regular basis, I think its alright. So this recipe is not one of my successful ones, but if any one out there decides to try it out, do let me know how it turned out so I can take notes and correct my mistakes.

Recipe halved from here
Plain flour- 1 1/2 cups
Cocoa powder- 1 1/2 tbsp
Baking powder- 1/2 tbsp
Brown sugar- 3/4 cups
Butter- 63 grams, melted and cooled
Milk- 3/4 cup
Egg- 1
Toblerone chocolate- 1/2 cup, roughly chopped
Sift together the flour, cocoa and baking powder. Mix well.
Add the brown sugar and stir well, making sure there are no lumps.
Whisk the egg lightly and add to the melted butter along with milk. Mix well.
Add the wet ingredients to the flour-cocoa mix, tip in the chopped chocolate and mix them all together until no traces of flour is seen.
Transfer into cupcake/ muffin cases till 3/4th full and bake in an oven pre heated at 160C for about 16 to 20 minutes.
Cool on a rack and when ready to serve, heat it for a lil while in the microwave, so the chocolate melts a bit (optional).
Notes: I used Cadbury cocoa and probably that's why the colour is not that strong. Use Dutch processed as the original recipe says.
I made cupcakes and so the cooking time was a little less.