Showing posts with label Breakfast and Brunch. Show all posts

Friday, 27 March 2020

Appam batter (no soaked rice nor grated coconut)

Rice flour- 2 cups (not the roasted one)
Rava- 1 tbsp (not the roasted one)
Coconut milk powder- 3 tbsp
Cooked rice- 1/2 cup (any leftover rice even basmati is fine. I prefer matta rice though)
Instant yeast/ active dry yeast- 1 1/4tsp

Salt- to taste
Sugar- to taste
Mix all the first five ingredients together in a blender using lukewarm water. 
Add a little at a time and blend well till you get a smooth batter. I used just under 1 1/2 cups of water.
Transfer to a large bowl, cover and keep to rise in a warm place, for about 4 to 5 hours or till the batter has almost doubled in quantity. It would be light and airy and would bubble up at this point.
Stir in the required amount of salt and sugar (i may have added around 1 1/2tsp salt and around 3 tsp sugar) and warm water to make it the consistency you prefer. (I added around 1/4 cup water and this was correct consistency for kal appam. For palappam you will need to thin it out further in order to spread around the vessel.
Add a little at a time cos you dont want to end up with a really loose batter. I mostly try one appam and adjust the water consistency accordingly.
To make appams, heat a tawa on medium heat (I have a flat ceramic hob so i cant use the traditional appam chatti due to its curved base).
Pour a ladle full of batter and wait for the bubble to slowly start showing.
Cover with a lid and cook for about a minute or so, till there is no raw batter visible.
Serve warm with curry of choice.
Notes: You can store this batter in the fridge for about 4 to 5 days and use as required.
You can also make the normal palappam as well with this recipe.
Since i live in a cold country, i sometimes adapt to methods to make the batter rise. I usually dont have any problem with this batter as it seems to rise after 4 hours without any prompting. But i do keep in a warm oven or an airing cupboard for the process to be quicker. Otherwise its mostly kept covered in a room which has the heater running or on a window ledge with sun directly on it.
I've mentioned not to use roasted rice flour and rava, but truth be told, i once did use roasted one and it came out fine. Dont take my word for it, just use the un roasted one :)

Tuesday, 14 March 2017

Brioche French Toast

db9479a8-13fa-4709-8e4d-4e424f7cd43c
Serves 3 as part of breakfast
Whole milk- 1 cup
Double cream- 1/4 cup
Eggs- 3
Vanilla extract- 1/2 tsp
Dark brown sugar- 1/4 cup
Salt- a pinch
Brioche bread- 6, one inch thick slices
Butter- 1 1/2 tbsp

Whisk together the milk, double cream, eggs, vanilla brown sugar and salt in a bowl until well combined.
Arrange the brioche slices in a high rimmed baking tray, without overlapping each other
Pour the milk-egg mix over the bread slices, making sure all the pieces are soaked.
Cover with a cling film and leave in the fridge for about an hour.
Remove after 2 hours and flip the bread slices over, carefully.
Cover with cling film and place back on the fridge for another hour.
73829406-c65e-41cc-b224-ee5b5e7ec89a 
When ready to cook, place a frying pan over medium heat and melt about 1/2 tbsp butter.
Fry the bread slices till they turn golden brown on both sides. 
Do them in batches of 2, as its easier to manage. Make sure you dont burn them. 
After each batch, add more butter, 1/2 tbsp at a time and continue frying.
If you feel the butter is getting burnt, use a kitchen towel to wipe off the burnt butter before proceeding with the next batch.
Dust some icing sugar on top and serve with honey, maple syrup or golden syrup and fruit on the side.
If you would like to try a butterscotch brioche bread pudding, you can find the recipe here

Notes: Add 1/2 tsp cinnamon or a pinch of nutmeg to the batter for another version.
Soaking the bread till all of the liquid is used up is ideal, but if you are short of time, you can leave it for just half an hour or so just till the bread slices are pretty well soaked.
I fried the bread in my Le Creuset cast iron pan and it worked wonders because of the heat retention.

Thursday, 14 May 2015

Harissa spiced eggs on cheesy English muffins

IMG_6220
My boss Dora is one of the best cooks I've come across. Till we moved to our professional kitchen a year back, I had the privilege of enjoying some of her cooking during lunch breaks and it was my first foray into the world of French food. Not only are her creations delicious, the fact that she used to whip them up in no time was something that amazed me. Be it a simple puff pastry pizza, or her signature vegetable lasagna- the taste was consistent all throughout, not to mention the copious amounts of mint tea we used to drink during brainstorming sessions.

I mentally wrote down her quick recipes and of course threw so many doubts her way as well. She is the one who made me experiment with aubergines for the first time, and enjoy fish in various forms (Ro secretly thanks her for my tolerance to mackerel now). Dora's Tunisian routes (which is her strong point, even when it comes to macaron flavours) made the dishes even more interesting. She introduced me to harissa, ras-el-hanout, brik pastry and so many other ingredients and dishes that were then new to me.
IMG_6234
This recipe or rather creation is truly Dora's. When we were short of time she would whip this up in a matter of minutes and i would devour it without batting an eyelid. I have watched her do it so many times, but even now it just doesn't taste as unique as hers. I remember making it at home the first time and it was an instant hit with Ro. I have then made it at several brunch sessions and everyone s absolutely enjoyed it.

Over time i changed the procedure and ingredients a bit, but it still is hands down one of the best recipes I've learnt from Dora. I have also used the authentic home made harissa paste she gave me, which is as authentic as it can get.. Once you taste the real thing, you will not want to try any of the store bought versions.
IMG_6188
On a different note, i think i have cracked my lighting issue. It's still a bit harsh, but i have narrowed down my light source and that is half of the issue sorted there. Now i just have to play around with diffusing and stuff to get it right. Talking about photography, this recipe goes straight to the #happyeggtastemakers challenge this month, which is to cook something using the happy eggs co and photograph it using food stylist and instagrammer Marte Marie Forsberg's top 5 tips for creating the best looking food. I hope i have done justice to the image, seriously, it tasted fab.

This harissa spiced baked eggs are so easy to make, you have to try it out. You can do so many different versions of it, and it would just not go wrong. Thank you Dora, for all those cooking lessons which you unknowingly instilled in me. I really do miss it :)

Serves 2
IMG_6194
English muffins- 2, sliced in half to get 4
Cheddar cheese slices- 4


Spring onion greens- 2 tsp (to garnish)

Olive oil- 1 tbsp
Shallot- 1 large, finely chopped
Bell pepper- 1, finely chopped
Garlic- 1/2 tbsp, finely chopped
Harissa paste- 2 generous tsp
Tomato- 2 small, finely chopped
Double cream- 1/4 cup
Salt and pepper- to taste
Eggs- 4
IMG_6239
Preheat oven to 175C and line a baking tray with foil paper.
Place the muffins, cut side up and top with the cheddar cheese slices
Heat the oil in a cast iron skillet and saute the shallot, bell pepper and garlic till soft, around 3 minutes on medium high heat.
Make a paste with the harissa and some water and add to the pan.
Stir till it loosens and coats the vegetables.
Add the tomato slices and cook till they turn mushy, after which you pour in the double cream and mix it all together
Season with salt.
Separate the mix in a few places and break the eggs into them.
Break the yolk and stir it gently into the mix. This is purely optional, you can of course leave the yolk intact
Bake for 10 minutes, or till the eggs are cooked. 
Around 5 minutes into the baking time, put in the tray with the muffins.
IMG_6213
Once done- the eggs cooked and the cheese on the muffins melted, take them out of the oven, wait for a few minutes for the bubbling to settle.
Slice the baked eggs into four and place on the cheesy muffins.
Garnish with spring onions and serve warm.

Notes: You can use bread slices, ciabatta, crumpets (these are the best) and any break of choice as the base
Add prawns, shredded chicken, minced meat etc to the mix before topping with the egg

With thanks to the happy egg co for the voucher

Thursday, 29 January 2015

Spanish scrambled eggs with spinach and chorizo

IMG_5465 
Breakfast is something i struggle with on days i have to head into work. I usually take the easy way out and have a bowl of cereal, or toast with some hummus or egg mayo or some days i don't even have breakfast, leaving me hungry by around 12 and with a bad headache. I promise myself i will never do it again, but thinking about being able to sleep that extra 10 minutes by skipping breakfast seems much more appealing when you turn off the alarm.

Ro on the other hand will not go a single day without breakfast. I really wonder how someone can have the same darn thing every single day for the past couple of years. Just recently he decided he wanted to alternate between fruits and toast and in spite of me saying id make him some hot breakfast (secretly hoping he'd say no) he declines.
IMG_5477 
Its only on weekends that we indulge a bit and make eggs (with bacon or sausage sometimes) or have a slightly more elaborate brunch with French toast, pancakes and the like. I love eggs in any form and given a choice would have it every day. So i was very happy to be selected as one of the Taste 100 #happyeggtastemakers by The Happy Egg Company, who pride in the fact that happier hens lay tastier eggs. Every month we are given a couple of activities to do and even though I've been thoroughly using the eggs in my cakes and bakes, I've not really been able to take part in those due to something or the other cropping up last minute. Today is the last date to submit this challenge and i thought i should somehow meet deadlines at least this time.

The challenge was to come up with a scrambled egg recipe of your own incorporating a vegetable or source of fish or meat, a herb or spice and a surprise ingredient of choice. I broke my head a bit and did come up with some interesting combinations but it all went down the drain when i saw a pack of chorizo half price at Sains. Its my favourite and i immediately decided to do Spanish style scrambled eggs instead. Its spicy, flavourful and so easy to whip up. Have it for breakfast on toast or with some Indian flat bread for dinner. We loved it both ways.

Serves 2
IMG_5441 
Chorizo- 1/4 cup, diced finely
Shallot- 1 small, finely chopped
Garlic- 3 pods, roughly chopped
Spinach- a generous handful
Peppers- half of one, diced
Paprika- 1/4 tsp
Eggs- 3 large
Milk- 2 tbsp
Salt- to taste
Spring onion- 1 tbsp of just the greens to garnish (optional)
IMG_5467
Cook the chorizo in a frying pan till done. 
Drain on to paper towels and keep aside. 
If there is a lot of oil that has oozed out of the chorizo, drain some of it and use the remaining to continue cooking. \its really flavourful oil, you don't want to throw it off.
throw in the shallot and garlic and saute for about 4 to 5 minutes, till the onions start sweating a bit. You don't want them golden brown.
Simultaneously, whisk together the eggs and milk in a bowl until slightly frothy. Keep ready
Add the spinach and peppers to the frying pan, and continue cooking till the spinach has wilted. The peppers need to retain their crunch.
Add the paprika and salt to taste and give a quick mix.
make a well in the centre and pour in the whisked eggs.
Let it stay for a about 15 to 20 seconds without stirring and then using a wooden spoon stir it up and fold, while mixing all the other ingredients.
Continue the stirring and folding till your eggs are cooked and they look fluffy. Don't over do the cooking or else they'd turn dry. 
Transfer on to serving plates, garnish with spring greens and serve with toast.
IMG_5469
Notes: You can use prawns or even shredded chicken or pork instead of chorizo
Some Monterey Jack cheese would have been a fab addition, but i didn't have any.
Garnishing with coriander leaves give it a sort of Mexican flavour which i absolutely love.

With thanks to The Happy Egg Co. for the voucher to be redeemed against a carton of eggs.

Sunday, 10 March 2013

Apple pie pancakes and OXO pancake kit review

IMG_7230
I have a love hate relationship with apples. I mean I love apple pie and apple turnover and apple cakes and stuff, but biting into an apple as a snack or so is not preferred. That said, if I'm given a slice or two, I'd eat it without complaint. Ro has taken a liking towards apples (????!!!) and we now have apples lying around all the time. He will soon get over it, I know! ...its like his pear phase, or green tea phase. But till then, I have to play along. 

I guess a whole lot of you know about Shrove Tuesday or Pancake day as its more commonly referred to as? It was on the 12th of Feb and I was sent the OXO pancake kit to review. Due to busy schedules, I could not post it on the day or after the day or even a week after, but finally got around to doing it today. Almost a month later, but better late than never right?
IMG_7204-1
Anyways, talking about OXO. Its one of my favourite brands and I have quite a few OXO products in my kitchen. The pancake kit which comprises of a batter bowl, whisk and pancake turner is a welcome addition to my already existing collection. I have had terrible luck with whisks, it breaks on me or is too flimsy to do its job properly and just when I was ready to give up, the OXO Good Grips Balloon Whisk makes its appearance. Its so sturdy that I can whisk the hell out of a batter or sauce and it doesn't give up. Heck, I even whisked cream to stiff peaks using the whisk. The silicone flexible pancake turner is another fabulous piece. The size makes flipping pancakes a treat and since I don't make pancakes that often, I have been using it for omelettes and rotis and anything that needs to be flipped (pun intended). The batter bowl looks different from all the mixing bowls I own, and has a handle which I thought was a fabulous addition. Its so much more easy to handle a bowl when you can hold it properly, trust me! It has a beak which makes pouring out batter easy as well. Although I must admit, I tried to pour out the pancake batter on to the pan and it was a bit of a disaster. But that could also be because I am, in general, clumsy.

I decided to put the pancake kit to full use by making apple pie pancakes. Its a wee bit time consuming, especially if you don't have apple sauce ready but it tastes fab nonetheless. I doubt this would make it to a breakfast table, but certainly for brunch if you ask me. The apple sauce makes the pancakes super moist and well, apple-like and the cinnamon is what takes it to a whole different level. Try these for your next brunch session and your husband, kids, boyfriend, parents... would thank you :)

Recipe adapted from here (serves 2 to 3)
IMG_7235 
Plain flour- 2 cups
Sugar- 1/4 cup
Baking powder- 1 tsp
Baking soda- 1/2 tsp
Salt- 1/2 tsp
Cinnamon powder- 2 tsp
Grated nutmeg- 1/4 tsp
Buttermilk- 2 cups
Apple sauce- 1/4 cup (recipe follows)
Eggs- 2, medium
Milk- 1/4 cup (give or take a tsp or so)

Apple sauce (recipe adapted from here)
Apples- 2 medium, peeled, cored and cut into cubes
Cinnamon- 1/4 tsp (optional)
Lemon juice- 1 tsp
Brown sugar- 1 tbsp
Water- 2 to 3 tbsp

Topping
Apples- 2 small, peeled, cored and sliced into thin wedges
Brown sugar- 1 tbsp
Butter- 1/2 tbsp
Maple syrup- to drizzle

IMG_7227
In a sauce pan mix together all the ingredients for the apple sauce.
Bring to a boil and then simmer for about 10 to 12 minutes, or till the apples become soft and of mashable consistency.
Keep aside to cool a bit and then blend to a purée using an immersion blender or food processor.

For the topping, melt the butter and sugar in a sauce pan.
Add the apples to the mix and toss around, making sure its all well coated.
Cook till you see bubbles around the edges.
Don't over cook the apples, they should still be a bit crunchy.
When done, take off heat and keep aside.
28-1
Whisk together all the dry ingredients (from the pancake section), basically the first 7 ingredients, in the batter bowl.
In another bowl mix the buttermilk, apple sauce and eggs till just combined.
Pour the wet ingredients into the dry ingredients and whisk till the batter comes together. Make sure there are no lumps of flour. It wont be a smooth batter, though.
Add milk bit by bit just until you get that pourable consistency, making sure you don't over whisk the batter.
Heat a frying pan and when hot pour a ladle full of batter on to the pan.
Wait for small bubbles to appear on top and when they just start popping (in around 2 to 3 mins), you are ready to flip.
Cook for a further 2 minutes or so and then take it off the heat.
Continue till all of the batter is used up.
If you are not having them immediately, don't stack them up, instead, place them side by side on baking paper. 
When ready to serve, gently warm them up in a preheated oven (at 90C) for around 15 to 20 minutes.

To assemble, stack two to three pancakes on top of each other and add a layer of the apple topping and a generous drizzle of maple syrup.  
Continue till your pancakes are all used up, but make sure the top most layer is apple.
Give a dusting of powdered sugar or even cinnamon and you are good to go.
IMG_7256
Notes: You can also use a potato masher to mash the apple sauce, but i feel small chunks would remain, which of course is not an issue.
Add chunks of apples to the batter if you prefer that instead of the apple sauce.
I love cinnamon, but if its not your thing then reduce the quantity used.
You can do the same with any firm fruit of choice- nectarines, pears, apricots etc.

With thanks to OXO for sending me the pancake kit to review.

Sunday, 9 December 2012

Smoked salmon- two ways

IMG_5133
It's beginning to look and feel a lot like Christmas this side of the pond. Temperatures have significantly dropped and a white Christmas is predicted for London this year. We did have our tiny stint with snow recently, but thanks to a drunken night out, I happily missed the snowfall (or flurries??) by sleeping in late. It wasn't that strong in Central London and since it didn't even settle on the ground, there was no proof that it actually snowed. I was, needless to say, a bit bummed that I missed the first snow fall of the season, and added to it was everyone flaunting snow pics and status updates on FB. I am praying it does snow like crazy one of these days, much to the husbands annoyance :)

I know we are all running around trying to get gifts sorted in time for the big day. If you want some cool Christmas gift ideas visit The Handpicked Collection online store for some inspiration. The pretty heart shaped chopping board in the pic was my Christmas gift from the lovely people over at The Handpicked Collection. Also, they have launched The Handpicked Food Store online which features award winning smoked salmon and other fine foods from artisan British producers, handpicked by food experts. I was sent a smoked salmon taster to review from the store, and I decided to go ahead and use it wisely in a dish, or two.

Smoked salmon-cream cheese sandwich (makes 4 finger sandwiches)
IMG_5251 
Smoked salmon- 3 to 4 thin slices
Green cucumber- peeled and sliced into 8 small rounds
Whole wheat bread- 2 slices (use white if preferred)
Cream cheese- 2 tbsp
Chives- 1 tsp, finely chopped
Salt and pepper- to season (optional)

Mix together the cream cheese and chives and spread the mix on the sandwich slices.
Top with smoked salmon slices. Trim to required length, if necessary.
Place the cucumber rounds on top of the salmon and season with salt and pepper.
Finally, top with the remaining bread slice, cheese side facing downwards.
Using a serrated knife slice the sandwich into quarters and serve with some crisps.

Notes: Use a mayo-chive mix if you don't have cream cheese.
Slice off the edges from the bread if you want to, but we keep it on 
You can flavour the cream cheese with lemon, garlic, parsley etc etc.

Smoked salmon breakfast bruschetta (makes 2)
IMG_5179 
Sour dough bread- 2 slices, toasted just before assembling
Butter- 2 tbsp
Eggs- 2, well beaten
Tomato- 1 small, cut into rounds
Salt and pepper- to taste
Chutney- 2 tsp (optional)
Smoked salmon- 2 thin slices, diced into long strips
Chives- finely chopped, to garnish

Heat a non stick frying pan and melt 1 tbsp of butter.
When bubbling, add the tomato rounds and fry on medium heat till done and slightly charred. About 3 to 4 minutes.
Flip the rounds and fry for a further 3 to 4 minutes.
Remove with a slotted spoon and drain on paper towels. Season with enough salt and pepper.
Into the same frying pan, add the eggs and scramble till the eggs are cooked, but don't dry it out too much.
Season with salt and pepper, give a final stir and transfer to a bowl.
IMG_5173
To assemble, place the toasted bread on to serving plates and butter them well using the remaining butter.
Add a layer of chutney (if using) and spread it as evenly as possible.
Top with the grilled tomato followed by scrambled egg and slices of smoked salmon
Drizzle some of the chutney on top of the salmon, garnish with chives and serve immediately.

With thanks to The Handpicked Collection and Handpicked Food Store for samples 

Tuesday, 4 December 2012

Mysore masala dosa and an event announcement

IMG_5463
Before you go ahead and judge me by saying, omg another dosa recipe, who needs that? let me confirm that its actually for my benefit than yours because i really had to have a fool proof recipe on record since my life was wasted searching the internet for chutney and masala recipes. I don't make my own dosa batter, let me make that very clear, and am very happy with the results the ready made dosa batter gives me. 

I also suck at making a normal sambar and an even simpler chutney which is why I like to serve dosa with chicken curry (for dinner that is) and idli with fish curry. Have you tried the combo? Its divine, really it is! But on some very rare occasions, I feel like going all out and the Mysore Masala Dosa was an after effect of one of those days. 

I have fond memories of Mysore masala dosa and I don't think i have had any as good as the ones from Sangeetha restaurant in Nungabakkam, Chennai. My hostel was just around the corner from the restaurant and on Sundays, usually after a hang over from hitting the clubs the previous night, we would all wake up by around 11 or 12 and conveniently miss breakfast at the hostel (which would be upma or something uninteresting like that). With rumbling tummies we would then start discussing brunch/lunch options. Ideally it would be Crescent hotel which we would want to go to, for their yummy Prawn biryani (which btw if you haven't tried, YOU SHOULD!), but mostly we would all be broke and so Sangeetha Vegetarian restaurant would be our next best choice. And the Mysore masala dosa there is perhaps one of the best i have ever had. Let me assure you, this is no where close to what they serve, but it was good enough to shut me up about Mysore masala dosa for a while.
IMG_5452
I would suggest you make all the items a day ahead so you dont ruin the whole assembling process. My dosa making skills are not so good and mostly the first 2 or 3 dosas always get dumped. Either the heat is not right or the spreading is not correct or something usually goes wrong. I also like my dosas crispy and so this time I was determined to make them right so I could take a few pics, which is no easy feat. One, because there are not many ways to make a dosa look appealing and two, they don't really stay crisp for that long. So this was the best I could do :)

For a recipe for perfect dosa batter, check out this informative post by Sala here
If it's idli's you are looking for then Nags has summed it up pretty well in her post here

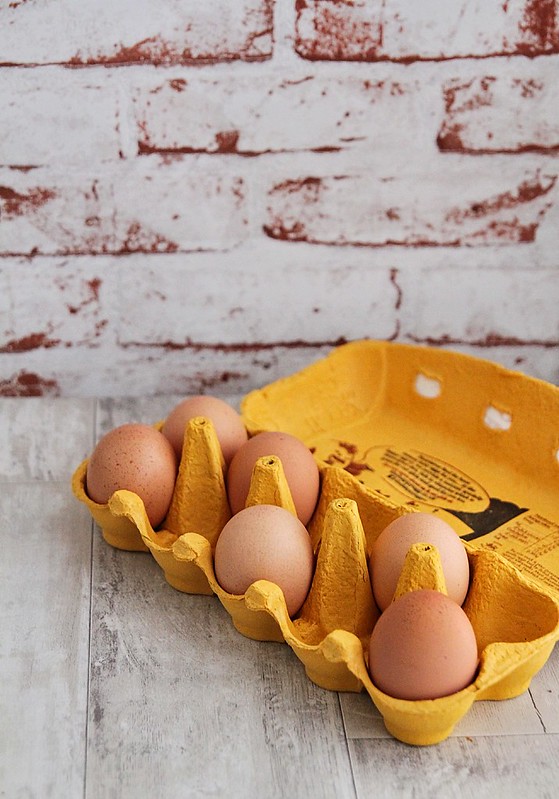
I, on the other hand, use the store bought batter for both idli and dosa. I always freeze the batter the day i pick it up and it stays for a really long time. I thaw it at room temperature and use it as desired. I usually make idlis the day I open it. I mix a tsp of baking soda to the batter and leave it for about an hour. This has fetched me really really soft idli's. I then thin down the batter with some water for using it in dosas, or if I'm up to it I separate them in the beginning itself and use them accordingly. But really, if you are up to making your own batter, follow the above mentioned links like the Bible :)
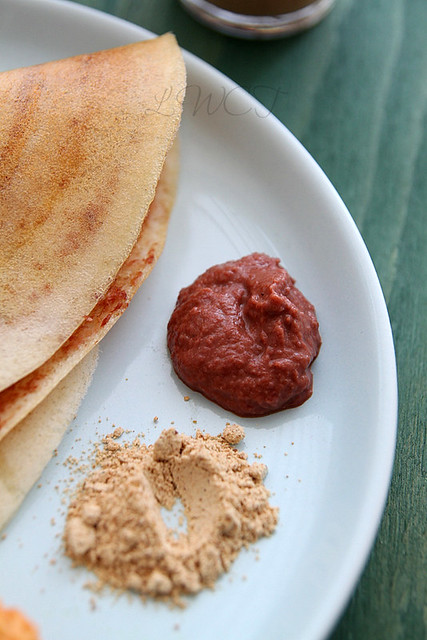
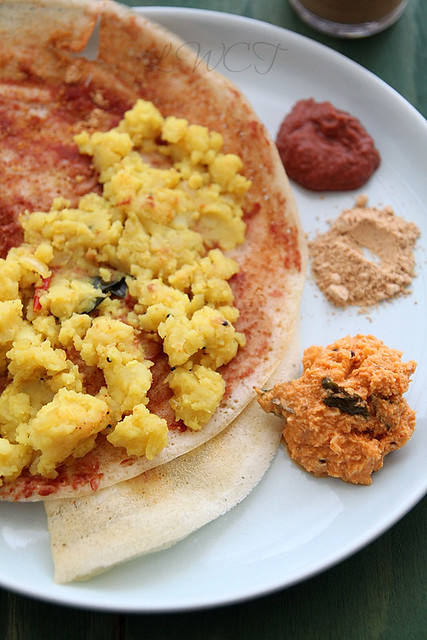
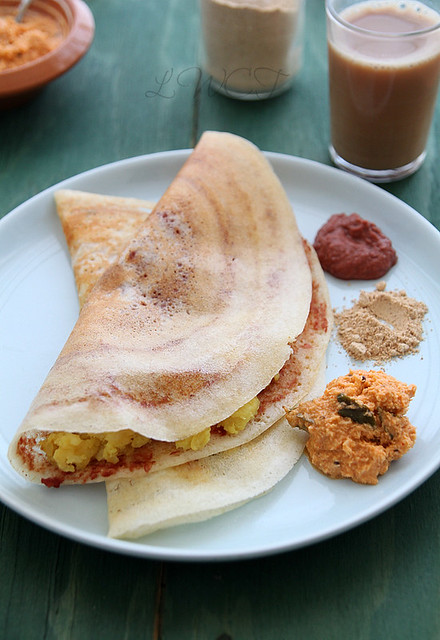
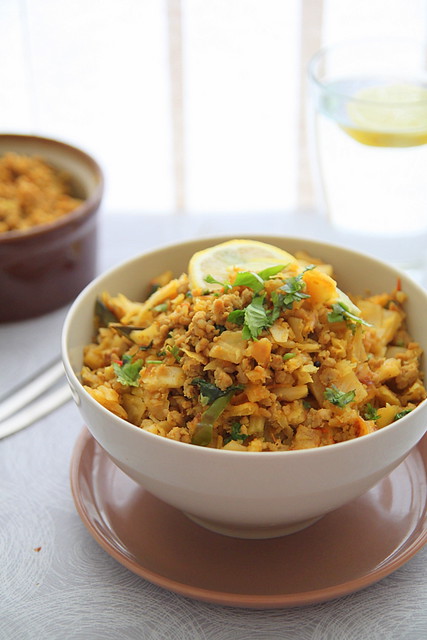
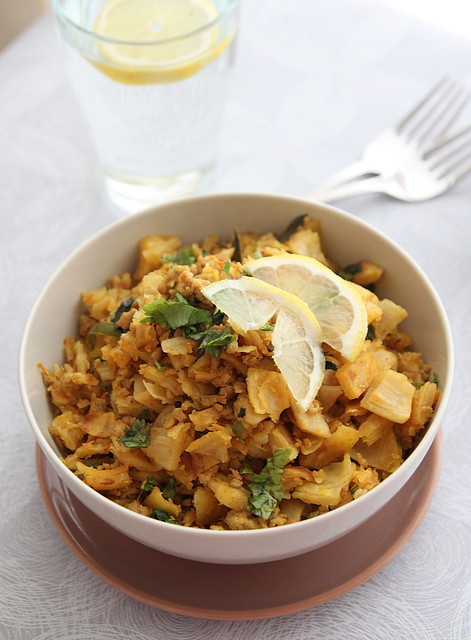
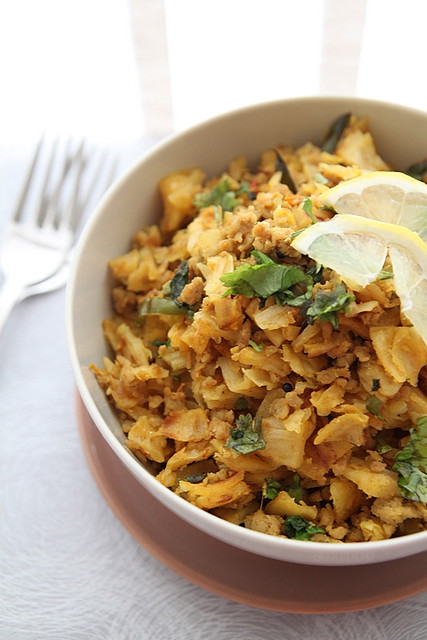
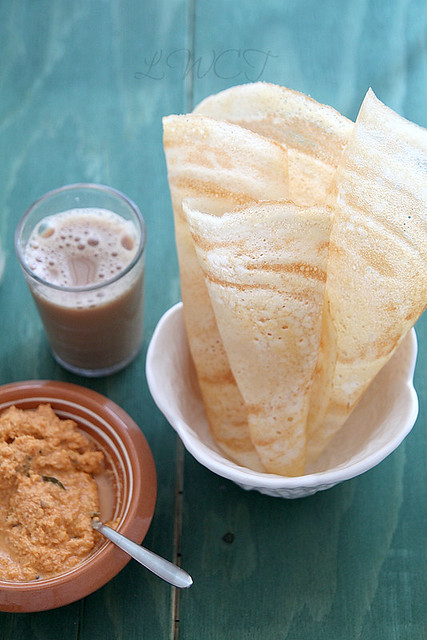
Mysore masala dosa
Dosa batter- around 1 cup
Ghee- enough to drizzle

For the filling
Idli podi/ mulaga podi- here & here (I buy mine from the store. Yes, I am a disgrace to the food blogger community)

Onion chutney
IMG_5478
Red onion- 1 medium, roughly chopped
Garlic- 4 to 5 pods, peeled and roughly chopped
Chilli powder- 1 tsp
Tamarind paste- 1 tsp
Salt- to taste
Oil- 1 tbsp

Heat oil in a pan and add the onions and some salt
Sauté on medium heat till they become a light brown in colour.
Add the chilli powder and continue to cook for a minute or so. 
Remove from heat and leave aside to cool for a while.
Add the cooled mix, garlic and tamarind paste and blend to a smooth consistency.
Resist the urge to add water, but if absolutely necessary, add a tsp or so and increase gradually.
You can do the above without cooking the onions by pulse all the ingredients in a blender. I find it a bit too overpowering and so I cook the onions.

Potato masala
IMG_5470
Potaoes- 2 medium, quartered and pre cooked
Mustard seeds- 1/2 tsp
Curry leaves- a sprig
Asafoetida- a generous pinch
Onion- 1 medium, thinly sliced
Ginger- 1.2 inch piece, thinly sliced (optional)
Green chillies- 2, slit
Turmeric powder- 1/4 tsp
Salt- to taste

Break down the pre-cooked potatoes using a fork, but don't mash it up. Keep aside.
In a kadai heat the oil and temper mustard seeds, curry leaves and asafoetida.
To this add the onion, ginger and green chillies and cook till the onions wilt and turn a light brown colour.
Add the turmeric powder and cook for a minute or two after which you dump in the potato and give a good stir, making sure the potatoes are well mixed with the masala.
Check for salt, add a dash of water to prevent it from drying out and cook for a further 2 to 3 minutes after which you can transfer the masala to a serving plate and keep ready. 

Accompaniment
Sambar- here & here

Coconut chutney (recipe adapted from here)
IMG_5477 
Grated coconut- 1/2 cup
Shallots- 1 small, roughly chopped
Ginger- 1/2 inch piece, peeled and roughly chopped
Chilli powder- 3/4th tsp
Water- 2 tbsp, adjust accordingly
Salt- to taste
Oil- 1 tbsp
Mustard seeds- 1/4 tsp
Curry leaves- a sprig

Grind together the coconut, shallots, ginger, chilli powder and salt with the water in a blender till you get a smooth paste.
In a saucepan, heat the oil and splutter mustard seeds and curry leaves.
Keep the heat to medium and pour in the coconut paste mix along with about a 1/4 cup of water.
Cook, stirring continuously, till you see the steam coming from the spatula when lifted off the chutney. 
make sure the chutney doesn't boil.
Also adjust water according to taste. I like mine a wee bit thick, so i reduced the water.

Assembling
IMG_5466
Keep a non-stick dosa tawa over medium heat.
When ready, add a ladle full of dosa batter and spread it in a circle.
Drizzle a spoon full of ghee over the spread out batter and along the side, lightly dabbing it into the batter. Wait for the dosa to slightly cook.
Spread a spoon of the onion chutney, sprinkle some idli podi and cook till the dosa slightly crisps.
Finally top one half of the dosa with a generous serving of the potato masala, fold over and cook for a minute or two after which you can transfer to a serving plate.
have them warm with a side of the chutney or sambar.

Bloggers' Buzz event announcement

A bunch us food bloggers met early this year in London and we had such a blast, we thought it was high time we took this whole thing to another level. So we brainstormed a bit and came up with Bloggers' Buzz, a platform for like-minded people to come together to share their passion for one thing- FOOD.

This is going to be a one day event with food blogging related master classes like basics in food photography, ethics and copyright, monetising your blog etc. and there will also be loads of networking opportunities with those attending. If that's not good enough then wait till you see the fabulous sponsors that we have roped in for the event and we assure you, you will be leaving the event with a big smile, some new friends and a goody bag full of surprises.

If you are a food blogger based out of UK or Europe or someone who simply fancies food in general, then this is definitely where you need to be. Do check out our official event blog http://bloggersbuzzuk.blogspot.co.uk/ for more details and updates and register right away as we have some really cool prizes to be won for a few competitions we will be running from Jan onwards. If you would like any more details regarding this, drop in a line to Nupur at bloggerbuzzuk@gmail.com or just leave a comment on this post :)

We are counting on you guys out there to make this event a success. So do book a place and feel free to spread the word. The more! the merrier!

With loads of love and Christmas cheer,
The Bloggers' Buzz Team

Tuesday, 6 November 2012

Blueberry breakfast muffins

IMG_3856
The husband started complaining about how boring his morning breakfast of toast, butter and cold meats were getting too monotonous and I thought I'll whip up some blueberry muffins for him. The muffins came out ok but our gluttonous minds set to work the moment they came out of the oven and so we were left with around 3 by the next morning. Since its just me and Ro doing all the eating, I usually make small quantities of all the cakes and bakes and cookies and such. This was no exception and yes, out of 8 large muffins, we ate around 5 within a time span of about 3 hours and then resisted the urge to have them as dessert after dinner.

So the muffins lasted for exactly one morning and it hasn't made its way through ever since. But please don't judge them by what I just said. It's got nothing to do with taste, just that blueberries went out of season right after this and the husband went back to having toast and cold meats because the muffins still left him hungry!!!!

I have tried making muffins numerous times before and except for the time I tried them with whole wheat, the rest have all been disastrous. I keep wanting them to taste (and look) like the Starbucks ones, but they don't come anywhere close. These, however, were moist, easy to put together and good to look at, and I was sold. If I ever make blueberry muffins again, I shall be sticking to this recipe. Well unless Starbucks actually gives me the recipe for their mother of a muffin :)

Recipe adapted from here (makes 8 of them)
IMG_3881-1 
Egg- 1 large
Sugar- 1/2 cup
Vegetable oil- 1/4 cup
Vanilla extract- 1/4 tsp
Plain flour- 1 cup
Salt- 1/4 tsp
Baking soda- 1/4 tsp
Plain yogurt- 1/2 cup
Blueberries- 1/2 cup (heaped)
IMG_3863-1 
Mix together flour, salt and baking soda in a small bowl. Keep aside
In a large mixing bowl, using a wire whisk or a wooden spoon, beat the egg till light and fluffy.
Gradually add in the sugar, while continuously whisking, followed by oil.
Stir in the vanilla extract.
Tip in the dry ingredients alternating the yogurt and mix it all in, without any traces of flour being obvious.
Slowly fold in the blueberries and using a large ice-cream scoop add the batter to a muffin pan, lined with muffin cases/ cups.
Bake in an oven preheated at 200C for about 20 to 22 minutes or till a skewer comes out clean (if you by chance pierce a blueberry, it wont come out clean, so don't take that into consideration)
Transfer the tray on to a wire rack and after about 5 minutes, remove the muffin cups and leave to cool completely.
Stays fine at room temperature for 2 days.

Notes: Original recipe calls for sour cream, but I had only yogurt at hand and used it instead. came out super moist whatsoever.

Tuesday, 18 September 2012

Curried spinach and mushroom tarts

IMG_3386-1
I have this knack to do things wrong. Its not a very frequent thing (although if you ask Ro, he would say its a recurring event), but since you cant ask him, I'm just going to go ahead and say its not always that I do idiotic things. I have the inane ability to tear packets and boxes without reading instructions. I rip them apart the wrong way which in turn makes it impossible to seal them back and then I have to hide it from Ro (who is annoyingly systematic and precise) so I don't get a dose from him. I attribute it to my 'no patience' trait which I don't know who I inherited from..mum, dad??? a little help here???

So the latest to the list are these mini tart tins. Every day for the past couple of weeks I used to pass by it in Sainsburys and notice that it was on a roll back- 3 pounds for 4 mini pans- but I could never decide whether or not I wanted it. I mean you get the sweet and savoury pre-made tart shells to buy so why bother to make them from scratch, was my logic.
IMG_3361 
Until one fine day I woke up and decided it would make a grand (also, unnecessary) addition to my already existing pans and pots, and also I could make tarts from scratch, show off a bit and blog it. Afterall how difficult is it to store 4 small tart tins. So off I went to Sainsburys and what do I see? Its no longer on a roll back but the damn thing now costs 5 bucks for 4 tins. Without even flinching (ya all that logic went down the drain) I put them in my basket, since by then I was already psyched about wanting tart tins and making some tarts for dinner that very day. 

I was also instantly lazy to make pastry from scratch so I picked up ready rolled pastry, did a tiny skip and headed home with my bounty. The tarts came out well, to say the least. In fact super duper well and I am very proud of my acquisition, although Ro later pointed it out to me that they weren't dishwasher safe, oh well bummer! But since he does the dishes anyway, I gave some gyan about how they are 'never' dishwasher safe. He bought it since he has no clue about tart tins :) :) :)

So yes, I do stupid things like that. But thanks to this trait of mine, you now get to see these yummy spinach and mushroom tarts. They are more quiche-like, and is a great breakfast item. Ro is now in the 'i am sick of bread for breakfast' phase and so I am trying to make some fun breakfast items for him. I hope he snaps out of it soon, because I sure am running out of ideas. Spinach and mushrooms are a fav combination of mine and I end up using it in pasta bakes, stir fries and such. Give it a go, and if you don't like it, you can come back and leave hate comments ;)
IMG_3376 
Makes 5 to 6 small tarts
Shortcrust pastry- 1 sheet (recipe follows)
Shallots- 2 medium, thinly sliced
Button mushrooms- 150 gms, cleaned and sliced
Spinach- 100 to 125 gms, washed and chopped roughly
Garlic- 2 tbsp, chopped fine
Curry powder- 1/2 tbsp
Eggs- 2 large
Cheddar cheese- 1/4 cup, grated
Milk- 3/4th cup
Butter- 1 tbsp
Salt and pepper- to taste

Pastry recipe adapted from here
Plain flour- 200 gms
Baking powder- 1/4 tsp
Salt- 1/4 tsp
Cold butter- 100 gms, cut into cubes
Cold water- 3 to 4 tbsp/ as required
IMG_3367-1
Mix together the flour, baking powder and salt in a large mixing bowl.
Add the cubes of butter and rub it into the flour, using your hands. It should resemble coarse bread crumbs.
Add the cold water bit by bit till it all comes together and you get a soft pliable dough.
Cling wrap it and place in the refrigerator while you get the filling going.

Meanwhile, melt the butter in a frying pan and sauté onions and garlic till soft and fragrant, for about 4 to 5 minutes on medium heat.
Add the curry powder and mix thoroughly.
Throw in the chopped mushrooms and sauté till all the water evaporates and is dry.
Finally, add the spinach, salt, a few twists of pepper and cook till the mixture becomes semi-dry in consistency. It shouldn't be too dry, but all the water from the spinach should have disappeared.
Transfer to a bowl and keep aside to cool.
Break the eggs into a bowl and whisk lightly.
Add the milk, season with enough salt and pepper and whisk the mixture well. Keep aside.
IMG_3375-3
When ready to bake, pre heat oven to 180C and lightly grease the tart tins with butter or oil.
Take the dough out of the refrigerator and roll it out on a lightly floured surface.
Cut out circles large enough to fit the tart tins and carefully place the pastry into the cases. Crimp the sides if required. Don't press it in too hard, taking them out can be a problem.
Add about 2 tsp each of the filling into the tart tins, spread it around and pour the milk-egg mix on top of the filling till about 3/4th full.
Repeat till all your filling and milk is used up.
Sprinkle the cheese on top of the filling and place all the tins on a baking tray.
Bake for about 20 to 25 minutes or till the eggs are cooked through. 
Once done, cool on a rack for about 15 minutes and then carefully unmould.
They taste the best on the very same day, but I stored them in an air tight container in the fridge for up to 3 days and used to reheat in the microwave for about a minute or two. Was perfectly fine!
IMG_3391 
Notes: You can either roll out the large ball of pastry and then use a lid or bowl to cut out circles or make small balls from the dough and roll it out to the size of the tart tins. If you already have rolled out pastry, then the first method works best.
Although I bought ready made pastry, I have used Maria's pastry recipe before and it is very easy and works great.
Use any filling of choice, eg, shredded chicken, sausages or even paneer. Paneer and spinach is a great combo BTW!
Store leftover dough, cling wrapped, in the freezer. Thaw completely in the fridge compartment and use as required.
Instead of milk, use double cream for a more richer filling.
Curry powder can be replaced with any meat/chicken masala.

Monday, 30 July 2012

Banana and macadamia loaf

IMG_2560
It's been a while isn't it? It's been pretty chaotic around here with guests one after the other. On the other hand, I thoroughly enjoyed my 3 weeks with the sister-in-law. I cant begin to say how much fun it was shopping, gossipping, bitching, partying, lunching and sightseeing. Ro was going mad with two girls sitting and bickering about anything and everything that at the end of 3 weeks he even knew a tad too much about the reality show on telly 'real housewives of OC and NYC.' :)

I have exactly one week of rest before my in-laws get here for another 3 weeks of non stop sightseeing. I am slightly sick of London in general and cant handle any more touristy things, lucky for me Ro is on leave for 2 weeks and he can do the needful, I hope. To add to it, the Olympics has created major chaos for us, especially because we are in the midst of it all- 2 venues within 10 minutes of where I live...sigh!

I haven't cooked anything major in the past 1 month and I don't intend to do so in the coming weeks as well. Having gained a couple of extra kg's (thanks to all the binge eating) I am on a crash diet and has to reduce all that extra weight asap. Summer clothes look hideous on me and sadly all that extra fat cannot be hidden under jackets, thanks to the amazing weather we've been having.
IMG_2578
I don't think I will be able to visit all your gorgeous blogs in the coming weeks, but I am trying to update mine with a couple of scheduled posts and reviews which should take care of matters for at least 3 weeks. In the mean time, here is a banana loaf from my drafts, which I made a month back and was a hit breakfast item.

I must admit, although I'm a big big fan of bananas, I have not liked any banana based bakes I've made at home. Muffins, breads, cakes, nothing hit the spot for me, maybe because the bananas we get here are quite tasteless, not sweet at all and once they are out of the oven, the weird worm-like strings is somehow a total put off. So I resort to buying amazing organic banana loaves from the grocery store and its perhaps one of the moistest and best banana breads I've had.

This time however, in spite of the bananas not being over ripe, I decided to purée it instead of mash it and voila, I got the desired taste and consistency- incredibly moist with no weird black strings and the nuts added that extra crunch. If you are not a fan of nuts, you can very well omit it.

Recipe adapted from here
IMG_2574
Plain flour- 200 gms
Baking powder- 2 tsp
Salt- 1/2 tsp
Nutmeg- a generous pinch
Butter- 140 gms, unsalted and melted
Granulated sugar- 200 gms
Eggs- 2 large
Vanilla extract- 1 tsp (optional)
Bananas- 3, peeled
Milk- 125ml
Macadamia nuts- 70 gms, roughly chopped
IMG_2581 
Slice the bananas roughly and purée till you can no longer see any chunks. You should get a mix that is not too watery. Use milk, a tsp at a time, if you need to. I didn't need to use any.
In a large bowl whisk together the first four ingredients. Keep aside.
In another mixing bowl whisk together melted butter and sugar till well combined.
Add the eggs, one at a time, beating well after each addition.
Pour in vanilla extract and mix it all together.
Add the puréed banana and whisk continuously till they are well incorporated into the mix.
Tip in the nuts and milk and fold gently, but till everything's mixed well.
Finally, add the dry ingredients into the wet ingredients bit by bit, whisking after each addition.
Pour into a loaf pan which is buttered and lined with baking paper and bake in an oven pre-heated at 160C for about 50 minutes to an hour or when a wooden skewer inserted in the centre comes out clean.
Take the tin out of the oven and cool for about 10 minutes after which you tip the cake onto a cooling rack and cool completely.
You can then dust with some icing sugar, if required, or serve warm with a dollop of buttah. Its sinful!
IMG_2568 
Notes: The original recipe called for self raising flour. If so just replace the flour with that.
There was also 1/2 cup of rum added to the wet ingredients. We are both not rum drinkers and so didn't have any at hand. However, brandy was an after thought and it was too late by then. If using rum, omit the milk and add that instead. I would do a glaze with it next time though :)
Use any kind of nuts- walnuts, cashew, hazel.
If you are not grossed out by the brown string like thingies from the banana, then fell free to just mash it up using a fork, instead of puréeing it. Puréeing however, made the cake super duper moist.

Friday, 8 July 2011

Kothu Paratha (finely shredded Paratha's cooked with meat and spices)

IMG_2952
My mom used to make kothu parathas with left over parathas and we used to love it. She used to do variations of it with bread and chapathi also. I have tried making the bread version here but it was pretty sad and so never really ventured into that again. I never really bothered making them with parathas because, for one I have no clue how to make parathas and two, store bought parathas were too precious to be torn up and used.

That's when I came across a frozen packet of 'kothu paratha' while scouting around the Indian grocery store. Picked it up thinking I'd give it a shot, hoping it would actually be worth it. My craving for kothu paratha made me prepare it the very next day for dinner. My mom and dad are holidaying In Delhi at the moment so I couldn't get the recipe she uses, but searched around a few blogs and came up with this. 

It tasted so darn good, I am kicking myself for not picking up more than one packet of kothu paratha. They are nothing but parathas shredded (which is for the plain lazy people like me). You can use left over chapathi's or frozen parathas for the same, but make sure you cook it before tearing it up. 
IMG_2986
Shredded paratha- 2 cups (about 5 to 6 medium size parathas chopped or shredded)
Onion- 1 large
Tomatoes- 2 medium
Ginger paste- 1/2 tbsp
Garlic paste- 1/2 tbsp
Coriander powder- 1 1/2 tsp
Turmeric powder- 1/4 tsp
Chilli powder- 1.2 tsp
Cumin powder- 1/4 tsp
Meat masala- 1.2 tsp (optional)
Minced chicken- 250 to 300 gms
Curry leaves- a sprig
Mustard seeds- 1/2 tsp
Oil- 1 tbsp
Salt- to taste
Eggs- 2, lightly beaten (optional)
Chopped coriander leaves- to garnish (optional)
If you are using frozen parathas or chapathis, then cook them on the tawa as per instructions and then chop it up or shred it. Keep aside.
In a large frying pan, heat the oil and splutter mustard seeds, followed by curry leaves.
Then add the chopped onion and sauté till it wilts a bit and turns a light brown.
Add the green chilli, ginger, garlic pastes and mix well. Cook till the raw smell disappears.
Throw in tomatoes and cook till it becomes one mushy ,mix.
At this point add all the spices- turmeric, chilli, coriander, meat masala and cumin. Season with salt and cook till oil starts appearing on top.
Add the minced chicken and stir to coat it well.
Cook till the chicken is done and all the water evaporates, but make sure its not too dry. Keeping it in semi gravy form is also ok, but not too watery. (If you feel that the chicken is too much, then store some away at this point).
Add the shredded parathas and give it a good stir to get the masalas and chicken to mix in with the parathas. 
Raise the heat to high and stir fry for a couple of minutes continuously.
Then make a well in the centre of the pan and add the beaten egg. Scramble it well and cook along with the paratha mix.
The kothu paratha is done when the egg is cooked through.
Transfer to a serving dish, garnish with some chopped coriander leaves and serve hot with yoghurt and pickle. (I made an okra-yoghurt side for it)
IMG_3002
Notes: You can of course do a veg version of it avoiding the egg and chicken and maybe adding some green peas, carrots etc.
Technically the paratha pieces are shredded much finely, but I kept it as it is. Watch this to get a better idea about what and how kothu paratha is made.
If you don't have minced chicken, then use chicken breast or thigh fillets. Chop them up into tiny pieces and pre cook with a bit of salt. Then add that to the onion-tomato mix.
I read somewhere that you can also used left over chicken curry as the base and then add the shredded parathas into that. Mighty easy that sounds, I must say :)