Showing posts with label Baked Goodies. Show all posts

Tuesday, 21 September 2021

Bahama Mama banana rum cake

Recipe adapted from here
For the cake
Pecans- 3/4th cup
Butter, unsalted- 1 1/2 cups, at room temperature
Caster sugar- 1 3/4 cups
Brown sugar- 3/4th cup
Eggs- 5 medium
Banana- 1 cup, mashed (very ripe)
Vanilla extract- 2 tsp
Dark rum- 3 tbsp
Plain flour- 3 cups
Baking soda- 1 tsp
Baking powder- 1 tsp
Salt- 1 tsp
Yoghurt- 3/4th cup

Rum glaze
Butter- 1/2 cup
Water- 1/4 cup
Brown sugar- 1/4 cup
Caster sugar- 1/4 cup
Dark rum- 1/2 cup

Preheat oven to 175C and generously grease a large bundt pan with cooking spray or butter. Make sure you get it into the creases if its not the basic tube bundt.
Lightly toast the pecans in a pan over medium heat.  Roughly chop and sprinkle at the bottom of the bundt pan. Keep aside
In a large bowl, using a hand held mixer, cream together the butter and both sugars till light and fluffy.
Add the eggs one at a time, beating well after each addition followed by mashed bananas, vanilla and rum. Mix well.
Sift in the flour, baking powder, baking soda and salt and using the lowest setting on the mixer mix well till no traces of flour is seen.
Finally beat in the yoghurt and pour the batter into the cake pan, and bake in the centre rack of the oven for about 60 to 80 minutes, or till a skewer inserted into the cake comes out clean.
While the cake is baking, make the rum glaze.
Mix all the ingredients for the glaze in a saucepan on medium high heat and bring to a boil.
Reduce heat to medium and simmer for about 5 minutes.
Remove from heat and keep warm.

Once the cake is done, transfer to a wire rack and cool for about five minutes.
Poke holes in the cake and pour half the glaze all over as evenly as possible.
Cool for a further five minutes and then invert on to a serving plate.
Spoon the remaining glaze on to the cake, bit by bit and let it stand till all the glaze has been absorbed. 
Wait till the cake cools completely to slice and serve.

Notes: The cake has a really strong flavour of rum. Omit the rum in the glaze if you are not a rum fan.
Use good, ripe bananas and this cake will be fabulous. I used the Indian bananas as opposed to the ones you get in the supermarkets here.

Friday, 30 April 2021

Cardamom cake with crackly almonds and sugar

Recipe adapted from here
Butter- to grease the cake tin
Caster sugar- around 2 tbsp
Almond flakes-  1/2 cup

Caster sugar- 264 gms
Eggs- 4 large
Plain flour- 160 gms
Salt- 1/4 tsp
Cardamom seeds- 1/2 tbsp (powdered)
Butter- 150 gms, melted
Vanilla extract- 1/2 tsp

Preheat oven to 170c (fan assisted) and grease a 9 inch pan using the butter. Make sure you generously do this.
Also line the base of the pan with grease proof paper.
Put the 2 tbsp sugar into the cake pan and swirl around/shake/tap to coat the side and base of the pan, as evenly as possible. Leave the remaining sugar if any at the base of the pan.
Cover the bottom of the pan with almond flakes. keep aside.
In a bowl whisk together the caster sugar and eggs using a hand held blender or in a free standing mixer., till it becomes pale and double in volume. This step is important so dont skimp it. It took me around 6 minutes.
Slowly fold in the flour and salt without deflating the batter.
Pour in melted butter, vanilla extract and cardamom powder and give a good mix, again without deflating the batter too much. The melted butter may go right to the bottom, so do scrape well and fold.
Pour slowly into the prepared cake tin, give a good tap on the counter and put into the oven.
Bake for about 45 minutes or till a skewer inserted into the centre of the cake comes out clean (original recipe said to bake at 35 minutes, but it just wasnt done, so mine took about 45 minutes. Start checking at 35 minutes and keep increasing just 5 minutes at a time.)
Remove from oven and leave on the counter.
After five minutes run a knife around the sides of the pan and invert onto a cooling rack (i inverted it directly on to a serving plate)
Peel off the grease proof paper slowly, while the cake is still warm and leave to cool completely before cutting.

Friday, 22 March 2019

Hot milk-coffee cake

Recipe adapted from here
Eggs- 2 large
Demerara sugar- 1 cup
Vanilla extract- 1 tsp
Plain flour- 1 cup + 2 tbsp
Baking powder- 1 tsp (slightly heaped)
Salt- 1/4 tsp
Milk- 1/2 cup + 1 tbsp
Unsalted butter- 5 tbsp
Instant coffee powder- 2 tsp

Beat the eggs on medium-high speed for about 3 to 5 minutes, either using your hand held mixer or using the whisk attachment of a free standing mixer.
Once the eggs turn light yellow and thick, add the sugar bit by bit till the mixture is light and fluffy, it should take another 4 to 5 minutes to get to this stage. Dont skip this bit, it really does make a difference to how to cake turns out.
I turned my free standing mixer on and by the time the eggs were done, i got the other ingredients ready.

Preheat oven to 170C and grease and line an 8 inch cake tin.
Mix together the plain flour, baking powder and salt in a bowl. Keep aside.
Heat the milk and butter in a saucepan along with the coffee powder, just until all the butter melts. Keep aside.
Once the eggs reach its thick consistency, reduce speed to low and add the flour and mix until smooth without any visible traces of flour combined. 
With the mixer still on low speed, gradually add the hot milk to the batter and beat until well combined.
Pour into the cake tin and bake for 40 minutes or till a skewer inserted into the centre of the cake comes out clean. (mine was done in 42 minutes).
Place on a cooling rack and once completely cool. store at room temperature in an air tight container.
Notes: You can replace demerara with granulated sugar
You can also use a square cake tin for this cake (in fact i think it would be a better option). If so, i would say reduce the cooking time to about 30-35 minutes.
If you dont add the instant coffee, you get yourself a good ol fashioned hot milk cake.
Here's the recipe for my coffee walnut cake 

Monday, 26 June 2017

French yogurt cake with cardamom and pistachio

Makes 1 loaf cake (double the recipe for an 8inch round cake)

c05ed260-ae3b-442e-908f-c094490a28f4
Granulated sugar- 1/2 cup
Eggs- 1 large
Vanilla extract- 1/4 tsp
Plain yoghurt- 1/4 cup

All purpose flour- 1/2 cup + 2 tbsp
Baking powder- 1 tsp
Salt- a pinch
Ground cardamom- 3/4th tsp

Flavourless oil- 1/4 cup
Pistachio nuts- 1/2 cup, lightly crushed
2fdb8d0c-239f-42e0-bf30-c3625c22bcf0

Preheat oven to 175C and line a small loaf pan with baking paper.
In a mixing bowl whisk together the sugar, eggs, vanilla extract and yogurt till well combined and pale yellow..approx 3 to 4 minutes.
Add the dry ingredients (flour to cardamom) and mix well to combine.
Pour in the oil and fold lightly, don't have to whisk vigorously, but make sure its all mixed well
Pour the batter into the pan and top with the chopped nuts.
Bake for about 30 minutes or till a skewer comes out clean.
Take them out and leave to cool completely on a cooling rack.
Slice and have with a cuppa.

Wednesday, 5 April 2017

Light brioche burger buns

IMG_3610
Makes 6 medium size burger buns or about 5 large buns (Recipe adapted from here)
Bread flour- 1 1/4 cups + 3 1/2 tbsp
Salt- 1/4 tsp
Oil- 1 1/2 tbsp
Warm water- 1/2 cup
Whole milk- 1 1/2 tbsp
Active dry yeast- 1 tsp
Sugar- 1 1/4 tbsp
Egg- 1 large
Bread flour- 1 1/4 cups + 3 1/2 tbsp
Oil- 1 1/2 tbsp
Egg white- of one small egg for egg wash, lightly beated
Sesame seeds- around 1 tsp or so
897b213b-6ded-4caf-8a53-80022e2bc86d
Into the bowl of a free standing mixer add the flour and salt and rub in the oil with your finger tips so the flour resembles coarse bread crumbs. 
In a separate bowl whisk together the warm water, milk, yeast and sugar.
Beat at egg into it and pour this mix into the flour mix.
Using the dough hook of the mixer, start kneading the dough on medium speed for about 5 to 6 minutes, or till the dough comes together. If you are kneading by hand, lightly flour a work surface and knead for about 10 minutes till the dough is no longer sticky.
The dough should not be really sticky, but pliable without the use of more flour.
Oil the same mixing bowl and place the dough into it, spreading some oil on it to prevent drying.
Cover with a kitchen cloth and leave to rise for a minimum of 1.30hrs or till doubled in size.
I preheated my oven to about 40C, turned it off but with the light on and left the dough in there to proof. If proofing in the oven make sure its not more than 50C as forcing the rising will result in a dense, dry bread.

After the dough has risen to double its size, punch it down and scoop out of the bowl (on to a lightly floured surface if needed. I didnt need to use any) on to your kitchen counter.
Divide the dough into 6 equal portions. (I am a bit mental when it comes to sizes in baking so i actually measured out the portions each weighting approx 78 to 80gms)
Roughly roll each portion, flatten to a thick pancake size and bring the sides together to join in the middle and make a parcel of sorts. Then turn it over and using your palm, cup the ball and roll lightly to form a perfectly round bun.
Place all the buns on a tray lined with baking paper and keep aside to proof for another hour or till the buns have risen.
I placed them back into a warm oven with just the light on.
8827d788-55c5-4e91-9e9e-a4ebdf0348e6
When ready to bake, preheat oven to 200C
Brush the tops of the buns with egg white and sprinkle the sesame seeds.
Pour boiling water into a baking dish or any oven proof dish and place on the oven floor. The steam created will ensure soft buns.
Place the tray with the buns on the middle shelf and bake for about 13 to 15 minutes (if they are medium size and for about 20 minutes if large).
Remove from oven once they are done, and transfer on to cooling racks.
Store in a bread bin or wrap in cling film and use as required.

Notes: The recipe can easily be doubled.
The same recipe makes about 8 mini brioche buns
I overdid the egg white a bit too much and i suspect that why the tops browned waay too much. Use sparingly. Even milk would do instead of egg white

Monday, 21 September 2015

Butternut squash loaf cake

IMG_8286
I am part of The Happy Egg Co. Taste 100 Blogger network comprising of taste makers and I absolutely love it. They send us challenges every month with of course a winning prize, and its one of those emails i absolutely look forward to. In fact I won the May challenge which was photography and styling oriented and was pretty stoked to have Marte Marie Forsberg select my post as the winning entry. I won an 8 course tasting menu meal for two at the award winning L'Atelier de Joel Robuchon and i cant wait to check out the place (waiting for an occasion to celebrate to make a booking).
H-ZOD5M1JD9zHWBpjpRZ3LhM-b2GuEp6NgM903Ke8sI 
In July The Happy Egg Co. decided to rustle things up a bit and organised a baking masterclass for bloggers at the Central Street Cookery School. It was conducted by Bee Berrie of Bee's Bakery and it was an afternoon filled with baking. We made a sponge cake and went berserk flavouring it, layering it and decorating it, an Eton Mess, an easy version of puff pastry and Custard tarts. By the end of the evening we were all in a sugar coma, but absolutely satisfied with our work and went back home loaded with all the goodies.
IMG_8240 
The fact that i had to distribute my custard tarts on the bus back home and among friends that weekend is another thing (I would have ended up eating it all on my own if i hadn't done that). I now use only Happy Eggs at home (thanks for the vouchers) and love the sizes they come in. I had some left over butternut squash after the gnocchi expedition and I put it to good use in this super moist butternut squash loaf cake with all the flavours (and colours) of autumn, not to mention how easy it was to put this together.

Recipe adapted from here (makes 2 large loaves or 3 small loaves)
IMG_8308 
Plain flour- 1 3/4 cups
Baking powder- 1 tsp
Baking soda- 1/2 tsp
Salt- 1/2 tsp
Ground cinnamon- 1/2 tbsp
Ground nutmeg- 1/2 tsp
Ground allspice- 1/2 tsp
Granulated sugar- 1 1/4 cups
Eggs- 2 large
Vegetable oil- 1/2 cup (any flavourless oil can be used)
Milk- 2 tbsp (refer notes)
Vanilla extract- 1/2 tsp
Butternut squash purée- 7 1/2 oz ( a little less than 1 cup) (refer notes)
IMG_8264
Preheat oven to 175C and line your baking pans with baking paper.
Sift together the flour, baking powder, baking soda, salt, cinnamon, nutmeg and allspice together till well combined.
In another bowl whisk together the sugar, eggs, oil, milk and vanilla until well combined. This may need a bit of work, but absolutely achievable by hand and you don't need an electric mixer.
Add the squash puree and continue to mix well.
In batches, add the flour and fold until just combined, and no traces of flour is visible. Resist the urge to over mix.
Pour into the prepared cake tins and bake in the middle shelf of the oven for 35 to 40 minutes (for small loaves and around 1 hr for a large loaf) or till a skewer inserted into the centre comes out clean.
Cool completely on racks, after which you can wrap them in cling film and refrigerate for up to a week.
IMG_8304
Notes: The butternut squash can be replaced with pumpkin purée, mango puree or any fruit purée for a different flavoured cake.
To make butternut squash purée, slice the squash into two, apply some oil on each side and roast in a 200C oven for about an hour or until tender. Keep aside to cool and scoop the flesh into a food processor/blender and make into a purée.
If you find that your purée is quite watery, avoid adding the milk.

With thanks to The Happy Egg Co. for inviting me to the baking masterclass and for the vouchers to be redeemed at supermarkets.

Friday, 13 February 2015

Rosewater pistachio cupcakes with mascarpone cream frosting

IMG_0900
Because its Valentines day and because no ones going to do anything special for me and because I felt like eating cake :)

I used to get all upset cos Ro hates everything to do with celebrating something (although he gives me some darn gift these days so i wouldnt sulk and make his life hell). These cupcakes were baked eons ago for Great British Chefs. I'm not a rosewater fan but the pistachio cake on its own is brill. Try it, cos you know, its Valentines day and all.

Makes 8 cupcakes
IMG_0892
Pistachio nuts- 50 gms
Ground almonds- 60 gms
Plain flour- 25 gms
Baking powder- 1/2 tsp
Butter- 100 gms, at room temperature
Caster sugar- 100 gms
Eggs- 2 small
Milk-2 tbsp
Rosewater- 1 1/2 tsp
Vanilla extract- 1/2 tsp (optional)
9776683646_65464c1d4a_o
Preheat oven to 176C and line a cupcake pan with 8 liners
Grind together the pistachio nuts, almonds and plai flour in a grinder or food processor. Make sure you dont over do this, or else you will be left with lumps.
Transfer to a bowl and add the baking powder.
In a separate bowl beat together the butter and sugar till light and fluffy.
Add the eggs, one after the other, beating well after each addition.
Pour in the milk, followed by rosewater and vanilla (if using) and mix well until well combined.
Fold in the ground mix using a spatula, till there is no trace of it in the batter.
Pour into the cupcake liners till about 3/4th full and bake for about 20 to 25 minutes or till a skewer inserted into the centre of the cupcakes come out clean.
Take them out of the oven and leave to cool completely on a cooling rack while you get the frosting done.

Mascarpone cream frosting
IMG_0898
Double cream- 100 ml (cold)
Mascarpone cheese- 250 gms 
Icing suagr- 2 tbsp
Red food colouring- a small bit to get the rose colour (optional)

Whisk the double cream in a large, clean bowl using the whisk attachment of your mixer or even a hand held whisk till stiff peaks form. Be careful to not overdo the beating or else it would split.
In another bowl mix the mascarpone cheese and icing sugar slowly till well combined.
Add this to the whipped cream, followed by vanilla and food colouring and continue whisking on low speed till they all come together and are mixed well.
Transfer into a piping bag and once the cupcakes are completely cool, pipe them.
Store in refrigerator for up to 4 days.

Thursday, 25 September 2014

Brownie butter cake

IMG_4534 (2)
Brownie and a butter cake together. Need i say more? Yeah, didn't think so. Every other day Ro asks me, whats for dessert, do we have cake, whats for tea and the answer to this most of the time is, er chocolates? fruit? He gets distracted with those options most of the time, but otherwise he makes a face and pretends like I've deprived him of his basic necessities.

I made my custard cake sometime last month on a whim, (mostly to finish off the last of the custard powder and baking soda that had gone past expiry) and I wasn't sure it would work because expired baking soda fetches the most horrid cakes. To my surprise however, this one turned out so so good, much better than the first time and it stayed perfectly moist at room temperature for about 5 days- all i did was cover the cake pan with foil.
IMG_4508 (1) 
I put Ro through the torture of watching Great British Bake Off and about 2 weeks back on a Sunday evening he wanted to eat cake and trying to get me off the couch challenged me to bake a cake in 1 hr. He did the whole GBBO intro line and all, and me like an idiot fell for it. So i got around baking my mums beat and bake chocolate cake- a cake id grown up with, but never managed to get right for some strange reason. This time I was so hasty with the recipe and couldn't care if it turned out nice or not cos 1- I'm not a chocolate cake fan and 2- Ro would eat anything with chocolate, no matter how it turns out. Surprise, surprise I'd made the most perfect chocolate cake in less than an hour. I was so proud of myself, not because i did it in time, but because i managed to get the taste bang on- the taste of the cake just as i remember from my childhood. Needless to say, the husband polished it all off in no time.

Since the cake luck was prevailing right now, I decided to bake a cake again, today. When I'm in the cake baking mood, its almost always a new recipe I put to test (along with my patience). I'd bookmarked Bee's brownie butter cake ages back and had completely forgotten about it till this morning when i was scouting my bookmarked list. I checked if i had all the ingredients, and except for brown sugar, i had all the other things needed. I still decided to go ahead, substituting brown sugar for demerara sugar.

I initially thought it was going to take time, but nope, had it all done in under an hour again and its a cake that can actually make someone say wow. I am not a big fan of brownies, so i really didn't care too much for that layer, but omg the butter cake was so so good. Moist like nobody's business and so darn tasty. I must remember to make just that one of these days.

Recipe adapted from here
IMG_4517 (1) 
For the brownie base
Dark chocolate- 140 gms, chopped into small pieces
Unsalted butter- 50 gms
Demerera sugar- 50 gms
Egg- 1, at room temperature
Plain flour- 35 gms

For the butter cake
Unsalted butter- 120 gms, at room temperature
Granulated sugar- 100 gms
Vanilla extract- 1/2 tsp
Eggs- 2, at room temperature
Plain flour- 120 gms
Baking powder- 1/2 tsp
Milk- 50 ml
IMG_4525 (1)
Preheat the oven to 180C and line a 20 x 10 cm loaf pan with baking paper.
On a bain marie melt the chocolate and butter till nice and smooth.
Take it off heat, leave aside for a couple of minutes and into it add the sugar. Whisk well
Break the egg into it, and beat till well combined.
Pour into the greased and lined loaf pan and chuck into the oven.
Bake for 15 minutes

While the brownie is baking, get on with the butter cake.
Cream together the butter and sugar in a mixing bowl till light and fluffy. You can either use a hand held blender or a spatula. I wanted it to be as simple as possible, so i didn't use my free standing mixer. Feel free to do so.
In goes the vanilla extract followed by eggs one after the other, beating well after each addition. The mix may look a bit curdled, but don't worry, the flour would sort this out.
Whisk together the plain flour and baking powder in a separate bowl and add it to the batter, alternating with the milk. 
Once the brownie comes out of the oven, reduce heat to 160C and pour the cake batter on top and immediately even it out with a spatula.
Chuck it back into the oven and bake for a further 30 minutes or till a skewer inserted into the centre of the cake comes out clean.
Once done, cool the cake on a rack and let the cake settle before slicing.
IMG_4530 (1)
Notes: Like i mentioned earlier i didn't have brown sugar, so used demerara instead. Please use brown sugar if you have it.
The brownie bit was still very gooey when i cut into it around 15 minutes later. But was fine when i went back to slice it around an hour later. Yes it was torture waiting to dig in. Using a serrated knife helps.
The cake batter when poured on top of the hot brownie melts immediately. Don't panic, just don't wait but try and do the deed as quickly as possible.

Tuesday, 26 August 2014

Mushroom cobbler

IMG_4081
Clearly summer is over, like seriously over! Its been raining non-stop since yesterday and I've thoroughly enjoyed staying indoors, snuggling up on the sofa watching brainless sitcoms back to back. We are off to Devon day after and i have so much to do, so I'm not quite enjoying the wet and windy day today. 

Chilly days like these call for warm bakes and crusty bread. So i got around to making this tasty mushroom cobbler by Marcus Wareing, a first for me actually. I have never tried making a cobbler before- a fruit one especially- and was pleasantly surprised at how nice this tasted. The scone was so flavourful and the perfect topping for the creamy mushroom mix. It does take a bit of time, but hey nothing tasty comes easy right? I had the privilege of meeting Marcus Wareing in person and visiting his signature brasserie Gilbert Scott last year. The place is fab and I'm glad i picked this recipe which is straight off his menu at Gilbert Scott.

Great British Chefs has this amazing array of summer recipes, contributed by the experts in the field and i had a tough time choosing one. My first choice was the hokey pokey ice cream, but the husband definitely thought it wasn't ice cream weather. Second choice was the cobbler, closely followed by the new potato salad with bacon and broad beans (which I'm sooo making soon). I'm entering this post for the GBC Summertime Bloggers challenge and even though summer may be over, there is no harm in embracing the summer bounty that's still in abundance. Crossing my fingers. Wish me luck.

Recipe halved (serves 2)
IMG_4059 
Scone topping
Plain flour- 87 gms
Baking powder 1 1/2 tsp
Cheddar cheese- 15 gms, grated
Dill- 1/2 tsp, finely chopped
Salt & pepper- to taste
Butter- 50gms, at room temperature
Ice cold water- approx. 1 tbsp
Egg white- for egg wash

Cheese sauce
Milk- 300ml
Bay leaf- 1
Cloves- 2
Thyme leaves- a small sprig
Shallot- 1 small, finely chopped
Butter- 20gms
Flour- 20 gms
Cheddar cheese- 25 gms, grated
Ground nutmeg- a pinch
Salt & pepper- to taste

Mushroom filling
Oil- 1 tbsp
Chestnut mushrooms- 250 gms, quartered
Flat mushrooms- 250 gms, chopped into chunks (same size as that of the chopped chestnut mushrooms)
Paprika- 1/2 tsp (optional)
Baby spinach- 100 gms
Garlic- 5 pods, crushed
Bacon bits- 5 rashers (optional)
Salt & pepper- to taste
IMG_4062 
First get the scones ready.
Mix together the flour, baking powder, cheese, dill, salt and pepper in a mixing bowl.
Grate in the butter (i thought this was a really cool idea, to grate in the butter, especially if you have forgotten to take it out to bring to room temperature) and mix gently with your hands to resemble coarse breadcrumbs.
Pour in the water, a bit at a time, if you are doubtful, and bring the whole mix together to form a dough.
Don't over work this mix, or else the scone becomes tough.
Keep covered in the refrigerator for at least 2 hours.

While the dough is resting get the cheese sauce going.
Mix together the milk, bay leaf, cloves, thyme leaves and shallot shallot in a saucepan, infuse over medium heat and bring to a simmer.
At this point remove from heat and leave aside to infuse for about 20 to 30 minutes (or however long you'd take to prepare the mushroom filling)

Fry the bacon in a saucepan till crisp.
Drain on paper towels and chop into small pieces.
IMG_4043 
Heat oil in a large frying pan and throw in all the mushrooms.
Season with paprika (if using), salt and pepper and stir fry on medium heat till it changes colour.
Throw in the spinach followed by garlic and continue frying till the spinach has wilted, the mushroom is cooked and all the water is absorbed.
Transfer to a baking dish.
Also stir in the bacon bits into the mushroom-spinach mix.

Preheat the oven to 180C at this point and get back to the cheese sauce.
Strain the infused milk into a cup and use the same saucepan to complete the sauce.
Melt the butter and add the flour.
Stir with a wooden ladle and cook the roux for about 5 minutes on low heat.
Add the infused milk, bit by bit, into the roux and whisk well to avoid lumps.
Increase the heat to medium-high and simmer for about 10 minutes, to cook the roux.
Add the cheese, season with salt and pepper and nutmeg. Stir it all in.
Pour over the spinach mix. Keep warm.

Take the scone dough out of the fridge and give a nice knead.
Lightly flour your work surface and roll out the dough to 1 cm thickness.
Cut into 7 disks using a 3cm diameter ring and place on top of the mushroom mix .
Brush the scones with egg wash and bake the cobbler in the middle shelf of the oven for about 25 minutes or till the scones turn golden brown and the mixture bubbles.
serve with some crusty bread.
IMG_4064 
Notes: You can roll out and cut the scones a day or so ahead and freeze them till ready to use.
Original recipe called for oyster mushrooms, i didn't have any, but certainly use them if you can.
I had to desperately use up some bacon and hence added that. Of course you can add chicken, beef or pancetta to the mix to make it a more heavy meal.
If you are using self raising flour for the scones, then reduce the baking powder to 1/2 tsp.
I did add/ omit some ingredients from the original recipe, just to suit our taste.

Wednesday, 20 August 2014

Basic vanilla sponge cake- the best so far

IMG_3789
Its been ages since I've posted a cake recipe here. Truth is, i haven't baked a cake in ages. In spite of tempting Ro every now and then saying, I'll bake a cake, I never get around to doing it. I did bake once or twice in between, but fetched not so nice results- that and the lack of motivation to take pictures left me hanging.

This cake was baked way back in June. My sister in law and family were throwing a BBQ party at theirs and I was in charge of dessert. I decided to make Ria's Tropical Mango Pudding Cake, and after harassing her with numerous questions, I was confident enough to go ahead with the recipe. It was probably one of the best desserts I've made so far. Got really good reviews from all the guests and even though it was a bit time consuming, I'm so totally going to make it again, and blog it. Managed to take some pictures with the phone, just so you get an idea of what it looked like. 

Coming to the genoise cake. I suck at it. Like I've never ever got a sponge that is so so soft and spongy, but always managed to over bake it, over fold it, under fold it, under bake it and whatever can go wrong with it, it always used to happen to my sponge cakes. I love eating sponge cakes, and every time i try a new recipe, its a disaster, hence absolute deprivation of sponge cakes.
PicMonkey Collage
I was petrified about Ria's sponge cake recipe and since i was baking for a party, I couldn't afford to screw up. So i searched and searched and searched for a less intimidating one and the search led me to Jo Pastry website which i must say is a treasure trove of information on pastries. His recipe and description and comments on tackling the genoise put me at ease and i decided to go ahead with it. I was so so nervous while the cake was in the oven, but the moment i took it out, i knew id nailed it. It was soft, spongy, evenly/perfectly cooked and all what a sponge cake was supposed to be. There was a bit of left over batter that i used for 2 cupcakes and they were immediately consumed without any regret. 

I had to record this recipe for posterity and its certainly one I'm going to be fall back on for all my sponge cake bases. For those intimidated by the whole genoise cake making process, this is for you. Try it and I'm sure you wont need to look elsewhere.

PS. I baked 2 cakes with the above measurement. Didn't want to take a chance and double it.

Recipe adapted from here (Makes 1, 9x12" sheet cake) 
Milk- 1/4 cup
Butter- 3 tbsp
Vanilla extract- 1 tsp
Eggs- 3, at room temperature
Egg yolks- 3, at room temperature
Sugar- 6 oz (1 cup minus 2 tbsp)
Plain flour- 3/4th cup
IMG_3787
Preheat oven to 205C and grease a 9x12 inch jelly roll pan and line with baking paper.
Mix together the milk, butter and vanilla extract in a saucepan and bring to a simmer. 
Take off heat and keep aside.
Into the bowl of your free standing mixer, add the eggs, egg yolks and sugar and beat on high using your paddle attachment for about 8 minutes or till the mixture is really thick and when the paddle is lifted the batter falls down in ribbons and hold its shape for about 5 seconds before dissolving. This step is very very important, don't skip.
Slowly trickle the warm milk mix through the side of the bowl.
Sift in the flour in 3 additions, folding well after each. I did this using the slowest speed on my mixer, just until incorporated. But if you are not comfortable doing this in your mixer, do it by hand using a spatula.
Make sure you scrape the bottom of the bowl while folding, but not too harsh that you deflate the mix.
Pour into the prepared pan and using an offset spatula spread the batter around, making it into corners etc. Even the top so there is consistency in the baking
Bake in the middle shelf of your preheated oven for about 12 minutes till golden and springs back to your touch
Take it out of the oven and when still hot, loosen the sides using a blunt knife.
Turn it out into a wire rack carefully, cool completely and use as required.

Sunday, 2 March 2014

Beef Moussaka

My boss is a brilliant cook- you know- the types that can whip up something with whatever is in the pantry and make a fabulous meal out of it. She refuses to let me take lunch to work which means I get to enjoy her fabulous cooking. I have learnt so many new methods of cooking, easy to make dishes and new ingredient names, and always come back home and try them out much to Ro's amusement. He's secretly thanking her, I'm sure :) 

Last week I was whining to her about how planning daily meals were such a feat and she gave me this idea to cook with aubergines. Both Ro and I were not aubergine fans till a while back when we went to an aunts place for lunch and she served baingan bhartha with biryani. We loved it so much that we got the recipe from her and tried it at home. As expected, it wasn't even close to what we had in mind and so gave up. After that, I may have tried working with aubergines about 5 or 6 times and 3 of those (successful ones) have appeared on the blog (actually one of it is what my friend Rashida made and sent over, so not counted). Aubergine parmigiana was another successful one and we loved it, but pictures were rubbish and hence couldn't blog it. 

So anyways, Dora gave me this really easy recipe to cook with aubergines and I got all worked up at how easy it was. But of course on the 1 hour train ride back home from work my mind decided to go on overdrive and research aubergine recipes. Moussaka was up there on search results and yes, it had to be made that evening. I went straight to the grocery store to pick up ingredients (of course got carried away and bought a whole lot of other rubbish as well) and came back home all ready to cook. Its a bloody long process- this thing called Moussaka. When I read the recipe, I had no idea how tedious it was and many times during the process I wanted to just cut it short and make something else out of it. The fact that I could make a blog post out of this was at the back of my mind and I think that's what made me determined enough to continue with the actual process. (Some good has come out of owning a blog i guess??)
At the end of it all, I must admit, it was thoroughly worth it, like really really worth it. Both Ro and I enjoyed it and I made a note to experiment with aubergine again. I served it with a fabulous salad I learnt from an aunt this time i was in India (will try and blog it some other time) and a gorgeous bottle of red.

Word of caution: Attempt ONLY when you have time.

Recipe adapted from here (serves 3 generously)
Olive oil- 2 tbsp
Onion- 1 large, finely chopped
Garlic- 4 cloves, peeled and finely chopped
Minced beef- 450 gms
Cinnamon powder- 1/4 tsp
Oregano- 1/2 tbsp, dried
Allspice- 1/4 tsp
Bay leaf- 1
Thyme leaves- 1/2 tsp, dried
Tinned, chopped tomatoes- 1, 400 gm tin
Dry white wine- 90ml
Aubergines- 3 medium, cut into 1 cm slices
Pepper- to taste
Salt- to taste

Bechamel sauce (topping)
Butter- 45 gms, unsalted
Plain flour- 45 gms
Milk- 450ml
Parmesan cheese- 45 gms
Gruyère cheese- 50 gms, grated
Egg yolks- 2

Place the sliced aubergines in a large bowl, sprinkle with salt and leave aside for about 30 minutes. This will draw out any bitter juices.
Heat the oil in a frying pan and cook the onions for about 10 minutes on medium heat. The onions should turn soft, but not brown.
Add garlic and sauté for a couple more minutes.
Into this add the mince meat and break it up, while mixing it into the sauteed onions.
Stir in the cinnamon, oregano, allspice, thyme and bay leaves followed by chopped tomatoes. Stir it all together till well combined.
De-glaze the pan with white wine, season with enough salt and pepper and cover and cook for another 15 minutes or so on medium heat, till the meat is cooked and the mix is thick.
Once the sauce is ready, cover and keep aside

While the meat is being cooked, you can deal with the aubergines.
Preheat oven to 200C
Rinse the aubergines in a colander and pat dry with a kitchen towel.
Toss with some olive oil and line on 2 baking trays, trying not to overlap.
Bake for 20 to 25 minutes, or till the slices turn a light brown.
To make the bechamel sauce, melt the butter in a saucepan and stir in the flour.
Take off heat and slowly whisk in the milk.
Return pan to heat and continue stirring till the sauce thickens.
Simmer for a further 5 minutes on low heat and then remove from heat.
Stir in around 30 gms of parmesan and gruyere cheese, season with salt and pepper and keep aside to cool lightly.
Once cool, whisk in the egg yolks till no trace is visible.

Once all the preparation is done, you can assemble the moussaka.
Into a large baking casserole/ dish generously spread a third of the mince.
Cover with aubergine slices, overlapping each other.
Repeat the layers, ending with a final layer of the mince.
Finally pour over the bechamel sauce, sprinkle both the remaining cheese and bake for 40 to 50 minutes or till it bubbling and golden on top.
Take the casserole out of the oven, leave aside to settle for about 5 minutes before slicing and serving.

Notes: Yes, its a frikkin long recipe and procedure. Atleast 2 hours including prep and cooking
Bechamel sauce can be made a day or 2 ahead and refrigerated in an air tight container
Try and serve it with a refreshing salad or some bread, to cut through the grease and cream.
Traditionally Moussaka is made with lamb mince but I'm not a big lamb fan, hence used minced beef. Feel free to replace the beef with lamb mince. 

Friday, 14 February 2014

Lemon madeleines

I know this post was supposed to go up a couple of weeks back, but that was me being optimistic about posting stuff on the blog from home. Horrible internet connection and working on a tablet is not really a favourite thing, and to add to it, blogger or flickr - one of these- were acting up, forbidding me to place images the way I want. Anyways, I had to have the post up and running because as part of my New Year resolution, at least a recipe post a week on the blog was a must. I actually don't have anything else in my drafts and if i need to keep with the resolution:
1. The weather must be significantly better for me to (want to) take pictures
2. I should get off my lazy ass and cook
3. I should unpack my bags and dig out the props i bought from India (really cool ones BTW)
4. I should get off my lazy ass and COOK!!!

After diving straight into work, today is my day off and I don't see any of the above happening. Its Valentine's day, and what I should actually be doing is to cook up a storm for Ro (who couldn't care less about VD) and then cuddle up and watch a movie or something. But all I'm thinking of is what cocktail I can make with the new bottle of Cointreau I picked up from duty free and how many varieties I can whip up with the mixers lying around home. (It's only 11.30am btw! Do I have a drinking problem??? No don't answer that). Its raining and unbelievably windy and I don't want to cant go out. Oh, and Ro is working from home and in about 15 minutes he's going to ask me 'what's for lunch.' I'm going to reply 'love and fresh air,' and then it might end up in an argument and we'd be the awesome couple who fights on every VD.
Ok so madeleines. When I visited Paris last September with my blog buds, one of the things on my 'to buy list' was a madeleine tray. We visited a couple of stores that sell cooking paraphernalia and they all had gorgeous madeleine trays, but bloody expensive. So I conveniently forgot about it and instead came back home with other rubbish.  

Imagine my excitement when I found a similar tray in TKMaxx for a third of the price. I had to pick it up and make madeleines immediately. So I did and they came out perfectly well. Its so easy to incorporate a flavour of choice into these and I chose lemon- i used my home made extract. Its just a basic sponge recipe and I'm sure you can make it without the molds, but then they wont be called madeleines, will they? I once saw a post trending on Pinterest where oven safe spoons replace the molds. They don't give you the bump, but they do look pretty madeleine like and is a substitute for the tray. 

Enjoy!

Recipe adapted from here (makes 18, 8cm madeleines)
Eggs- 3 large, at room temperature
Granulated sugar- 1/2 cup
Dark brown sugar- 2 tbsp
Butter- 1/2 cup
Plain flour- 1 cup
Baking powder- 1/2 tsp
Salt- a pinch
Vanilla extract- 1 tsp
Lemon extract- 1/2 tsp
Lemon zest- 1 tsp, freshly grated
Whisk together the flour, baking powder and salt in a bowl and keep aside.
Beat together the eggs and both the sugars on high speed, either in a free standing mixer with whisk attachment, or using a hand whisk, for about 5 to 8 minutes or till pale and thick.
While the egg mix is being whisked, melt the butter in a saucepan and keep aside. It should be warm to touch.
Into the egg mix add the vanilla and lemon extracts and the lemon zest and whisk till just combined.
Sift in the flour mix bit by bit, folding well after each addition. Do this slowly and carefully, as you don't want to deflate the egg mix. I used a silicone spatula to fold it in.
Take about 1 cup of this batter and mix it with the warm melted butter.
Whisk it in really well to make sure the butter has been nicely mixed in with the batter.
Add this to the remaining egg batter and gently fold it in till well mixed. (Its easier to mix a bit of the batter with the melted butter and then add that to the bigger batch. You also don't end up deflating the mix too much.)
Cover with a cling film and refrigerate for a minimum of 1 hour. You can also keep it up to 3 days in the fridge.
When ready to bake, preheat oven to 190C and generously grease a 2 12 mold madeleine trays with melted butter using a pastry brush. Also dust the molds with plain flour (tapping out the excess) to be on the safer side.
Drop a tbsp each of batter into each mold. It will be slightly domed in the centre which is precisely what you want.
Bake for about 9 to 11 minutes or just until the cake springs back when touched with a finger, or till the edges turn a light brown. Don't over bake it.
Take the pans out of the oven and immediately tap out the madeleines on to a wire rack.
Dust with some icing sugar and serve immediately with a cup of coffee.

Notes: I had only one 12 mold tray and so after i finished baking the first batch, i kept it aside for a few minutes to cool down and then repeated the greasing process. The dough was kept back in the fridge while the first batch was baking. The second batch also came out perfectly fine for me.
The madeleines are best had immediately, but it can also be stored up to 3 days in an air tight container in the fridge.

Thursday, 9 May 2013

Blueberry cream cheese butter cake

IMG_8754-1
Its been ages since I updated the blog, and even longer since I posted a cake recipe. I have half written posts in my drafts and loads of reviews to be done, but somehow my days have become really busy..ever since I started working part time. I love my job and its opened up a completely new world of baking and cooking and such for me. More on that later.

I am not going to ramble today, yes, time constrained, so I'll go straight to the recipe. Like I said before, I hadn't baked a cake in a looong time and so on a day I felt the need to eat something seriously unhealthy, cake was what came to my mind. My usual Google searches led me to this fab recipe, tried by 3 of my fav bloggers and so I knew it was going to be a winner. 
IMG_8715
Loads of butter, loads of sugar and loads of cream cheese is what nice things are made of. So by no means think that this is a low calorie cake...which I think is bull shit any way. There is nothing called low calorie cake. If you want to eat cake then go all out and eat the real thing is my motto! Which is also probably why I need to go on a crazy diet :O

I usually don't like to bake with butter, more so because the whole creaming it with sugar etc etc is messy and time consuming, as opposed to oil which is soo cool, you just pour it into the batter (and also I can be a teeny tiny happy its a bit better than butter). But once in a while I don't mind going all out and, although I cringed at the amount of ingredients needed, that's exactly what I did with this cake! The outcome was delicious. I mean really, really delicious. Its so moist, like melt-in-your-mouth moist, and the blueberries break down the sweetness at intervals. It so versatile, you can definitely make this cake plain or add any other flavouring like orange or lemon and it would be great. TRUST ME!

Recipe adapted from here (makes an 8 inch loaf cake + an 8 inch square cake)
IMG_8738
Caster sugar- 1 cup
Butter- 250 gms, softened
Vanilla extract- 1 tsp
Eggs- 3, medium at room temperature
Cream cheese- 250 gms
Milk- 1/3rd cup
Self-raising flour- 2 1/4 cups
Blueberries- 150 gms, fresh or frozen (I used fresh)
IMG_8748
I didn't have self raising flour so I made my own by sifting together 3 1/2 tsp of baking powder with 2 1/4 cups of plain flour. The ideal measurement is 2 tsp baking powder to 1 cup plain flour.
Pre heat the oven to 160C and line an 8 inch loaf pan and 8 inch square brownie  pan with baking paper
Beat together the sugar butter and vanilla extract in a free standing mixer, using the paddle attachment, till soft and fluffy. You can use your hand beater as well.
Add the eggs, one at a time, beating well after each addition.
Change to the whisk attachment and add the cream cheese and milk. Whisk till the mix turns lump free and you get a smooth batter.
Add the flour and whisk just until mixed.
Using a spatula, fold in the blueberries.
Pour the batter into the lined pans till about 1/4th full and bake for about 50 minutes or till a skewer inserted into the centre comes out clean. My brownie pan took only 40 minutes to bake.
Once done, cool completely on a wire rack and before eating either dust with some icing sugar or have it plain.
IMG_8733
Notes: Original recipe called for 1 1/2 cups of sugar. Even for an ardent sugar lover I thought that was a bit too much, so i reduced it to 1 cup. It was pleasantly sweet.
I changed to whisk attachment half way through because i noticed that the cream cheese was still in lumps and not smoothening out with the paddle attachment. The whisk worked like a charm.
The cake keeps well in the refrigerator for about a week. I cling wrapped it properly and refrigerated it. It also freezes well.
Replace the blueberries with any berry of choice.

Wednesday, 10 April 2013

Almond crinkle cookies

IMG_8157
After a really long time I took my camera out to take some pics only to realise there was absolutely no motivation. But since it was a sunny day (for a change) and since I didn't have anything in my drafts to post, I decided to bake and make use of the lighting to take some pics.

I had bookmarked a recipe for almond crinkle cookies, but then the measurements seemed a bit confusing and so I ended up doing my own thing. I was 90 percent sure it wouldn't work out, but was pleasantly surprised at the end result. I made chocolate crinkle cookies a long time back and it is one of my most popular posts on the blog. They are an absolute crowd pleaser and perfect gifts- especially Christmas, because those powdered sugar tops make them look like snow mountains.
IMG_8139 
Anyways, we are not here to talk about the chocolate crinkles are we? The star here are the almond crinkles which are not bad at all, in fact I like them better than the choc crinkles and hot out of the oven, they are delish. I also thought they were easier to put together compared to the choc ones- the entire process was done in half an hour. Its a one-bowl, no-fuss recipe which I'm sure I'll be making again.

The pictures however, are horrible. Once I was done with baking, my mind just went blank. I just didn't know how to style them and make them look great. Even the perfect lighting couldn't inspire me. So I just chucked them all in a bowl and did the easiest possible thing...used a white background and back lighting to take boring pics. That said, I took 125 pics of the same damn thing in different angles. Transferred them on to the computer only to realise most of them were out of focus and the harsh lighting was hurting my eyes. So I had to re-do the whole setting with diffused lighting and then cleaning up the mess just made it so exhausting, I stayed away from pictures and editing and writing for two days. Hence the delay in posting the recipe after teasing you all with the picture on fb. Apologies!

Makes 20 small cookies
IMG_8095
Egg- 1 medium
Granulated sugar- 63 grams
Lime juice- 1/2 tsp (optional)
Vanilla extract- 1/2 tsp (optional)
Ground almonds- 150 gms
Fine semolina- 40 gms
Baking powder- 1/2 tsp
Vegetable oil- 1 tbsp 
Powdered sugar- to roll the cookies
IMG_8142
Beat the egg and sugar together in a mixing bowl till pale yellow. I used my hand whisk to do this, but feel free to use a hand blender if you please.
Add the lime juice and vanilla extract to it and continue whisking till well mixed.
Throw in the ground almonds, semolina and baking powder one after the other and fold it all in using a spatula. The mix would be slightly coarse, but that's ok. Just make sure you mix it well.
Pour the vegetable oil and give a thorough mix till they all come together.
You can either chuck the bowl into the refrigerator for a couple of minutes for the dough to set which would make it easier to roll, but I didnt need to do this as the dough was of perfect consistency.
Even after you have refrigerated, if your mix still is a little too loose, just add more semolina, or if its too thick, loosen it up with a few drops of milk.
In the mean time, preheat your oven to 160C and get the baking tray ready with baking paper.
Put a couple of spoons of powdered sugar on a plate and start rolling the dough.
Wet you hands lightly and make small balls with the dough (about half tbsp per ball) and roll in icing sugar. The ball should be completely covered with icing sugar.
place them about an inch apart on the baking sheet. The cookies expand when baking and the icing sugar cracks giving it that crinkly top effect.
Bake in the oven for 20 minutes. Take out of the oven and cool for about 5 minutes after which you can (eat them non stop or) transfer on to a wire rack and cool completely before storing in air tight containers or zip lock bags.
IMG_8077
Notes: Feel free to double the recipe for a larger batch
I used gluten free baking powder.
The cookies are not really crunchy, but more cakey in consistency (in a nice sort of way, I promise). bake them a little longer if you want them crunchy

Wednesday, 20 March 2013

Vanilla macarons with speculoos filling

IMG_7420
Dora of BoBo Macarons had given a master class on macaron making at the Bloggers' Buzz event, and that really pushed my confidence levels. I got down to business a few days after the class with a free mind and casual approach and voila, the perfect macarons at my disposal. I had tried espresso macarons a while back (when the macaron rage was full on) and although they weren't perfect, at that time I thought it was an accomplishment. After that I would have had at least 4 to 5 disasters and had almost given up on making macarons when Dora showed us how easy it was. Really, you need to see an expert do it all with ease to actually learn the art of macaron making. 

So after the success with vanilla macarons, I was over confident that I had tackled the macaron monster. and happily agreed to make some chai spiced macarons for a shoot (as per request of course). Little did I know the macarons had a mind of their own. The day before the shoot, I shortlisted Meeta's recipe for the same (
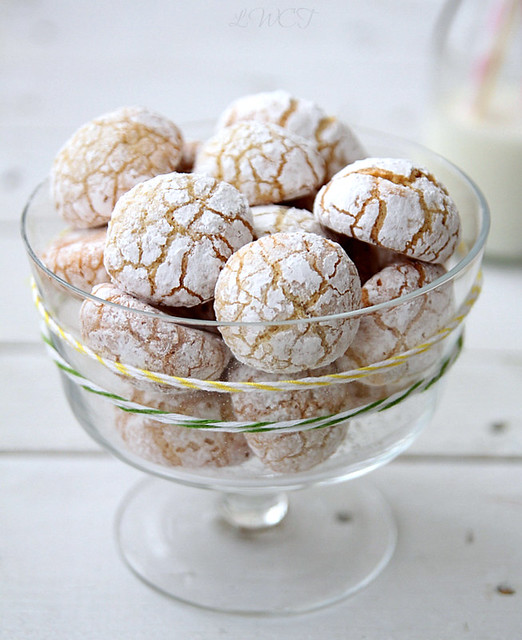
spiced chai macarons) and got down to business- confident to the core and a bit nervous at the thought of ending up with no feet at all. Well, feet were the least of my problems. The first batch had feet but came out cracked on top, like crazy cracked. Of course, what do I do first, panic. Panicked like crazy for about 1/2 an hour, read up on troubleshooting macarons, thought it was the temperature that caused it to crack and decided to make another batch. Followed the same recipe, reduced temperature a bit and nope, no difference, cracked tops on some, and those which didn't crack came out with crinkled tops. Chucked out that lot as well. 
IMG_7457
By this time, I was almost in tears. I immediately called up Shab (an expert at this) who calmed me down and I decided to do the recipe I was used to, with just the addition of the spiced chai powder. Piped them out onto two trays and this time, one tray came out sort of perfect, but the other again crinkled and cracked tops. The problem here was... I had no clue what the hell I was doing wrong, to actually rectify it. If one tray of the same batch came out right and the other didn't, it couldn't have been the macronage or the setting time or the temperature. The only reason I could come up with was the tray lining used. One was a silicone mat and the other just baking paper. The macs on silicone mat came out good whereas the other was rubbish. I got around 6 to 8 decent macs from that lot, but it still wasn't enough for the shoot.

My mum called at the exact minute I was fretting over the macs and managed to freak her out as well. Her solution, just buy them from the store. If only chai spiced macs were readily available..and that too not filled, because that I had to do on the day of the shoot since they wanted to capture the piping technique. I had other dishes to prep for the shoot, plus a prop consultation by the stylist and I was a mess by then. I decided to give the macs a break and started tackling my other dishes. And then at around 9 at night I decided to give macs one last try. Yup, you guessed it right..disaster again. I mean I just didn't know what to do. Sorted out around 10 decent macs from the 4 batches I made, which means just 5 sandwiches. I knew I was in deep shit and had to figure out a way to make the macs work at the shoot. Lesson learnt..never ever agree to do macs for anyone. Like Dora said, your mood clearly reflects on the macs you make, I completely believe that now!
IMG_7563
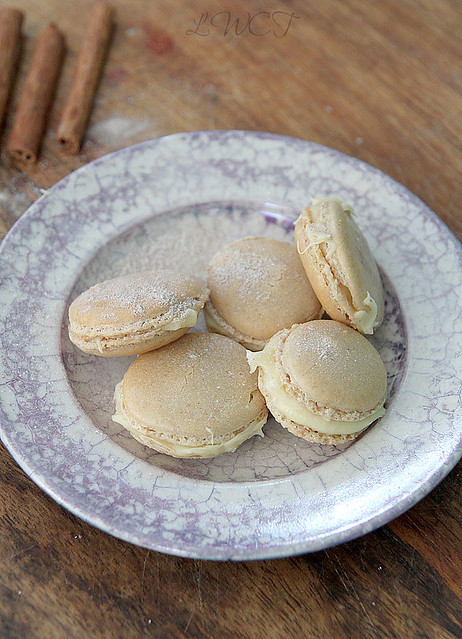
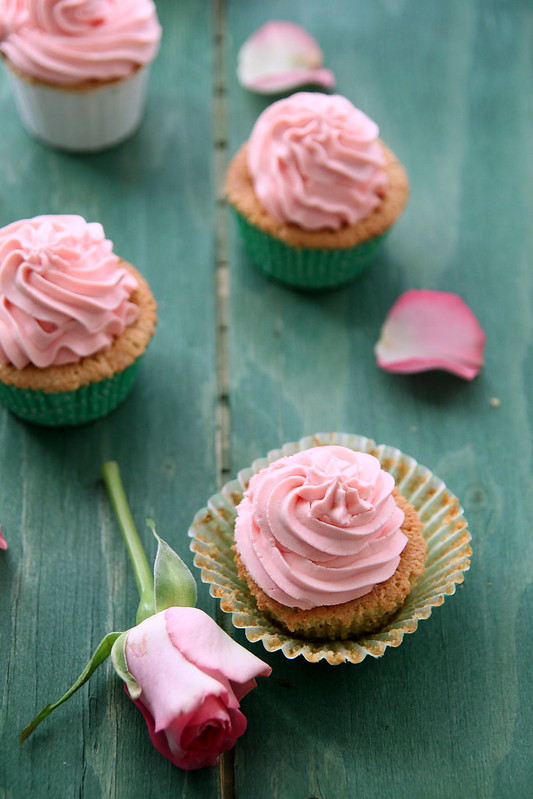
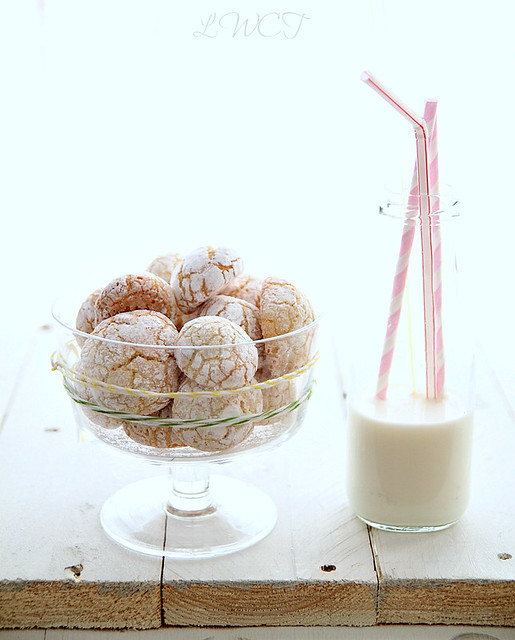
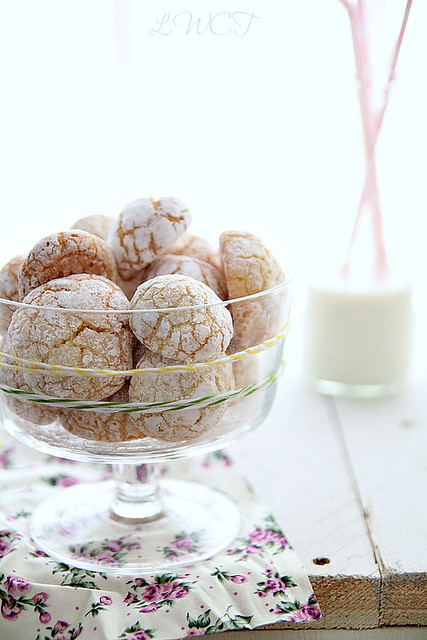
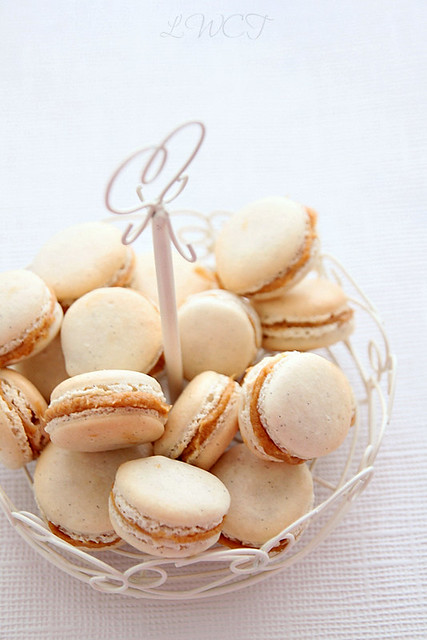
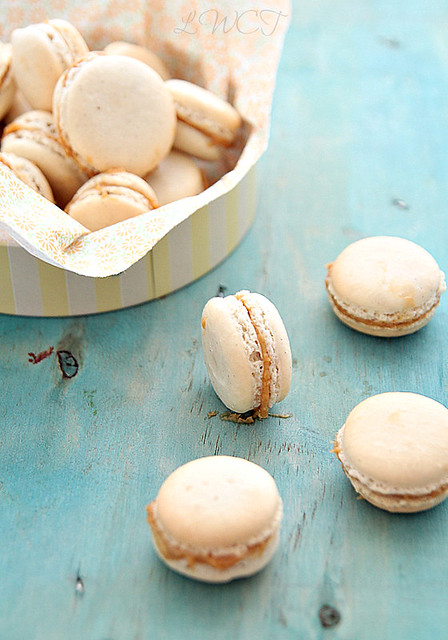
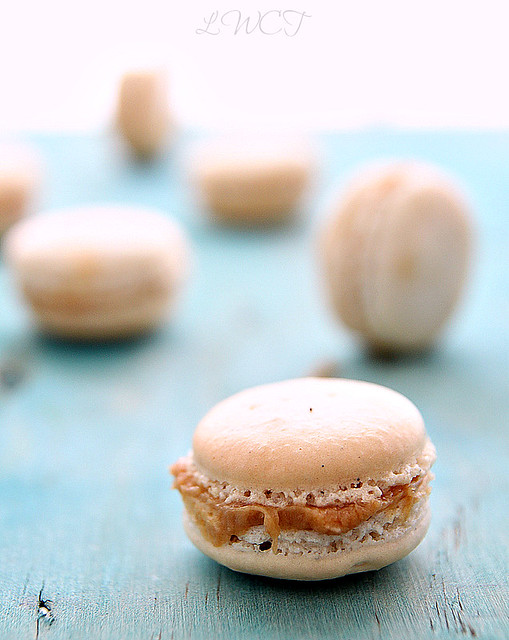
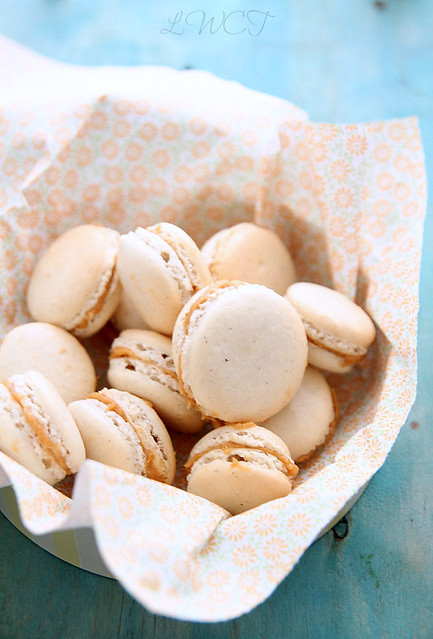
In the pic above you can see the disastrous macs (see the cracks?). Even after sandwiching them, they looked ugly. The flavour however was brilliant and I hope to try them out again when my macaron phobia is over. Comparing the vanilla macs to the chai ones, I'm in awe of how great they turned out. The biscoff / speculoos spread is a current fav and Nutella has been happily replaced. Keeping the macs simple with vanilla worked because the speculoos filling is fab and that was the only way to bring out its flavour. I loved the combo and some of our friends who tried it, loved it as well.

Recipe adapted from here, makes around 18 to 20 sandwiched macs (originally from Ottolenghi)
Ground almonds/ almond meal- 60 gms
Powdered sugar- 100 gms
Caster sugar- 40 gms
Vanilla paste- 1/2 tsp (or 1/2 tsp vanilla extract)
Egg whites- 60 gms (I used eggs whites from a carton Two Chicks)

For the filling
Double cream- 1/4 cup
Speculoos spread- 4 tbsp (Lotus spread)
Granulated sugar- 2 tbsp (optional)
IMG_7435
If you are trying macs for the first time, do read Demystifying Macarons by the ever talented Helen Dujardin and you will be fine (except if the macs just decide they will not make us happy).
Before you start, get the baking trays lined with baking paper and the piping bag with round tip nozzle ready.
Sift the icing sugar and almond meal together once or twice to make sure there are no lumps. Its ok if they are not too fine. 
In a free standing mixer with whisk attachment whisk the egg whites till frothy.
Add the caster sugar bit by bit, while continuously beating, till soft peaks form.
It should hold its peak shape when you lift the whisk, but shouldn't be too dry and stiff.
Add two spoons of almond powder mix into the meringue and fold it all in using a spatula. You can be a bit vigorous here.
Add the remaining almond powder mix and slowly fold it in till you get a smooth mix.
To check if the consistency is right the batter should fall back in ribbons when you lift the spatula.
Also put a spoon full of the batter on a plate and if it spreads out on its own (not too fast) then you are good to go. If it doesn't, give a couple more folds and loosen it out. This is very tricky, if too loose  you are ruined.

IMG_7452-2
Fill the piping bag with batter and pipe small rounds on to the trays. leave around 2 inches gap between the shells.
Gently tap the trays on the kitchen counter to rid of the air bubbles and keep aside to dry. This can range from 15 minutes to about an hour, depending on the humidity of the place. 
They are ready to bake when a film forms on the shells and when you lightly touch them, they no longer stick to your fingers.
Pre-heat oven to 140C and bake the macarons on the middle rack for 12 to 14 minutes. And do pray that nothing goes wrong in the oven. 
Once time is up, take the trays out of the oven and leave aside to cool completely after which you can carefully remove the shells from the paper and store in an air tight container till ready to pipe.

IMG_7477
For the filling, whip the double cream till soft peaks form.
Fold in the sugar and speculoos spread and mix till they all come together.
I have eye balled the measurements here, if you need more spread flavour coming through, then add more.

Either fill a piping bag with the filling and pipe on to the macaron shells or if you are lazy like me, use a small tea spoon and spread on to the shells.
Sandwich them and store in the refrigerator in an air tight container over night for the flavours to set in.