Monday 29 November 2010

Thai-inspired butternut squash soup

Made the first soup of the season and it wasn't a favourite. Its the first time I've cooked with butternut squash and to be honest I wasn't too fond of the obvious sweetness...at least not in a soup for sure. I spiced it up quite a bit, in spite of that it was still sweet and not my kinda soup flavour. 
I adapted the Thai-spiced roast pumpkin soup recipe by Cooksister for this soup. The changes I made were:
I replaced the Pumpkin with 500 gms of butternut squash
Used a medium size leek stalk instead of the onion
Chopped up two pods of garlic and added to the leek while frying
Used red curry paste instead of the green curry paste
Just before I pureed the soup, I added a slit chilli as well to the mix since it was too sweet for my liking
Added a dash of Maggi seasoning towards the end
Drizzled some coconut milk on top and served it hot with some garlic and herb bread.

Thursday 25 November 2010

Vanilla-flavoured custard cake

The moment I saw Aparna's custard powder cake, I knew I had to try it out. In all honesty, I love plain cakes and if its vanilla flavoured, I'm sold.

I decided to try out the version with the egg in it and didn't regret. Aparna had mentioned it was a comfortably sweet cake and she was right. Although, just to take it a notch higher, I dusted icing sugar on top. The top was a bit crumbly, but this dense cake was perfect with a cuppa tea on a cold Autumn day. 
The next time I'd probably try it out as the base for an upside down cake or 'jam' it up in a sort of Victoria sponge cake way. Whatever it is, this cake is a keeper because it is absolutely fuss free and delicious and took me about 15 minutes to prepare.

Recipe adapted from here as Aparna mentioned (I halved it)
All purpose flour- 1 cup
Vanilla flavoured custard powder- 43 gms
Granulated sugar- 1 cup
Baking powder- 1 tsp
Butter- 125 gms
Eggs- 2
Milk- 1/2 cup
Vanilla extract- 1 tsp
Pre-heat oven to 160C
Mix all the dry ingredients together in a mixing bowl
Add the rest of the ingredients and mix until well combined, either with a wooden spoon or with an electric mixer which I what I used.
Pour into a greased or lined round cake tin (9 inch) and bake for about 55 minutes or till a tooth pick inserted in the centre comes out clean.
Cool on a wire rack and just before you serve, dust with some icing sugar and serve with a smile:)
Notes: OK, so just before I started I realized Id run short of AP flour and so I used about 3/4 cup of plain flour and rest was wholemeal flour. Didn't make any difference I'm assuming
The original recipe calls for Self raising flour and since I didn't have that either I used 1 tsp baking powder.

Tuesday 23 November 2010

Kashmiri chicken curry with cumin flavoured rice

This is a recipe my aunt passed on a few weeks back after I called and harassed her, that is! I googled it quite a bit but none that looked appetising enough turned up. So I got it from the expert herself. I remember her making this during certain family functions and used to serve it with parathas or like my cousin later mentioned, fried rice. 

While I was taking down the recipe, it felt like a really long procedure, but once I got started, it was actually a breezy affair. Usually if it is a recipe that requires you to purée and blend and grind, I think twice about making it. But this, in spite of all that was not too treacherous...maybe it was that urge to taste something you used to love so much, that made me do this. But seriously, if I need to say that, you have no choice but to believe me. By now you would already know how incredibly lazy I am. 
My aunt told me she got this recipe from a not-so-popular magazine and this was in one corner of a page. She cut out the recipe and once she tried it there was no going back. I'd say the same for me too. This is definitely on my list the next time i entertain guests...especially if I want to show off a bit:)

The curry is quite spicy, rich and creamy and tastes even better the next day. I served it with cumin flavoured rice and have absolutely no regrets. 
I have halved the recipe here, since I was trying it out for the first time. Feel free to double it.

Kashmiri chicken curry
Chicken- 750 gms, cleaned and cut into medium pieces (I used thighs and legs, bone in pieces)
Onions- 2, medium, chopped and pureed
Tomato- 3 ripe ones, pureed
Garlic paste- 1 tbsp
Ginger paste- 1 tbsp
Hot water- 1 1/2 cups
Cashew nuts- 15 no's, ground with a tbsp or so of water to form a thick paste
Oil- 3 tbsp
Ghee- 1 1/2 tbsp (optional)

To grind:
Turmeric powder- 3/4 tsp
Kashmiri chilli powder- 1 tbsp or 6 to 7 dry red chilliesFennel seeds- 3/4 tsp
Cloves- 6
Cinnamon sticks- 2 inch long 2 pieces
In a large heavy bottomed pan, heat the oil.
On medium heat, fry the onion paste, ginger and garlic paste till light brown.
Add the ground mix, sauté and cook till the mix turns a deep brown colour and oil separates. This is very important.
Add the puréed tomato to the mix, stir and again on medium heat cook till the oil separates. Don't hurry this process.
Toss in the chicken pieces and mix well till they are all coated with the masala. 
Add enough salt and hot water. Stir well, cover and cook till the chicken is almost done...say about 15 minutes or so.
Then add the cashew paste and give it a quick stir. 
Reduce the heat to low and cook again for 6 to 7 minutes.
Add a dash of ghee (if using) and serve hot with rice or parathas)
Notes: I would reduce the chilli powder to about 1/2 tbsp the next time
You can chop the onion finely instead of puréeing it. 
Cooking the masala is very important..it becomes a really dark colour and the oil forms a layer. Also make sure you do this on medium heat only.

Cumin flavoured rice

Basmati rice- 1 cup, washed and soaked for at least 15 mins
Boiling water- 2 cups
Ghee (clarified butter)- 1 1/2 tbsp
Turmeric powder- 1/4 tsp (optional)
Cloves- 2
Cinnamon- 1 inch stick
Cardamom- 3
Cumin seeds- 1 tbsp
Lime juice- 1/2 tsp
Salt- to taste
Fried onions and cashew nuts- to garnish (optional) (I shallow fry it in some oil, drain and keep it ready)
In a shallow pan heat the ghee and add the cloves, cinnamon and cardamom. Stir till they start to sizzle.
Drain the rice completely and add to the pan. Fry for a few minutes, stirring at intervals.
Add the cumin seeds and turmeric powder and mix maxing sure the rice is coated evenly.
Pour boiling water, lime juice and salt and give one final stir.
Close with a lid and cook on medium heat till the rice is done..about 10 to 12 minutes.
Just before you serve, fluff the rice, garnish with the fried onions and cashew nuts or coriander leaves and serve hot.

Sunday 21 November 2010

Hot chocolate, a blanket to cozy up and a chick lit in hand

....bliss??? I'd say so especially on a weekday when otherwise I'm running around like a headless chicken trying to finish off chores and deadlines and gym before I take my vacation end of this year. I was thinking of not taking any more freelance assignments this year, but a lil extra pocket money wont hurt right, especially when you are going on holiday.
Hot chocolate at the restaurants and cafes are not really a favourite of mine because I am not a sucker for the bitter dark choc taste and will have to douse so much of sugar into it and Ro gives me the stare. But at home, I made Nigella Lawson's 'Adults Hot Chocolate' with loads of sugar and honey as the recipe called. 
My current obsession are these lovely caramel flavoured tea biscuits called Lotus which I more or less have with anything and everything these days. Dipped them in the hot chocolate, wrapped myself up in a blanket and read to my hearts content the Shopaholic series, in between drifting off to the Prada, Dior and Versace sections at Harrods ;)

Adapted from Nigella's Chocolate Heaven on Nigella Feasts (makes 1 large coffee mug)
Milk- 1 cup (preferably full fat..yeah go all out)
Dark chocolate- 50 gms
Cinnamon powder- 1/4 tsp (or about 1 inch of a cinnamon stick)
Honey- 2 tsp
Dark brown sugar- 1 tsp
Vanilla extract- 1/2 tsp
Dark rum or Kahlua- 1 tbsp or to taste (optional)

Pour the milk into a saucepan and break in the chocolate along with the cinnamon sugar and honey. Stir well on medium heat until the chocolate melts.
Splash in the vanilla extract and rum (if adding) and whisk till it slightly starts bubbling around the edges, but not boiling. It should be a slightly creamy, thick consistency.
Add more sugar at this stage if required.
Take out the cinnamon stick (if using) and pour into a coffee mug and sip on it while its still steaming hot.
Notes: You can add Baileys, whisky or even brandy as your choice of alcohol.
Brown sugar can be replaced with normal sugar, probably need to add a wee bit more.
I preferred cinnamon powder instead of the stick because the flavour was a bit more stronger and strangely I loved it in hot chocolate.

Thursday 18 November 2010

Swede and carrot thoran (stir fried with coconut)

I had never cooked or eaten swede, till today that is. And I'm pretty sure it will be the last in a preparation like this. I am yet to try out the swede mash, which I hear is pretty decent, but it will have to wait.

As I had mentioned in my previous post about piling things in my cart, this pack of swede and carrot diced and ready to cook, was also part of that. 
I followed the recipe for a basic thoran (South Indian preparation with coconut) replacing asparagus with the swede and carrot (approx. 250 gms each), chopped into cubes.
You can have it with roti or as a side to rice and dal.

Tuesday 16 November 2010

Stir fried rice noodles and Pork Vindaloo

I was not that big of a pork fan till I somehow ended up making a pork fry once. The meat was so tender and it tasted so damn good, I made it again and again....but just that one preparation and that too with pork shoulders and none of that immensely greasy pork fat which I despise, and Ro loves. Its the same case with my mom as well. She makes yummy pork curries and stir fries, but has only the gravy. So the other day we were casually talking and then she suddenly blurt out that she'd made this amazing Pork Vindaloo and it was so good even SHE ate it. That was a revelation and so I decided to give it a go as well. I took down her recipe but got side tracked and came up with a more complicated recipe but the outcome was simply marvellous. 
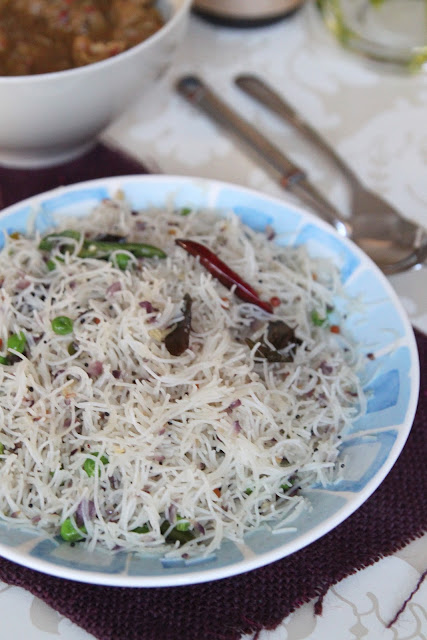
The stir fried rice noodles also kinda happened by fluke. I have this bad habit of grabbing things at the supermarket and piling it up in my cart with the intention of making something with it, but the moment I get home I forget and end up throwing it out once other life starts growing on it. Yes these noodles were once part of that scenario, but this time Id done proper research on what to do with it and so it didn't get chucked. They came already cooked in these small packets (one of the reasons I picked it up in the first place) and all you need to do is stir fry it with whatever veggie or meat you want for 2 minutes and you're good to go. I decided to do a South Indian version (upma as its called). But once I tasted it, I wasn't too impressed. Its alright, not out of this world. So that's not really gonna make its way back into my kitchen that often, but the pork vindaloo..definitely a YES and strangely the combo was a good one.

Stir fried rice noodles (rice noodle upma)
(loosely adapted from here)
Rice noodles- 300 gms (cooked as per instructions)
Mustard seeds- 1/2 tsp
Curry leaves- 1 sprig
Dry red chillies- 3
Urud/ chana dal- 1 tsp
Onion- 1 small, chopped into tiny pieces
Green chillies- 3, slit lengthwise
Ginger- 1/2 inch piece, thinly sliced
Frozen green peas- 1/4 cup
Oil- 1/2 tbsp

In a wok heat the oil and splutter mustard seeds.
Add the curry leaves, dal and dry red chillies and sauté for 5 seconds.
Add the onions, green chillies and ginger to this and saute on medium heat till the onions turn a little brown. Not too much though.
To this add the frozen green peas, salt and cooked rice noodles and on medium- high heat stir fry for a few minutes, making sure the masala is evenly coated.
Take it off the heat and serve hot with any curry of your choice.
Notes: You can add any veggie of your choice..carrots, beans etc.
I cut the long cooked strips of noodles randomly so i got smaller easier to handle strips before throwing it into the wok.

Pork Vindaloo
(a mix of Anjum Anand's recipe and Yummy o yummy's recipe)
Diced pork shoulder or any cut you please- 450 gms
Pepper powder- 1/2 tsp
Salt- to taste

To grind:
Cumin seeds- 1/2 tbsp
Cinnamon sticks- 1/2 inch piece
Cloves- 2
Cardamom seeds- from 3 cardamom pods. Lightly crush them and take off the seeds
Dry red chillies- 4
Whole black peppercorns- 1/2 tsp
Black mustard seeds- 1/2 tsp
Fenugreek seeds- 1/2 tsp (I only had fenugreek powder so used about a 1/4 tsp)

Onion- 1 large, roughly chopped
Ginger paste- 1 tbsp
Garlic paste- 1 tbsp
Coriander powder- 1 tsp
Turmeric powder- 1/4 tsp
White wine vinegar- 2 tbsp
Brown sugar- 1/4 tsp
Oil- 1 tbsp
Marinate the cleaned pork cubes with pepper powder and enough salt. Keep aside.
Grind together all the ingredients under the 'to grind' section. Mix the white wine vinegar and brown sugar to the ground spices. Keep aside.
In a pressure cooker, heat the oil and sauté the onions on medium heat till they become slightly brown. About 10 to 15 minutes.
Remove with a slotted spoon and keep aside to cool slightly.
Once cooled, combine it with the spice-vinegar mix and blend to a smooth paste like consistency.
In the same pressure cooker, add some more oil if required and sauté the ginger and garlic paste till the raw smell goes.
Add the coriander powder and turmeric powder and stir for a further 2 minutes.
Finally add the ground spice-onion mix and sauté on medium heat till the oil starts separating.
Throw in the diced pork, salt and give a generous stir, making sure the masala coats all the pork cubes well.
Add about 2/3rds of a cup of water, give one more stir and close with the lid.
Once the steam appears, place the weight and cook for 3 to 4 whistles.
Wait till the steam releases on its own and then open the lid. Do a taste check, add salt if required.
There will still be some liquid left. Either leave as it is or if you want it dry, transfer the same to a frying pan and fry till you get the required consistency.
I paired it with the rice noodles and so I preferred some gravy.
Notes: You can make the same with beef, lamb or even chicken.
The curry was extremely spicy and I think the next time I'll reduce the red chillies to 2.
Its one of those curries that taste extremely good the next day.

Monday 15 November 2010

Mulled (spiced) wine

In a crabby mood (even the picture makes me wanna cry) so I'm going to be mean. It's my blog, and I'm allowed to be whatever I am. If you are going to be offended in any way, please stop reading and just scroll through the pics. I am so angry and pissed off right now, I should actually start a separate blog to just bitch and vent out my frustration and most importantly keep it private. My other blog was meant to be for that but sadly I now have a lot of relatives, including my parents, reading it...so cant be a wreck there. Circumstances are making me very unattractive...it makes me wanna pull my hair out and bitch slap every single person in my way, sometimes I wish the floor would just open and swallow me in but most of the time, I'd wish I was invisible. I would love to go on and on, but in short, men are seriously inconsiderate. period!!! If you're not married...just give yourself a tight hug, you are the lucky one. This is not just my finding btw :O

On a drunk note, here I am posting a recipe for mulled wine which I have become very fond of after being a regular at the Christmas German markets spread around England during this time. I didn't want to post anything in such a mood but if I didn't, remember the 'pulling out the hair bit'? I'm afraid I might actually end up doing that...so since I've stupidly begun to convince myself that blogging is therapeutic and it makes me calm...I thought I'll post it any way.
Scene- Winter Wonderland, Hyde Park: It would be freezing and maybe even snowing and we'd be huddled under a canopy waiting for the mulled wine....served hot and spicy that you can actually trace it all the way down to your stomach. An over dose of it the first year and an overdose of mulled cider last year has kinda made me a lil less fond this year, but I'd definitely be having a few mugs full this year as well for sure....I mean how can I not..you only live once right? (thank god for that).

Red wine- 1 cup (full bodied, semi- dry but don't waste expensive wine on this..savour that instead)
Water- 1/2 cup
Sugar- 1/4 to 1/2 cup (depending on your taste really)
Cloves- 5
1 inch cinnamon sticks- 4
Whole black peppercorns- 1 tsp
Chopped and peeled ginger- 1/2 tbsp
Lime juice- 1/2 tbsp
A lemon wedge

To a sauce pan add the water, sugar, spices, ginger and lime juice. Close with a lid and on low to medium heat simmer for about 15 minutes. 
Take it off the flame add the red wine and lemon wedge. Give a stir and place it back on fire...simmer for 10 more minutes. Make sure you don't boil it.
Pour into wine glasses/ cups and serve hot. 
Notes: Watch while pouring the 2nd round, because you might be a wee bit tipsy and you don't want hot liquid falling on parts that might be of need later ;)
If you don't want an alcoholic version, you can of course do this with apple juice and orange juice (yup have tried that as well)

Thursday 11 November 2010

Red velvet cake with cream cheese frosting

I think every food blog should have a red velvet cake recipe...what say???? I know I want one and trust me I've been at it for so darn long. The Hummingbird Bakery here in Notting Hill got me hooked on to the lil red darlings about a year back and since then I have been trying to recreate it at home. Five times and I've never been successful. Have tried different recipes, different brands, different procedures, but never have I managed to get that red colour....that I am so deeply in love with. I know using food colouring is not the best, but what the hell...once in a blue moon you crave some red velvet goodness and its OK to indulge, I guess!

So anyhoo, after all those disaster episodes I finally decided to use a ready mix..yes, I'm a cheater..a good one at that, because I couldn't for the love of me find a red velvet cake mix in any of the supermarkets here in London and so I wrote to my cousin in the US, who happened to be visiting me, to bring me the original Duncan Hines Red Velvet Cake mix. He did and boy was I glad. If you cant make em, buy them...that motto kinda works great with me, you know :)
I was waiting for an occasion to make it, but my baby (read Ro) was nagging me saying I never make cakes (ya rt!) for him. So finally I decided to give this mix a go and I was so happy when I saw the red colour appear when I mixed it all together. I forgot how amazingly easy ready mixes were. I even thought out loud, that I should go back to being a Betty Crocker ready mix fan. It makes life so much more easier especially if you have any intention of filling and frosting it. The cakes were ready in no time and they were so spongy and soft and doing the job of the original red velvet so beautifully.

Now what is red velvet without the traditional cream cheese frosting? So I finally put my cupcake decorating class to good use and for the first time my cream cheese frosting came out perfect...it was the right consistency to spread and to pipe, something I always managed to screw before I was shown how to do it. A lot of you wrote in asking for tips from that cupcake decorating class. This is one of the proportions I learned for the cream cheese frosting and hence forth I think I'm gonna follow it and be a happy gal.

I am not giving you the cake recipe simply because I didn't make it from scratch and the recipe that I have been following haven't been yielding good results. So here is the cream cheese frosting recipe.
Cream cheese- 175 gms
Mascarpone cheese- 175 gms
Icing sugar- 83 gms
Vanilla extract- 1/2 tsp

Mix together all the ingredients in a mixing bowl and using a paddle attachment beat on low speed till they are all just combined and then on medium speed for about a minute or two max till you gain the required consistency. Don't over-beat it because once the icing becomes loose, there is absolutely nothing you can do about it. Trust me, I KNOW!
Once thing I learned while making a layer cake is to weigh the batter equally for a consistent cake size. That way you wont end up with 2 different sizes.
I also find that after doing a crumb coating for the cake, placing it in the refrigerator for about 15 to 20 minutes helps while doing the final layer on top.

Tuesday 9 November 2010

Review: Penn State Snacks

I thought I'd never find pretzels here in UK and boy was I glad when Penn State, the leading supplier of pretzels here in the UK, contacted me to review their Christmas snack Box.

A big red box looking all Christmassy landed at my door step and in the box was the Original Sea Salted Pretzels, the Sour Cream & Chive flavour, Spicy Jalfrezi and an array of exciting dips to go with it. I devoured each and every one of it with great enthusiasm and what went through my mind immediately was it would be great to snack on these while watching a movie or just chilling out at home.
Now the exciting bit is that these Pretzels are baked and not fried which makes you a little less guilty gobbling them up and they are lower in fat as well...good eh? Absolutely!
The original Sea Salted Pretzels were basic as far as taste was concerned with the initial salty flavour melting off and giving way to a crunchy pretzel. But what hit the spot for me was this dipped in the 'Mistletoe & Thyme' dip which was slightly sweet and caramelised with a hint of thyme. The combination was so good I found it hard to stop with just one.
I also tried the 'Cinnamon Wonderland' with the salty pretzels and they were nice too. The strong chocolate and cinnamon flavours combined well with the salty pretzels, but its not a combination everyone would like I suppose.
My favourite pretzel however was the Sour Cream and Chive- which as a flavour on its own is brilliant. Imagine pretzels with the same awesomeness included? Yes, it was mind blowing and I loved it so much that i went back to Sainsbury's to pick up a few more packets. I liked them on their own but I'm sure it would have been great with the Jingle Bell Chilli (I know, I love the name too), a honey and chilli mix.
The Jalfrezi flavour somehow didn't hit the spot for me. It was just about OK I would say. Although, what I did with it is, crumble it and layer it on top of a macaroni bake for that crispiness, and the Indian flavours it emitted went well with the bake.
The 'Cinnamon Wonderland' dip was really hard and it took me a lil over a minute to warm it up in the microwave and even then it wasn't as gooey as i liked it to be. I am thinking of using the leftover dip to drizzle on some cookies.

My favourite dip was the 'Mistletoe & Thyme' and I also served it with some chicken kebabs I'd made. It was a nice combination..the spiciness of the chicken with the chutney-like dip was a hit among my guests.
The Penn State pretzels are available in most of the leading grocery stores in England, but do check where all they are available on their website. I shall definitely be picking them up more often at the store now!

With thanks to Penn State for this wonderful box of goodies. 

Thursday 4 November 2010

Sweet and spicy Asian dipping sauce with Tibetan Momos

I was first introduced to Momos by my college mates in Chennai. I had three Tibetan friends in my class and they used to rant and rave about these, and invariably all of us ended up liking it so much we started harassing them to throw Momo parties. Even for our culturals there used to be Momo stalls and needless to say we absolutely loved gorging on those with the sauce topping it all.

I have no idea what came over me yesterday, but I had to make some Momos and I put in a message on one of these friends' FB page asking him for the recipe. He had not replied and my lack of patience didn't let me back out. So I harassed my best friend on gtalk asking for the recipe because she had made it once long back after seeing it in some mag. She gave me a-lil-bit-of-that a lil-bit-of-this recipe and I soooo knew I was gonna screw up and that's when I realized, why not head to the Chinese store and just buy the wrapper (which is where I usually screw up) and use the remaining mince meat which I'd frozen, as the filling. Oh how clever am I? Yes, clever indeed and ran to the Chinese store only to realize there were at least 4 varieties of dumpling wrappers and another 4 varieties of wonton wrappers. After a failed attempt at trying to understand what the store keeper was trying to explain, I called Ro, who was working from home, to check it up online and let me know. He just confused me even more (no surprises there). Anyway, picked the one I thought was apt and ran back home.

The focus here, however, is the kick-ass sauce I whipped up surprising me altogether. I usually don't experiment when it comes to food and follow a recipe religiously, but this time, I just threw in a few things and came up with this dipping sauce which I'm sure teams well with almost any Asian appetizer and maybe Indian ones like samosas and I'd even serve them as a dip for normal chips.
Filling:
I used this recipe for the mincemeat filling. I know its not authentic but by now you'd already know be familiar with my lack of patience and so had to make do with this. But my mom-in-laws spring roll filling is a good enough one I'd assume and so please do follow that for a more authentic recipe. 

Wrapping and cooking:
Now wrapping it up...I just blindly followed this video and it is actually as simple as that. But where I think I screwed up was the steaming bit which I either kept for too long or too short and it was a wee bit rubbery. If you guys have some knowledge about it please clear it for me. Is 20 minutes too short or too long a time to steam the dumplings??? 

Dipping sauce:
(The quantity is for a very small bowl of sauce, so adapt it to how much ever you'd like)
Tomato- 1/2 of one medium sized tomato, thinly sliced
Onion- 1 shallot, thinly sliced
Dried red chillies- 3 to 4 (or even more if you want it really spicy)
Chopped coriander leaves- 1 tbsp
Tomato ketchup- 1/2 tbsp (if you want it sweeter, add a wee bit more but not too much)
Cumin powder- a pinch (optional)
Soy sauce- a dash (Its optional , but if adding add very little)
Salt- to taste
Oil- 1/2 to 1 tbsp (yes I know its a lot for such small quantities, but it just worked for me. Reduce if you are not comfortable)
EVOO- a dash (optional)

In a saucepan, heat the oil and throw in the onions and red chillies. Sauté till they turn light brown.
Add the tomatoes, cumin powder, soy sauce and salt to this and on medium heat cook till the oil separates.
Add the tomato ketchup and coriander leaves and mix well for about a minute or so.
Take it off the fire and leave aside to cool a bit.
Now using either an immersion blender (oh how I love you immersion blender) or a pestle and mortar, grind/crush this till it becomes more or less mushy....not too paste like. Pulse it two or three times if using a blender.
Pour into a sauce bowl, add a dash of olive oil, mix well and serve with just about anything.
Notes: Adding garlic to this makes it even tastier, but I just didn't have time. Next time for sure.
Its like a tomato chutney, but with a sweetness attached to it.
I think I've found the perfect and easiest sauce for all my fried stuff.

Since the first batch didn't turn out well, I fried a few just to see if it would be any different. Well compared to the steamed ones, the fried ones were better but that is simply not an option for me cos I detest fried stuff. This is how it looked like:
Sending the sauce over to the Food Palette Red Event over at Torviewtoronto

Tuesday 2 November 2010

Spicy tomato rice

My lil brother buzzed me the other day to ask me how to make tomato rice. I didn't know really. I mean I did try it out once loooong back but it wasn't really the best. But at that time getting rice cooked without mashing or burning it was a big achievement and this simple tomato rice was indeed a day for celebration.  So when N asked me I passed on some random recipe I'd found on a blog and asked him to follow it to the dot. He did and even sent me a picture the next day saying it turned out good. I realized it definitely looked waaay better than the one I first made and so I took it upon myself to make the perfect spicy tomato rice. I also realized I dont have that many rice recipe here. And secretly, after I started watching Jamie's 30 minute meals, I am awesomely motivated and even better his method of cooking rice (which I'm sure all you guys would have know and even practise at home) of mixing it all together, was a revelation to me and I just had to make something rice related to test the waters again.

Basmati rice- 1 cup, washed two to three times and soaked in warm water.
Boiling water- 2 cups

To puree:
Tomatoes- 2
Ginger paste- 1/2 tsp
Garlic paste- 1/2 tsp

To sauté:
Oil/ Ghee- 1 tbsp
Onion- 1 medium, chopped into small slices
Kashmiri chilli powder- 1 tsp
Turmeric powder- 1/4 tsp
Cumin powder- 1/4 tsp
Asafoetida- a pinch
Sambar powder- 1/2 tsp (optional)
Tomato pickle- 1 tsp (optional)
Lime juice- 1 tsp
Salt- to taste

To temper:
Oil- 1 tsp
Mustard seeds- 1/2 tsp
Curry leaves- a sprig
Dry red chillies- 3
Channa/ Urud dal- 1 tsp
In a frying pan heat oil and saute the onions till lightly brown.
Add the puréed tomato-ggp mix, chilli, turmeric, cumin, sambar, asafoetida powder. tomato pickle and salt and give it a good stir making sure every things combined well.
On low-medium fire cook the tomato mix until oil starts separating. This is very important and to prevent it from sticking to the vessel, keep stirring in between and if its really dry add a tbsp of water or so.
Drain the rice and add to the tomato mixture once it turns to a slightly pulpy consistency.
Mix well making sure all the rice granules are coated with the tomato paste.
Turn the heat up to a medium and add the boiling water and the lime juice. Give a stir and cover with a lid.
Cook till the rice is done, approx 7 to 8 minutes.
Fluff it lightly and place in a serving bowl.
Add some oil in a small pan and splutter mustard seeds.
Then add curry leaves, dry red chillies and the dal and saute for a few minutes till they all start changing colours.
Pour over the rice, mix well and serve with raita, pickle and pappad. BLISS...let me assure you.
Notes: It was indeed a bit spicy but I loved it nonetheless. Reduce the chilli powder to half a tsp maybe.
The tomato pickle/ thokku adds that extra zing and i loved it. Its purely optional and so is the sambar powder.
The tadka also can be avoided. I just did it for glamour sake:)