Showing posts with label continental. Show all posts

Tuesday, 21 February 2012

French onion soup

IMG_8990
First of all, thanks a bunch to all of you who wrote in with all those words of consolation. It felt good to know I'm not alone in the whole Vday-bday saga. You girls rock. Hugs :)

The husband came back on Friday afternoon with a bad fever and it was like having a baby at home. I panic when anyone other than me fall sick and this was no different. Ro goes a bit overboard and acts like a whiny kid being all 'I'm so cold,' and 'touch and see if I have fever (every 5 mins) and has been on the couch snuggled up under the throw watching telly all day. Every evening I ask him, 'are you going to work tomo,' to which he says 'are you crazy.' So its been lunch and dinner non stop for the past 4 days and it has driven me a bit crazy because I haven't done my usual quota of articles. He claims his appetite has gone for a toss and this morning the fever subsided and turned into a cough and cold. Perfect time for soup I thought and decided on the French onion soup which I've seen in so many restaurants and has been curious about. Scouted around for a recipe and decided on Finla's descriptive one with minor changes.
IMG_8996
I am actually jinxed when it comes to soups. I am not crazy about soups and I seldom get them right when I make from scratch. Whenever we crave soup, we go for the canned ones, jazz it up with leek and such and enjoy it hot. I must also add that I am not a fan of the clear soups and prefer the creamy ones (cream of mushroom, chicken and celery topping the list) any day.

That is why I was pleasantly surprised at how much I enjoyed this soup. I must admit, its not an easy soup to make and takes an awful lot of time. The procedure is pretty straightforward but its all about timing (you cant just leave it to simmer on stove top and watch Gossip Girl in the meantime. I did it and had to face consequences). But the end result is rather rewarding, I assure you. You push past the cheesy bread, dip into the slightly sweet onion soup, and its bliss. Not exaggerating here, but it was delicious on a cold winter evening. I of course paired it with some dry white wine and wished I'd made some more to freeze and keep for a rainy day. Since my soup disasters have been plenty, I was not sure about making a huge quantity and I'm now kicking myself for not doing so. There's always a next time (or is there?).
212
Recipe adapted from here (serves 2)
Butter- 10 gms
Oil- 1 /2 tbsp
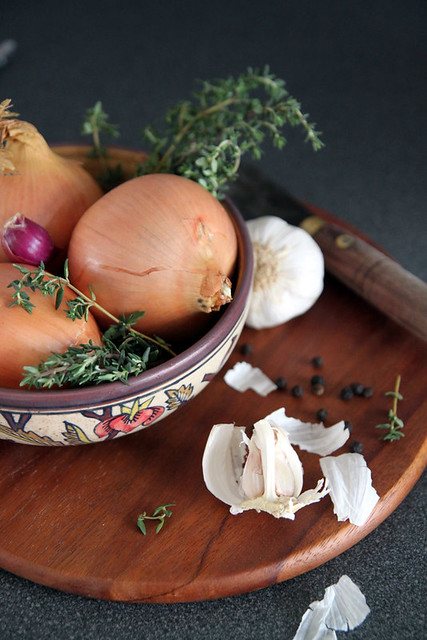
White onions- 2 large, thinly sliced (julienned)
Garlic- 3 pods, chopped fine
Fresh thyme- 1/2 tsp (chopped) (dried is fine as well)
Sugar- 1/2 tsp
Balsamic vinegar- 1 tsp
Plain flour- 2 tsp
Beef stock- 500 ml
Dry white wine- 3 tbsp
Sat and pepper- to taste

Croutons
Ciabatta slices- 10 to 12
Grated cheese- 1/2 cup (I used a mix of sharp Cheddar, Gouda and Emmental)
Garlic powder- 1 tsp
Olive oil- 2 tbsp
IMG_9005
Place a large stainless steel sauce pan over medium heat and melt the butter along with the oil
When it starts to sizzle add the chopped onions, garlic and some salt (to draw moisture out) and stir around for a while till the oil and butter coats them well.
After about 10 minutes, reduce heat to super low, add the chopped thyme and cook for about 30 to 40 minutes or till the onions wilt and turn a light brown (very imp.) in colour. Keep stirring in between to prevent the onion from sticking to the bottom. Caramelising the onions on low heat is the trick towards getting the perfect onion soup. You technically do this over a period of 3 hours (but as we all know, that long for the onions to caramelise is just not worth the effort, especially for a sick husband whose taste buds are all screwed up anyway).
Once you attain the light brown colour, add the sugar, crank up the heat to medium and let it turn darker. This could take about 8 to 10 minutes.
Follow up with vinegar and cook for a further 6 to 7 minutes till the colour completely changes to dark brown. Don't forget to keep stirring in between.
Get the stock ready at this point. Heat it up if using pre-made stock, or if using stock cubes, add boiling water to about 1 beef bouillon cube, dissolve and keep ready.
You can also pre heat the grill at this point.
Add the flour and cook for about a minute.
In goes the beef stock and white wine, stir well.
Do a taste check and season with enough salt and pepper.
Bring to a boil and then simmer for about 10 minutes.
Transfer to soup bowls.
IMG_8960-1
For the croutons, in a small bowl mix together the olive oil and garlic powder.
Arrange the ciabatta slices on a baking tray lined with foil paper and liberally brush the olive oil-garlic mix on both sides.
Place under a grill for exactly a minute.
Take it out, flip to the other side and chuck it back under the grill for one more minute (I managed to burn mine, so watch it like a hawk).

Assembling
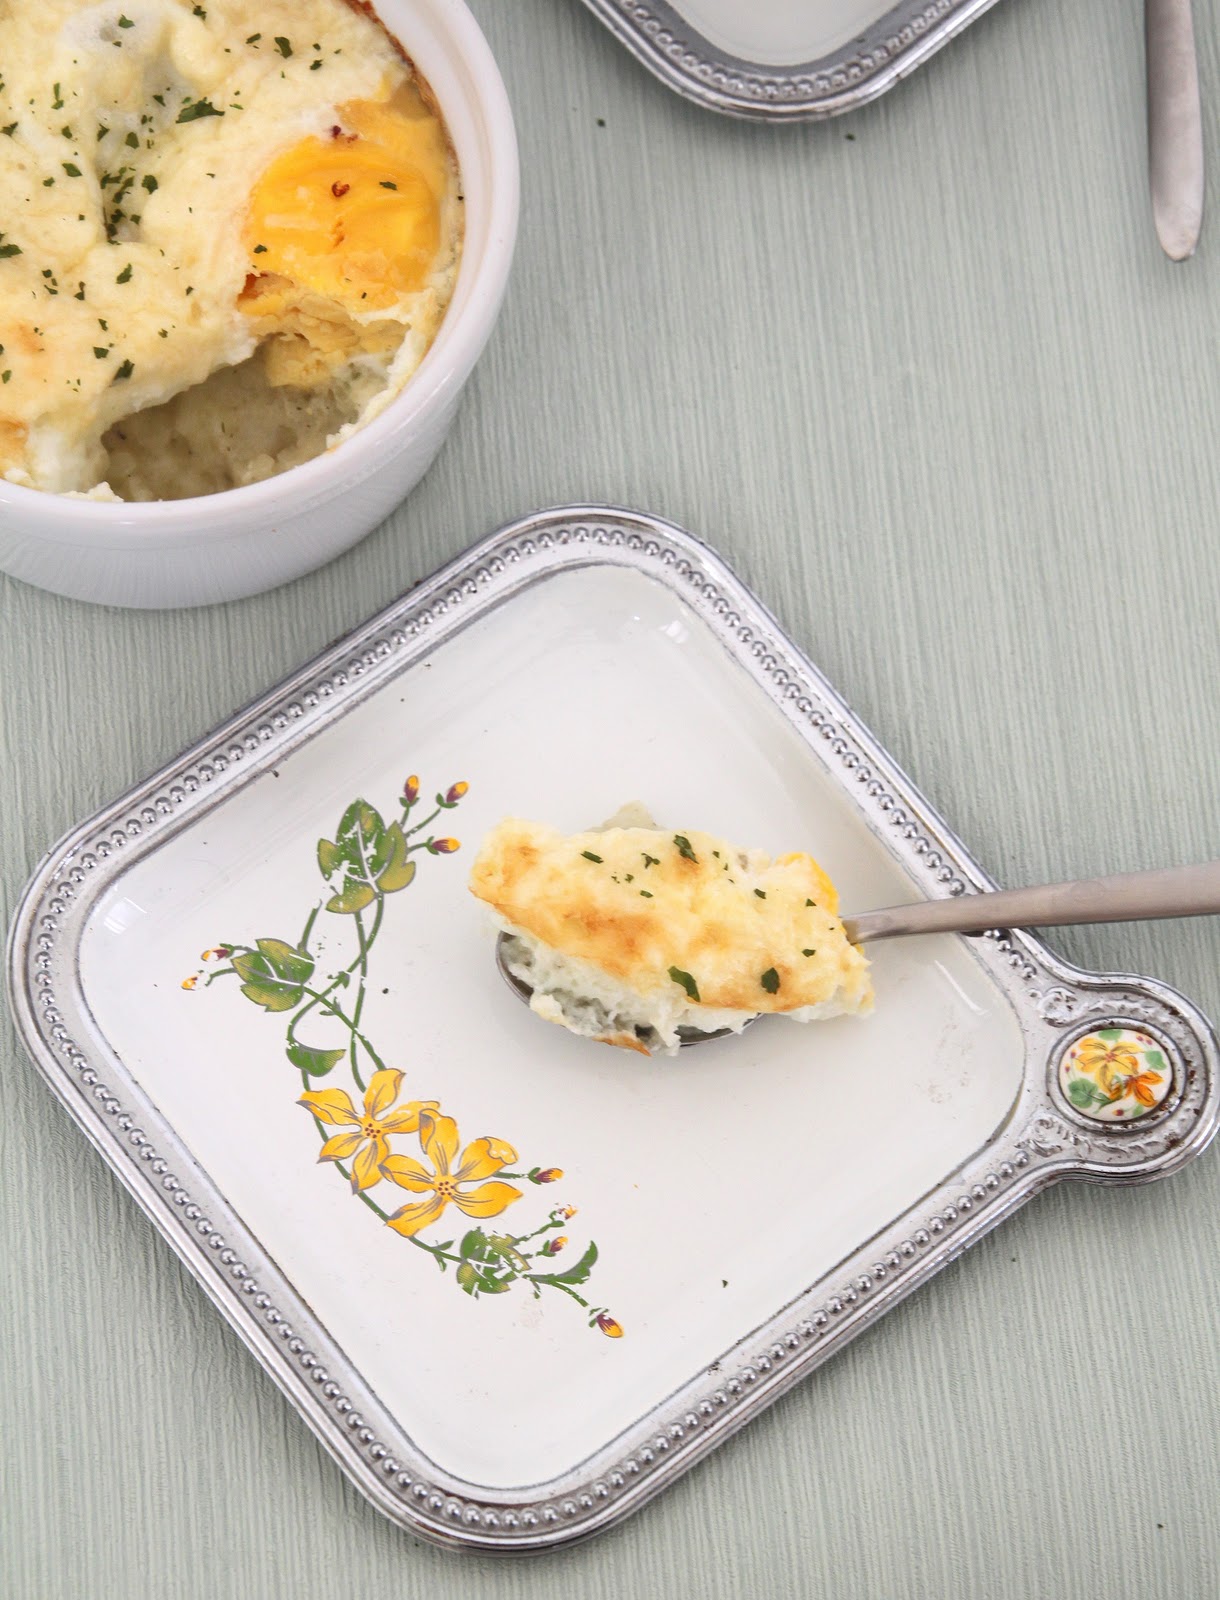
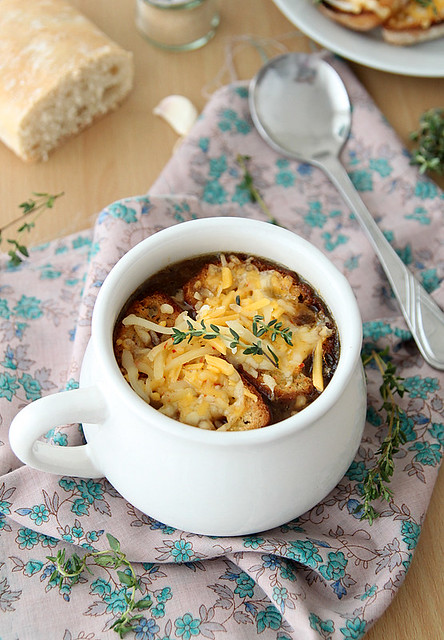
There are two ways to do this: Transfer the soup into oven safe bowls, top with toasted bread slices and generously scatter the cheese on top. Place under the grill till the cheese melts and then have it hot.
The other way to do this is to add the cheese to the toasted slices, chuck them back under the grill till the cheese melts (about 2 mins) and then top the soup with the cheesy slices.
IMG_9016
Notes: Don't use the red onions, they will be incredibly sweet.
Replace white wine with Cognac which is better any day
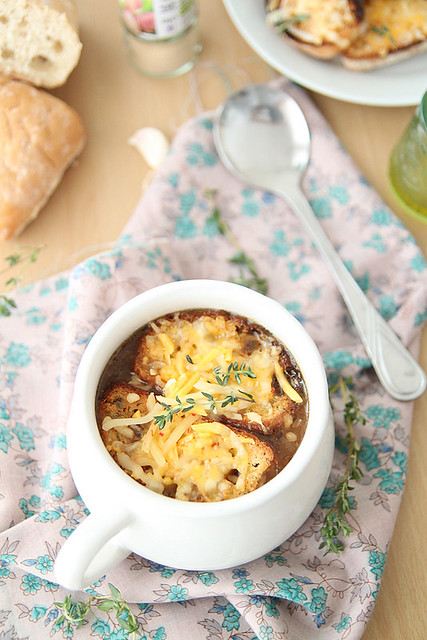
Traditionally a French baguette is used to top the soup, but I'm far from traditional and hence the ciabatta :)
Use 2 minced garlic cloves instead of garlic powder for the bread slices
Be extremely careful while caramelising the onions, as one bad move (could scorch) and your soup could taste bitter.
I followed the second method while assembling simply because my soup bowls were not oven safe.
You should be able to crush the onion easily between two fingers and you can be sure that the consistency is right.

Tuesday, 12 April 2011

Thomas Keller's Macaroni Gratin (a very dignified mac n cheese)

The 3 year old (read Ro) has been nagging me AGAIN! This time for macaroni and cheese of all the things. I have tried making mac & cheese so many times but it has always failed. I mean taste-wise its kinda fine, but I've never really got the consistency, the sauce or the look (????!!!!) right. Marks & Spencer has a good mac n cheese in their ready to eat section and I've resigned to buying it from there whenever I'm craving it.

So the other day Ro comes home from work and he's craving mac n cheese. I give him the brilliant idea of popping over to M&S and picking up a tub but no, he wants his super awesome food blogger wife (exact words) to make it instead. Sweet talking me into anything works, except cooking. I don't fall for it..never have and I'm pretty sure I never will. I tell him it takes at least 2 hours for me to make it and that I'm craving Chinese instead and he instantly changes his mind. We head to our favourite Chinese joint just down the road and are both happy. Ro more than me for some reason. How can someone juts let go of a craving like that???
Weeks passed and the mac n cheese idea was long forgotten. Everything was fine with the world, until I stumbled upon Ellie's stylish mac n cheese. Now when I crave something, its different..I have to have it no matter what. I've dragged Ro to a zillion stores and restaurants at ungodly hours just because I wanted the perfect churro or the perfect espresso coffee and baked at 10 in the night because I wanted something warm and sweet out of the oven.  He humours me most of the time, but otherwise tells me to piss off or make my own espresso at home.

So anyways, I'd bookmarked the recipe and decided to make it on a day I was lazy. mac n cheese, how long can it take anyway??? Apparently quite long. Its only after I started that I actually read what Ellie had written...30 minutes for the sauce alone...Ro was gonna get back home soon and I didn't have dinner ready (this after teasing him all day saying oh you are soo gonna thank me for tonights dinner). I almost changed my mind and postponed mac n cheese for a day I was proactive, and that's when Ro called to say he was grabbing a couple of drinks with his colleagues and would be home a bit late, but would definitely come for dinner (I didn't tease him any more..yeah sure, was my calm reply).

I started off the cooking process and this is no simple mac n cheese to make but taste-wise it was probably the best mac n cheese I ever had. It cannot really be called mac n CHEESE because its more of the white sauce that adds the richness than the cheese per se. Maybe that's what I liked about it because too much cheese can make it oily and unappetising, It cannot be whipped up in no time and you need to have immense patience. But the recipe is a total keeper, and so I'm penning it down for a day I'm super proactive and want to make gourmet mac n cheese :)
Recipe halved from here, originally from Thomas Keller's cookbook Bouchon
Macaroni- 115 gms (approx. 4 oz) (I used spirali since I already had a pack with me)
Cooked Ham/ Bacon- 1/4 cup, diced (I used bacon)
Grated nutmeg- a pinch
Thyme- 1 tsp, minced
Parmessan cheese- 1/4 cup, grated
Bread crumbs- 2 tbsp
Salt and pepper- to taste
Mornay sauce- 1 1/2 cups (recipe below)

Mornay sauce
Butter- 2 tbsp
White onion- 1/3 cup, diced (half of one large onion)
All purpose flour- 2 tbsp
Milk- 1 1/3 cup
Heavy cream- 1/2 cup + 3 tbsp
Bay leaf- 1
Peppercorns- 2
Whole cloves- 2
Ground Nutmeg- a pinch
Cheddar cheese- 1/4 cup
To make the sauce, place a diffuser (a tawa or so) on medium heat and a large saucepan on it.
Melt the butter and add the onion and a pinch of salt and cook stirring occasionally for about 3 minutes or until the onion turns translucent.
Sprinkle the flour and cook for a further 3 minutes, whisking constantly and making sure the roux doesn't burn.
Whisking constantly pour the milk and cream till they are mixed well.
Bring to a simmer and then add the bay leaf, black peppercorns and cloves.
Reduce heat to low and continue to simmer, whisking in between to make sure the sauce doesn't get burnt and doesn't form clumps. If it does, like Ellie says, pour into a new pan and continue the process instead of scraping the bottom.
Let it stay on a gentle simmer for about 30 minutes until the sauce becomes nice and thick, but smooth.
Take it off the flame, remove the peppercorns, cloves and bay leaf and add the cheese. Whisk to melt
You can use this sauce immediately or can make it the previous day or a week in advance and store it in the refrigerator. To thin it out later, if needed, add a dash of heavy cream to it.
Assembling:
Cook the macaroni according to the instructions on the cover. Drain and keep aside.
If the Mornay sauce was just made, then take it off the flame and into it add the cooked macaroni and bacon. Mix well and season with nutmeg, salt and pepper.
It may look a bit loose, but not to worry the macaroni will absorb the sauce while baking.
Pour into a baking dish or individual gratin dishes. Sprinkle with cheese and thyme, followed by bread crumbs
Bake in an oven pre-heated at 190C for 15 to 20 minutes or till the sauce bubbles at the sides.
If you want to brown the top a bit, turn on the grill for about 6 to 8 minutes.
Serve with garlic bread or on its own.
Notes: The taste of thyme and nutmeg was distinct and I loved it. It is obvious so if you don't like it, you can omit the same.
The bacon can be substituted with ham, mushrooms, artichokes might be nice too.
For more tips do head over to Ellie's space.


Sending this to Presto Pasta Nights (#209) hosted by Sweet Artichoke.


PS: I have to tell you that after all the drama, Ro gets back home and gives me a sheepish grin and tells me he grabbed a sandwich on the way cos he was sooo hungry. I had already downed a glass of wine and was feeling a bit light headed or something, I let it pass saying he can take it for lunch the next day..Thanks to the wine, otherwise I would have definitely been a bitch about it!

Wednesday, 23 March 2011

Sunday brunch for two

I love the whole idea of a brunch. I've said that loads of times and here I am saying it again. There is something romantic about the whole brunch bit, even better when you are not making it and you just sit there with a cocktail and make idle conversation with friends. I keep thinking about making Sunday a brunch day, but I wake up at quite an ungodly hour and by that time Ro would have already had his breakfast and then brunch idea keeps getting pushed on to lunch. But I still like to refer to it as brunch, you know..because I can :)

Last Sunday wasn't any different. Had a late night out on Saturday and by the time I woke up it was close to 10 and of course Ro had made himself a nice lavish breakfast with eggs and the works and I was just getting into cooking mode when the husband decides he wants lunch NOW (this is probably at around 11.30- 12, and after a heavy breakfast). I was so damn pissed that I decided to ignore him and make my so-called brunch, whatsoever.
By the time I was done it was about 1.30 (perfect lunch time, if you'd ask me) and Ro obviously wanted to eat what I made and did so with a long face. And then we had to argue about random stuff (so not what I had in mind) and I stormed out of the room leaving everything in the kitchen as it is and vessels unwashed. If Ro hadn't even bothered to clean up, I would have probably stormed out of the house itself, but that drama didn't happen and by evening Ro pretended all was good with the world and I even bribed him into making me a hot cuppa ginger-lime tea (oh its awesome if you haven't tried it btw) and then caught a movie (The Lincoln lawyer which was interesting to say the least). Dinner out and cocktails were a great end to an otherwise normal Sunday and I decided 'all's well with the world, after-all' :)

Individual oven-coddled eggs with mashed potato and herbs (Baked eggs and potato)
I found this recipe while I was browsing and the bon appetit online version appeals a lot to me, the pictures at least and its very rarely I actually read through a recipe (typical me) unless I'm looking for something in particular. This recipe by Dorie Greenspan caught my eye since i WAS looking for a baked egg brunch idea and have no regrets. It tasted so darn good that I cant wait to throw a brunch party and flaunt it. Go ahead say it 'I'm so vain' ;)
Anyhoo, the herbs in this dish just added that awesome flavour and I cant imagine why I never really used Rosemary and Thyme in my cooking. But like I have mentioned before, its an acquired taste, and if you don't like it...then you just don't!
Also, I was wondering how incredibly cute these eggs would have looked in the amazing Le Creuset cookware. Cant wait to get my hands on some of those.
Milk- 1/4 cup
Bay leaf- 1
Potatoes- 7 oz (I used about 5 to 6 baby potatoes)
Shallots- 2 medium, thinly sliced
Butter- 1tbsp
Rosemary- 1/2 tsp, minced
Thyme- 1/2 tsp, minced
Eggs- 3
Whipping cream- 3 tbsp
Freshly grated Parmesan cheese- 3 tbsp or as per your taste
Salt & pepper- to taste
Chives or parsley- to sprinkle (optional)
Bring the milk to a boil, add the bay leaf and let it seep for about 15 minutes.
While that's taken care of, cook the potatoes in boiling water till mashable consistency..say about 15 to 20 minutes. 
Drain, remove skin and mash with a potato masher or fork.
Add the shallots, butter, rosemary, thyme and milk (discard the bay leaf), season with enough salt and pepper and mix well till you get a smooth consistency.
Butter 3 ramekins and divide the potato mix equally.
Crack one egg each carefully over the mashed potato in each ramekin.
Spoon 1 tbsp cream on top of each egg and also sprinkle enough (approx. 1 tbsp) Parmesan cheese.
Preheat the oven to 176C and place the ramekins in a baking tray. Fill the tray with enough hot water making sure they come half way up the ramekin.
Bake for about 20 minutes or until the egg whites are set but the yolk is still soft.
Take it out of the oven, sprinkle some parsley or chives and serve on its own or as a side to any main meal.
Notes: I halved the recipe. Double it if you need to please more guests :)
You can also make the whole thing in a baking dish rather than doing it individually in ramekins.
I baked it for a bit longer (30 minutes) cos I was a little scared of the uncooked yolk (salmonella and all that crazy stuff you know!). Also I hate runny yolk. But I think 30 was a tad too much and it became a bit too hard, so lesser time hence forth.
You also don't need to particularly bake it in a water bath. Tried both ways, not much difference.

The best ever beef chops with gravy
My mom-in-law, who is such an awesome cook, introduced me to these beef chops on my visit home last December. I stood by her side trying to grasp all that she was showing me but you know me, how spaced out I am, that I start thinking about what to wear for the dinner party that evening. So after the first few steps, it all went over my head. I told mamma that I will call her up for the recipe and method since I was pretty sure I wouldn't remember half of what she showed me. I went back to my place and bragged about this dish to my mom and one day while we were sitting around chatting, my mom asked me for this recipe and I had no clue. No problemo, I called up my mother-in-law and she gave me the details. Made it and it was such a big hit. Came back to England and obviously I had forgotten the recipe AGAIN! Lucky for me, my sister-in-law and family had just relocated to UK and time differences were not an issue. Called her up and got the details on how to make it. Made it and it was brilliant (although Ro would beg to differ). Made it again last weekend and it was even better. So before I forget here's the recipe for my mom in laws kick ass beef chops with gravy.
Thin cut beef steak or frying steak- 500 gms
Onion- 2 small, finely chopped
Ginger- 1 inch piece, thinly sliced
Garlic- 3 pods, thinly sliced (optional)
Soy sauce- 2 tbsp (or less if you don't want a strong taste)
Tomato ketchup- 1 tbsp
Freshly ground pepper powder- to taste
Salt- to taste (check if required at all)
Oil- 2 tsp

Potatoes- 3 large, cut into wedges or circles (you can also use baby potatoes)
Boil the potatoes till about 3/4th done. It shouldn't be over cooked. Keep aside.
Cut the beef steak into smaller slices and thin it out using a mallet or if you don't have that, just use a knife as a mallet and lightly chop it on either side..through the entire length of the steak (I know I'm not making much sense here, but I promise I'll post a pic the next time I do it)
In a bowl mix together the rest of the ingredients checking for enough salt and adding as required.
Place a pressure cooker on medium high heat and layer the beef steak slices at the bottom. Don't over crowd it and make sure they don't overlap.
Place a generous layer of the onion mix on top of the beef followed by the remaining beef and onion mix, till you are done, making sure you end with the onion mix.
Add a 1/4 cup water (if you want more gravy), close the lid, wait for the steam, place the weight and cook for about 4 to 5 whistles or about 10 to 12 minutes. You would know how long the beef you get cooks, so do accordingly.
Once the steam releases, open the lid and separate the beef chops from the gravy and the onion. Leave the gravy on medium heat to simmer for a while to get a thicker consistency. If there is not much gravy, you can add a wee bit water here.
Heat a frying pan and pour the oil. Swirl it around to coat the pan and once hot, char/fry the beef chops in batches. Just to get the beef a bit brown, you can skip this step if you are lazy. Remove and place in a serving dish.
Do the same with the pre-cooked potato wedges as well. Fry till the colour changes to a light brown. Place them on top of the beef chops and pour the gravy over it. Try and cover most of the chops and potatoes.
Serve hot with chapathi or garlic bread or like I did with the baked eggs.
Notes: My mom in law places the potatoes as well inside the pressure cooker so that also gets cooked simultaneously. I don't trust myself with that method because I always end up over cooking it.
Since I already had my carb in take with mashed potatoes, I avoided the potato wedges with the beef chops and hence its not in the picture.

Monday, 18 October 2010

Easy peacy chicken tart

How are you all doing? Been a while isn't it? Well I have just been super duper busy with something or the other and must say I'm not complaining. Except that I haven't had the time to hit the gym and that's not something I'd like to get used to. I also haven't really had time to visit your blogs as much as I'd like and I apologise for the same. 
This tart is really the easiest to make if you have the base ready. And by ready I mean store bought. Yes, my dilemma about not being able to roll out dough continues and the one time I tried, I ended up with a torn dough and then tried to mend it with some more dough and altogether it wasn't a pretty scene. That's when I discovered the savoury tart cases at Sainsburys...neat! I shall however give you the recipe for the base, just in case you might be interested:) (of course you will be, because not everyones handicap like me when it comes to rolling dough)
So here goes, a Sunday brunch favourite of ours.

For the tart base:
Plain flour- 200gms
Chilled butter- 100 gms
Baking powder- 1/4 tsp
Egg- 1, beaten
Ice cold water- a few drops
Salt- to taste
For the filling:
Chicken breasts- 2 medium sized (approx 200 to 250 gms), cleaned and diced into small pieces
Pepper powder- 1 tsp
Salt- to taste
Paprika- to taste (optional)
Onion- 1, roughly chopped
Tomato- 1, roughly chopped + 1 for decoration if required
Frozen green peas- 1/4 cup
Milk- 1/2 cup
Eggs- 2
Salt and pepper- to taste
Cheddar cheese- enough to sprinkle on top
Oil- 1/2 tbsp
To make the tart shell, mix the butter along with the flour, baking powder and salt till it resembles a coarse mix.
Add the egg and the water as required and mix till it forms a dough.
Knead for about 5 minutes and then roll it out, a little larger than your tart tin and carefully place it inside with the edges coming up a bit. Press it down well and cut off the extras.
Poke the dough with a fork in a few places and bake in an oven preheated to 170C for about 10 minutes. Ideally you fill it with baking beans when you do so, but I didn't have any, so baked it as it is.

While that's taken care of, make the filling.
Boil the chicken with salt and pepper and paprika (if using) till it is cooked. If the pieces are large, shred them. Keep aside
In a frying pan, heat the oil and saute onions and tomatoes till they are slightly cooked. You don't need it to brown or release oil or anything.
Add the cooked chicken, green peas and mix it all together. Check for seasoning and add as required.
Keep aside to cool for a while.
Beat the eggs and the milk together and season well with salt and peppah!

Assembling:
Once the tart base is pre-cooked. Take it out of the oven and fill it with the chicken mix. Try not to stuff too much in. Its ok if you have leftover chicken, I used it for a sandwich :)
Pour the egg mix into the tin, on top of the chicken. Try and get it as even as possible. Again, big deal if its not...being rustic is a charm I'd try and work on :)
Sprinkle enough cheese on top, arrange a few sliced tomatoes on top and bake at 170C for 20 to 25 minutes, or till it is slightly firm.
Once done, cool on a rack for 5 minutes, and carefully remove it onto a chopping board. I didn't want to slice them in the tin because for one, mine was a brand new non stick tart pan and two, its a bit difficult to get it out without creating a mess, for me that is!
Do do whatever suits you. Slice them in wedges and serve with a salad. I'd say brunch is ready.
Notes: You can really do any filling of your choice. I once did a mushroom and chicken mix. I'm sure paneer would be a great option as well.
I pre-cooked the tart base because the first time I made this, I thought the base was a bit undercooked and all doughy!
If you want to Indianise it, add a dash of meat masala while boiling the chicken.
You can freeze it and it would definitely last a week or if you just refrigerate it, definitely for 3 days. Its a perfect make- ahead breakfast item.
The above measurements fill two tart cases of that size, but the base recipe is just for a large 9 inch tart.


PS: All you guys who wrote in asking for the icing recipes and tips on cupcake decorating, I shall definitely get down to it once I bake and decorate something on my own first. Thanks a lot for those beautiful comments as well. You guys made my day. Hugs { }

Saturday, 10 October 2009

Baked tuna steak with garlic and rosemary

Saturday brunch is completely taken over by Ro while i sit around watching something on TV or browsing and if i feel a bit enthu, id help him chop the veggies or something. But most probably, i avoid being in the same space with Ro which ultimately ends up in a fight about 'the masala containers don't go there' and the 'this is not how you should be doing it' sagas. So this Saturday was one of those days and i just sat and watched the episodes of HIMYM while Ro went out, bought fresh tuna steaks and decided to do a conti preparation.
This is a recipe from the BBC good food guide and we had it with jacket potatoes, steamed veggies and this new Belgian fruit beer we discovered called fruli.
Verdict: The fish was way too fishy for my taste and i ended up having left over pizza from the previous night. So I'm warning you, if you are not a big fan of fish (read bland and fishy), then this is definitely not for you. This is as Brit as it can get:) Also, the rosemary was a bit overpowering and i guess its an acquired taste.

All you need
Tuna steak- 1 or 2, about 200 gms (can be substituted with any white fish as well)
Roasted garlic- 3 cloves (drizzle the garlic cloves with some olive oil and salt, wrap them in foil and roast in a hot for about 10mins)

Dry red chilli- 1, crushed
A few sprigs of rosemary
Dry white wine- 3 tbs
A pinch of salt
Extra virgin olive oil- 25ml
Parsley- a few sprigs, chopped
Lemon- half, squeezed

Preheat the oven to 220C.
Make a paste of all the above ingredients (except the wine) and generously rub over the steaks.
Place a large aluminium foil, large enough to hold the fish steaks, on the kitchen top and cover with a baking paper, almost the same size. Fold over the edges so that both the foil and paper are joint at the edges. It should look like a bag.
Now place the marinated steaks into this and pour the wine over this along with the roasted garlic. Make sure you crush it a bit so that the flavours get infused with the gravy. Seal the bag and place inside the oven. The fish steams inside and so the bag has to be sealed well. Cook for 15 minutes. Once done, serve the steaks on a plate and pour the gravy over.

Notes: The same marinade can be used for white fish or even prawns
Jacket potatoes are the easiest. Cook them in the microwave for about 10 to 12 minutes, turning occasionally and once a knife cuts through easily, take it out and slice them into quarters, but not all the way. Apply some butter or load it with cheddar cheese and about 2 or 3 mins before the fish gets done, chuck the potatoes into the oven as well. This is just to melt the cheddar.

Tuesday, 1 September 2009

Squid in a spicy beer batter and kudos to myself on my 50th post!

I don't like squid in any other form, but batter fried. I have also never bought squid and was never planning to until last week when Ro and me went to the nearby super market and we saw some. We asked if they would cut it into rings but said they cant, but told us how to do so though. Ro got completely excited about the whole cutting process and we picked up about 200 gms, just cos we were clueless about how it would turn out. Ro cleaned and cut it and did what all..i have no clue. All i know was, it was stinking like crazy and i was running around lighting candles and turning on the room freshener. Nothing worked, but the squids came out awesome. We paired it with some apple cider and finished it all at one go.

Also, Happy Onam to all of you. I honestly wouldn't have realized it was Onam if it wasn't for the numerous status updates on Facebook. And since I'm in London, and since i don't know anyone who celebrates Onam, i have made reservations at a S. Indian restaurant this evening for an Onam sadya. This, after googling so so much, and convincing Ro it would be ok to try out a restaurant somewhere in Zone 4. Going purely by the reviews posted on certain websites, I'm assuming its not a weird place afterall. I am also darn happy that i hit my 50th post today which is not a milestone achievement but still, considering that i am such an awful and lazy cook, i think its a pretty neat accomplishment. I would have posted something better if i knew it was my 50th post, but i realised only half way through and so decided to go ahead with this anyway.

Squid rings- 200 gms
Flour- 5 tbs (heap)
Pepper pwd- 2 tsp
Paprika- 1/2 tsp
Beer- 2 tbs
Egg- 1 (beaten)
Salt- to taste

Oil- enough to fry

Mix all the ingredients and make a semi-liquid batter. Marinate the squid rings (make sure its well coated) for about half an hour and once the oil is hot, fry till golden brown. Drain well on paper towels and serve with a dip or pop it on its own.

Dip:
Mix Mayo (3 tbs), Garlic paste (1/4 tsp) and Chilli sauce (1 tsp) well enough to make a loose paste.

Notes: Beer is optional. But it certainly adds to the taste
I used garlic mayo and so had to put in only the chilli sauce. Make sure the garlic is not too overpowering