Showing posts with label North Indian. Show all posts

Thursday, 4 October 2018

Tandoori chicken

Recipe adapted from here

a0231926-06d9-4e67-8e77-bfc6aa63a9bc
First marinade
Chicken 1kg, with bone (i used skinless leg and thigh pieces, comparatively large pieces))
Kashmiri chilli powder- 1/2 tbsp
Ginger garlic paste 1tbsp
Lemon juice 1 tbsp
Salt- to taste

Second marinade
Yoghurt- 200gms
Ginger garlic paste- 2 tbsp
Kashmiri chilli powder- 2 tsp
Turmeric powder- 1/2 tsp
Garam masala- 1 tsp
Black salt- 1/2 tsp
Mustard paste - 1 tsp (I used English mustard)
Kasoori methi- 1 tsp
Cumin powder- 1/2 tsp
Oil- 2tbsp
Salt- to taste

Put slits in the chicken pieces and marinate with all the ingredients in the first marinade.Rub it into the pieces well and in between the slits.
Keep covered in the refrigerator for an hour.
Get the second marinade ingredients ready by whisking together all the ingredients in a small bowl.
Bring out the chicken after an hour and pour the second marinade over it. Nicely massage the marinade on to the chicken and keep covered in the refrigerator overnight for best results, or at least for 3 hours minimum.
When ready to cook, bring the chicken to room temperature and preheat oven to 250C (the highest on your oven).Line a baking tray with heavy duty foil and brush a thin layer of oil on it.
Place the chicken pieces and whatever marinade leftover on to the tray and place in the oven for 7 minutes.
Then reduce heat to 220C and cook for another 10 minutes.
Take the tray out, turn the pieces over and cook for another 10 minutes.
Remove the tray from the oven and change oven setting to grill/broiler mode on highest temperature.
Baste the chicken pieces with oil and place under the broiler for 5 minutes. (Watch well, as it could burn the chicken. Anytime between 3 and 5 minutes should be fine. This is just to char the chicken for that tandoori effect)
Remove and serve with coriander-mint chutney

Notes: Use thick drained yoghurt, so that the marinade sticks to the chicken. I used thick set yoghurt, but squeezed out the water content by hanging it in a muslin cloth.
You are using salt in the first marinade and black salt in the second, so taste before you add more salt.
If you cant find black salt, normal salt is fine.
Of course oven cooking times will vary depending on the size of the chicken pieces. Adjust a few minutes here and there accordingly. It should be anywhere between 20 and 30 minutes including broiler time.

Tuesday, 27 February 2018

Shikampuri kebab (cheese stuffed kebab)

Recipe adapted from Vah Chef (makes around 20)

00100dPORTRAIT_00100_BURST20180227130338255_COVER (1)
Meat- 500 gms (I used minced beef, you can use beef cubes, minced lamb, lamb cubes, or even chicken)
Chana dal- 1/2 cup, washed till water runs clear
Ground pepper- 1/2 tsp
Cinnamon- 2, 1 inch pieces
Cardamom- 3 pods
Cloves- 2
Dried red chilly- 3
Salt- to taste

Mint leaves- 1 tbsp, finely chopped
Coriander leaves- 2 tbsp, finely chopped
Fried onions- 2 tbsp
Cumin powder- 1/2 tsp
Garam masala powder- 1 tsp
Red chilly powder- 1 tsp
Lime juice- 1 tbsp

For the filling
Ricotta cheese- 250 gms (Traditionally, hung curd is used)
Green chillies- 2, finely chopped (add more if you want it spicy)
Coriander leaves- 1 tbsp, finely chopped
Onions- 2 tbsp, finely chopped
Salt- to taste

Oil- to shallow fry
00100dPORTRAIT_00100_BURST20180227130215945_COVER (1)
Cook together the meat, chana dal, ground pepper, whole spices and red chilly in a pressure cooker with little or no water. I used about 1/4 cup water.
Once you open the cooker, if there is lot of stock, cook on high flame till most of the water has evaporated. 
Keep aside to cool completely and then blend to a paste. Do not add any water.

Transfer this mix to a mixing bowl and add the mint, coriander, fried onions, cumin, garam masala, red chilli powder and lime juice. 
Using your hands, mix the masala into the meat paste, as evenly as possible. 
If you feel that the mix is slightly moist, keep in the refrigerator so its easier to shape.

While the meat is cooking you can also get the filling ready.
Mix together all the ingredients for the filling in a bowl. Keep refrigerated till ready to use.
I used ricotta because it was a more convenient option. But even then there was quite a bit of water content in the cheese, so i still hung it in a cloth and tried to get as much water out. 

Assembling
At this stage if you fee that the meat mix is too dry, as in, its cracking while you are tying to make balls, then sprinkle some water and knead well. Add water bit by bit, or else the kebab will fall apart while frying,
Make lime size balls out of the meat mix, you should get around 20 of them.
Flatten it out , make a well and stuff about 1/2 tsp of cheese filling. Bring edges together and seal.
Gently flatten the kebab using your palm, and shape into a round
This takes a wee bit of practise. If the filling is too much then it oozes out, so start with a small quantity and once you get the hang of it, add more filling.
Heat a tawa and drizzle the oil. Not too much oil, just enough to shallow fry.
Fry the kebabs on medium heat till both the sides turn crisp and brown.
Serve with mint chutney.

Notes:
If you are using minced meat, you can cook it in a frying pan as well.
Ive also tried it with Mascarpone cheese and it works fine.
Make sure your filling isnt loose, as it will ooze out of the kebab while frying. remove as much water content possible.


Thursday, 28 May 2015

Mutton rogan josh

IMG_6419
I have one mutton recipe on the blog. One!!!
That clearly depicts my aversion to lamb, mutton and goat. And i still don't know the difference between the three.

There is a huge Asda near work and on one of those days I was so tired to go back home and cook (it happens a lot btw!), i walked in there to see if i can pick up some marinated meat to grill or something, and i chanced upon their butcher section that housed a whole lot of marinated meat and fish and also a pack of mutton mix, among other interesting stuff. I was in two minds about the mutton, but I was so bored with the usual chicken, beef and pork, that I thought I should do this for the husband, if not for anything else.
IMG_6400 
So I went home armed with a pack of mutton and a head full of ideas on what to do with it. Of course it never made to the table that day but it did the next day as a spicy mutton pepper fry. It was delicious and it surprised me- that i actually enjoyed it. So that was the beginning of my affair with mutton and i learnt that i can handle mutton but not lamb. I've made plenty of dishes with the mutton mix hence and its a pity i don't get it anywhere other than in big Asda's.

This rogan josh (translation- red/hot oil and as you can see from the pictures, there is an oil layer on top) turned out so darn good, i had to take some pictures, even if hastily, because i do plan on making it again. I thought it was a dish hard to make, after seeing the list of ingredients, but its not and it needs very little preparation. No onions, no tomatoes, so sauteeing till golden brown etc, just charring the meat and then slow cooking it together till done. Of course, the slow cooking takes time, and that makes a difference, but we have the pressure cooker for those days you don't have the luxury of slow cooking.

This recipe, after reading the comments, came across as quite authentic and I'm so glad i tried it, its fab. Do give it a shot and let me know what you think.

Recipe adapted from here (Serves 3)
IMG_6423 
Mutton- 500 gms, cut onto medium size pieces

Marinade
Ground cinnamon- 1/4 tsp
Ground cardamom- 1/2 tsp
Ground cloves- 1/4 tsp
Ground peppercorns- 1/4 tsp
Ground fennel seeds- 1/4 tsp
Kashmiri chilli powder- 1/4 tsp

Oil- 1/4 cup
Cinnamon- 1/2 inch stick
Cardamom- 5 pods
Cloves- 4
Peppercorns- 1/2 tsp
Fennel seeds- 1/2 tsp
Asafoetida- 1/2 tsp
Dried ginger powder- 3/4th tsp
Kashmiri chilli powder- 3/4th tbsp
Yoghurt- 1 cup
Salt- to taste
IMG_6427
Mix together all the ingredients for the marinade and rub on to the meat. Keep aside for half an hour or so.

Heat oil in a deep, heavy bottomed pan and throw in the cinnamon, cardamom, cloves, peppercorns and fennel seeds.
To that add the marinated meat and cook on medium heat, stirring continuously, till brown.
Stir in the asafoetida, dried ginger powder, Kashmiri chilli powder and salt and mix it all in with the meat.
Reduce the heat to low and add the yoghurt, mixing it well to coat the meat.
Cover the pan and cook till the meat is tender and the oil separates on the surface. 
I cooked it for 1 hour and it was perfect. You will need to keep stirring and adding some water on and off, to prevent the sauce from sticking to the base of the pan. 
Serve hot with rice or rotis.
IMG_6398
Notes: Of course, if you are not a fan of slow cooking then add everything as mentioned, in a pressure cooker, and cook the meat for about 4 whistles on medium heat. I bet it wouldn't taste as gorgeous as the slow cooked one though :)
You can use goat meat as well, but I'm not sure how lamb would turn out for this recipe. Worth giving it a shot.
Replace the mutton with beef for a beef rogan josh.

Wednesday, 6 May 2015

Palak paneer (spinach and paneer)

IMG_5900 (1)
Its been a bit quiet around here hasnt it? Well, I finally decided to unpack my props after about a month of moving into the new place and when that got sorted, I had trouble with the whole lighting situation. I had to find ways and means of utilising what little light came from the one window in my living room. From a house with floor to ceiling windows, this came as a complete downer. I cribbed about it to Ro and he said a good photographer would figure out how to manipulate light whatsoever. Challenge accepted was my reply!

The fact that we have terrible weather now hasnt helped either. I mean seriously.. enough with the whole rain, wind and single digit temperatures. We had 1 week of brill weather where everyone rejoiced and thought summer arrived early, only to be fooled by this ridiculous cold spell soon after. So its back to boots and shawls for a lil more longer i suppose.

Anyways, after a few hasty trials with the camer, I finally called it quits. This was the outcome of the final few trials and although I'm not happy with it at all, i thought i should feed the blog with this rather satisfactory preparation of palak paneer. Its been ages since ive cooked with panner and its the first time ive tried palak paneer at home. I cant remember the last time i tasted palak paneer and so even though it didnt taste exceptionally good, i cherished it to no end. It was delicious with hot chapatis.

Recipe adapted from here (serves 2 to 3)
IMG_5894
Paneer- 225 gms, cut into cubes

Baby spinach- 200 gms
Garlic- 3 small pods, roughly chopped
Ginger- 1/2 inch, peeled and roughly chopped
Green chillies- 2 small, chopped

Ghee oil- 1 tbsp
Cumin seeds- 1/2 tsp
Bay leaf- 1 small
Onion- 1/3rd cup
Garlic- 4 small pods, peeled and finely chopped
Tomato- 1 small, finely chopped
Turmeric powder- 1/4 tsp
Chilli powder- 1 tsp
Coriander powder- 1/2 tsp
Asafoetida- a pinch
Water- 1/2 cup
Garam masala- 1/4 tsp
Kasoori methi- 1 tsp
Double cream- 2 tbsp
Salt- to taste
IMG_5910
Soak the paneer cubes in some warm water if its hard..especially if its store bought. This would soften it pretty much. Drain before using.
Cook the spinach in a microwave, for about 3 minutes, covered. Blanching is ideal, but i was too lazy to do that.
Purée the wilted spinach with garlic, ginger and green chillies and keep aside.

In a kadai, heat the ghee and add the cumin seeds and bay leaf.
Once they splutter, add the onions and cook on medium heat till golden brown.
Throw in the garlic and saute for a minute or two. Dont brown it.
Add the tomato and cook till the oil slightly separates at which point you put in the spices- turmeric, chilli, coriander and asafoetida- and cook till the raw smell disappears.
Pour in the spinach purée, mix it all together and cook for about 3 to 4 minutes along with 1/2 cup water.
One the sauce starts simmering, add the paneer cubes and salt and continue to cook for a few more minutes. The paneer should be coated well with the palak masala.
Sprinkle the garam masala and kasoori methi and mix it all in
Finally stir in the double cream, close with a lid.
You can pour a tsp of cream on top of the palak paneer when ready to serve.

Sunday, 13 October 2013

Dum ka murgh (slow cooked chicken curry)

IMG_1544_CR2
Posting a chicken curry after a really really long time. Some of us BB-ians realised it was National Curry Week and decided to do a curry post together. Of course its the last day of the event, but better late than never right? 

I love a good chicken curry. In fact its my favourite past time to keep browsing the internet for new chicken curry recipes and bookmarking every one of them that comes my way. I have a few delicious favourites, which keep making its way through to our tables, but never to the blog because I find photographing any sort of curry incredibly difficult. I keep taking pictures each time I make a nice curry, but then they never look nice. Its mostly the styling, which I'm stuck with.

Which is why, I was pleasantly surprised at how these pictures turned out. I had initially put the curry in a brown bowl and the colour combinations just didn't work. I was all ready to give up, when I thought I'll try it in the beautiful blue bowl which I'd picked up from this gorgeous Polish pottery store called Blue Dot Pottery. The red curry worked well with the blue pottery and it was a pleasure working with that set up. Half of my worries are over if I manage to get the styling right, which brings me to the Bloggers' Buzz Photography Club (#BBPC) which we run every month. We get together in a central London location, do a couple of food photography exercises and learn from each other. If you are not in London, then you can of course join us online where we'd give a theme a month. Email us at bloggersbuzzuk@gmail.com if you want to give it a go. We are all amateurs trying to learn a thing or two about food photography, so please don't feel intimidated. All you need is a camera and some food to shoot :)

I have tasted dum ka murgh at various restaurants and it wasn't really a big hit with me. I am not claiming this is the best curry I've ever had, but surely one of the nicer ones. It pairs well with naans and parathas and the good thing about this recipe (sans the frying of onions) is how you don't need to saute various ingredients at various stages etc, but just add the chicken, close with a tight lid and let it cook in its own juices. 

Recipe adapted from here and here
IMG_1554_CR2 
Chicken- 500 gms with bones, cleaned and cut into medium pieces
Oil- enough to fry
Onions- 2 medium, finely chopped
Cinnamon stick- 1 inch
Cardamom pods- 2
Cloves- 2
Whole peppercorn- 4
Green chillies- 2 slit (optional)

To marinate
Yoghurt- 1/4 cup
Almond powder- 3 tbsp (grind with some water to make a paste)
Garam masala- 1 tsp
Turmeric powder- 1/4 tsp
Kashmiri chilli powder- 1/4 tsp
Tomato ketchup/ paste- 1 tbsp (I used ketchup)
Coriander leaves- 1 tbsp, finely chopped
Mint leaves- 1 tbsp, finely chopped
Ginger paste- 1/2 tbsp
Garlic paste- 1/2 tbsp
Lemon juice- 1 tbsp
Salt- to taste
IMG_1547_CR2
Heat the oil in a frying pan and fry the onions till golden brown and crispy. You need to keep stirring this at intervals, so it fries evenly. Also make sure you don't burn it.
Drain on paper towels and keep aside.
In a large bowl, mix together all the marinade ingredients.
Crush the fried onions, reserving about a tbsp of it, and add to the marinade. Mix well.
Add the chicken and thoroughly rub in the marinade. Keep covered in the refrigerator for at least 2 hours.

When ready to cook, heat the remaining oil (from frying) and throw in the spices and green chilli. Sauté till it gets all fragrant.
Add the marinated chicken and fry in the oil for a couple of minutes.
Cover with a tight fitting lid, reduce heat to medium and cook the chicken for about 20 minutes.
Check once or twice in between to give it a quick mix and if you feel that the water is really less, add about 1/4 to 1/2 cup, mix well and continue cooking with the lid closed.
Do a taste test and check if salt levels are good and if the chicken is cooked. 
The curry is ready when you see a thin layer of oil that's separated from the gravy.
Garnish with the remaining fried onions and some coriander leaves just before serving.
IMG_1541_CR2
Notes: I did the mistake of adding the almond powder on its own without grinding it to a paste and so kept getting the grainy texture in the gravy. Not pleasant, so make sure you grind it.
Its not spicy at all, so add more green chilli/ chilli powder if needed.
Add a dash of cream at the end, just before taking it off heat for some extra richness.

Monday, 15 July 2013

Potato and chickpea cakes

IMG_9940
Are you all enjoying the weather wherever you are? Too hot? Too cold? Too much rain?? or is it just perfect? Too many questions??? :) :)

We have had gorgeous sunny weather for the past few weeks and its been good. Well most of the time that is. I have been out galavanting with friends, attending events and generally being busy which sometimes drains me out in the heat. But I'm not complaining.. Work has taken a back seat for the time being and I'm glad it is so, because I really do need to figure out how to handle the backlog of work that has accumulated over this past few months..yes, you read it right, months. I'm slowly finishing it off and hopefully will learn how to manage time more efficiently. My husband would be very glad I've even declared this in public because he has the biggest issue with me not managing time responsibly and planning well.

Coming to the recipe. No offence to all the vegetarian, but I have the toughest time cooking for them. Its not because there are no recipes available, but because I suck at it. My vegetarian dishes don't really come out nice and paneer, potatoes and spinach are the only options I usually play around with. Its become boring and I've run out of ideas. This combination of potatoes and chickpeas however was a welcome change. The recipe is by Alfred Prasad from Great British Chef's Vegetarian Recipes and a very easy one at that. Few ingredients needed, can be put together in no time and you get a decent vegetarian starter.
IMG_9933
I had a bit of trouble with cooking the patties, since there was nothing to really hold them together like egg white or bread crumbs. So after two failed attempts at getting perfect shaped cakes, I decided to try the method mentioned in the recipe (I know, I should have just stuck to it the first time) and then it worked. I happily ate the first two that didn't turn out well without any complaint though. The recipe is apt for kids, but I don't have kids and so chucked in a green chilli which was such a fab idea. Serve it with just ketchup and you have a perfect snack to please your guests

Recipe halved from Great British Chefs
Potatoes- 2 large
Cooked chickpeas- 100 gms (I used canned)
Cumin seeds- 1/2 tbsp
Garam masala- 1/2 tsp
Green chilli- 1, finely chopped
Coriander leaves- 1/2 cup, finely chopped
Salt- to taste
Oil- 1 tbsp
IMG_9930
Slice the potatoes into quarters and steam in a dumpling steamer for about 15 minutes or so. I find steaming much easier than boiling. But feel free to boil till tender and a fork goes through easily.
Cool for a while and then peel. Break the potatoes with a fork, but don't mash it completely.
Into a big bowl add all the remaining ingredients except oil and mix well using a masher or even better, your hands.
Again, they need not be completely smooth, a few chunks here and there is fine,
Heat the oil in a frying pan.
While that's heating, shape the potato mix into small discs.
Cook each cake in the pan, making sure you press it down so it gets cooked evenly.
Drain on paper towels and serve hot with ketchup.

Notes: Don't add a lot of oil, the cakes will only fall apart and make life difficult. The 1 tbsp oil was enough for all the potato cakes, but if you feel you need more oil, add bit by bit and fry.
The recipe calls for refrigerating the cakes after shaping them, which i didn't. I'm thinking this would sort the falling-apart issue.

Monday, 4 February 2013

Kale- two ways

IMG_6585 
I was introduced to kale a while back at this PR event where they served it crispy, and I loved it. From then on Ive wanted to try it at home but never actually got around to doing it. This time too I picked up a pack of curly kale leaves to make crispy kale, but obviously my mind (and tummy) had other plans. I decided to make a thoran and then half way through I suddenly changed my mind and decide to also make dal with half of it. Yes that's how my mind works, no planning, nothing :)

I have also started freezing anything and everything possible, and did the same with this as well. Both dal and thoran were put into freezer bags and stashed away for a day I would be absolutely lazy to cook. Replace the kale with spinach for spinach dal and spinach (cheera) thoran (shall be attempting this soon).

Kale dal
IMG_6684 
Moong dal- 1/2 cup
Green chilli- 1, slit
Garlic- 4 pods, roughly chopped
Water- 2 cups
Cumin seeds- 1/2 tsp
Dry red chillies- 2
English shallots- 3, finely chopped (or 1 small onion)
Turmeric powder- 1/2 tsp
Kashmiri chilli powder- 1/2 tsp
Asafoetida- 1 generous pinch
Fenugreek powder- 1/5 tsp (optional)
Tomato- 1, finely chopped
Kale- 3 cups, washed and roughly chopped
Oil- 2 tbsp
Salt- to taste
IMG_6691 
Cook the dal with the green chilli, garlic 1/4 tsp of turmeric powder, salt and water in a pressure cooking till done (around 2 to 3 whistles on medium heat).
Remove from fire, open the life once the pressure releases on its own and lightly mas the dal with the back of a spoon. 
If you feel its too thick, add more water, put it back on flame and bring to a boil. Keep aside.
Heat the oil in a sauce pan and add the cumin seeds and red chillies.
Once they slightly sizzle, add the shallots and cook on medium fire till they turn a golden brown, 6 to 7 minutes.
Add the powders- turmeric, chilli, asafoetida and fenugreek- and continue sauteeing till the oil starts to surface slightly.
In goes the tomato. Cook till they get mashed and you get a thick masala.
At this point add the kale and mix it all in. 
Add salt and cover and cook till the kale gets wilted a bit (it doesn't get wilted like spinach though).
Pour in the cooked dal and give one good stir to mix it all in. Check for salt and add more if necessary.
Bring to a gentle boil and then simmer for about 5 minutes after which you can transfer to a serving bowl and have it hot with rice, pappad and pickle.

Kale thoran (kale with coconut and spices)
IMG_6603
Kale- 3 cups
Dessicated coconut- 1/2 cup (I use frozen)
Cumin seeds- 1/4 tsp
Garlic- 3 pods, peeled
Shallots- 7 to 8, peeled
Turmeric powder- 1/4 tsp
Green chilli- 1
Salt- to taste
Oil- 1 tbsp
Mustard seeds- 1/4 tsp
Curry leaves- 1 sprig
Dry red chillies- 2
IMG_6634 
Grind together coarsely the coconut, cumin seeds, garlic, shallots, turmeric powder and green chilli and salt in a spice grinder or using a pestle and mortar. It need not be paste like. Keep aside.
Heat oil in a heavy bottomed deep pan and splutter mustard seeds with curry leaves and dry red chilli.
Into this add the ground mix and saute for a couple of minutes, just to get rid of the rawness. Don't brown the coconut.
Add the kale and mix well. Pour in a tbsp of water and cover and cook for about 10 minutes on medium flame, stirring occasionally.
Check for salt, add more if needed, give a final stir and transfer to a serving bowl.

Thursday, 17 January 2013

No-yeast naan and keema {quick dinner idea}

IMG_6276
Trying to figure out what to make for dinner these days has become a major chore. I mean sometimes I know what exactly I want to have and then I get all enthusiastic to source ingredients and make it happen. But on most other days I'm just lost. I'm bored with chapati and usual curries, bored with macaroni bakes, bored with dosa/ idli and bored with soup and bread. I ask Ro what he wants for dinner and he says two words all the time, Chinese or Mediterranean. Unfortunately I'm rubbish at both these and so the only option is to eat out. Which is what Ro means by Chinese and Mediterranean, but that's not an option always isn't it?

Anyways, on one of those days I was breaking my head over what to make, I did my usual scouting of blogs to get some inspiration and landed on this beautiful blog that had pretty pictures and some interesting recipes. The yohurt naan caught my eye and the fact that it didn't need any yeast and rising time and such made it even more attractive. I have always wanted to make naan at home, and have bookmarked quite a few recipes from experts out there. But that, I kept for another time and decided to try this no yeast naan the very day I found the recipe. It was so so easy to make and came out really well. In fact, I think I like this option better than the real deal, not just because it tastes fab, more so because it was all done in under half an hour. 
IMG_6303
The first time I made it, I paired it with some Andhra egg curry, which was good, but not great. Yesterday I paired it with some kheema and it was fab. I'm not a big fan of minced beef/lamb, so I very rarely use them at home. This preparation was a pleasant change from the usual and so I enjoyed it. I am gonna use the left over mince meat in a stuffed bun, following this recipe. Both the recipes- naan and keema- are from the same blog and I'm so glad I chanced upon it on my frantic search for inspiration. 

On a completely different note, if you haven't entered my giveaway, do so soon, you only have 2 more weeks. And as I had mentioned before, we are having a bloggers meet in London on the 23rd of feb. Its a whole day event with lots of fun master classes, food and great company. We have been lucky enough to get some fabulous sponsors and it would be really great if you can make it to the event. Check out our event blog for details on how to register, sponsor updates and competitions.

No-yeast naan (recipe adapted from here, makes 10)
IMG_6283
Plain flour- 300 gms (3 cups)
Baking powder- 2 tsp
Baking soda- 1/2 tsp
Salt- 1 tsp
Sugar- 1 /2 tsp
Yoghurt- 60ml (approx. 2 tbsp)
Water- 140 ml
Oil- 2 tbsp
Butter- to brush on the naan
IMG_6280 
Mix together the flour, baking powder, baking soda, salt and sugar together in a mixing bowl.
Make a well in the centre and add the yoghurt and water.
Knead well, either using the dough hook of your mixer or using your hands, till the dough comes together.
Add the oil and continue kneading until you get a pliable dough. Don't over work it though.
Divide the dough equally into 10 and roll each into a ball.
Meanwhile, put a tawa on high heat and dust your counter with flour.
Roll out each of the dough balls into a round or oval- naan shape. My rolling skills are pathetic, which I'm sure you can see. But roll it out in whichever shape and size you prefer. 
Place the rolled out dough on to the tawa and wait till it puff up or you see bubbles appearing on top.
At this point flip it and cook for about a minute or so, and the naan is slightly charred.
Transfer to a plate and generously brush with butter.
Sprinkle some coriander leaves on top and serve warm.

Notes: Feel free to halve the recipe. have done it and it works fine.
I am sure you can improvise using garlic, cumin, herbs and spices etc etc. Incorporate it into the dough or sprinkle on top on you brush with butter.
To keep the naan warm, wrap in aluminium foil till ready to serve.

Beef keema with peas and potatoes
IMG_6288 
Beef mince/ Lamb mince- 500 gms
Cumin seeds- 1/2 tsp
Cardamom- 3 pods
Cinnamon stick- 1, 2 inch piece
Bay leaves- 2
Onions- 2 medium, finely sliced
Ginger-garlic paste- 2 tsp
Meat masala- 1 tsp
Turmeric- 1/4 tsp
Pepper- 1/2 tsp
Chilli powder- 1 tsp
Coriander powder- 1 1/2 tsp
Garam masala- 1 tsp + 1/2 tsp to add at the end
Yoghurt- 1 tbsp
Tomato- 1 small, finely chopped
Potatoes- 1 medium, peeled and diced into small cubes
Mint leaves- 1 tbsp, finely chopped
Coriander leaves- 3 tbsp + enough to garnish
Green peas- 1/4 cup (I used frozen green peas)
Salt- to taste
IMG_6301 
Heat oil in a pan cooker and throw in cumin seeds, cardamom, cinnamon and bay leaves and wait for it to sizzle.
Throw in the onions and sauté till they turn a golden brown in colour.
Add the ginger garlic paste and cook for 2 to 3 minutes till the raw smell disappears.
Turn the heat to high and add the minced beef.
Break the meat using the spoon and cook, stirring well, until all the meat is browned.
Reduce heat to medium and add all the masalas, making sure you mix it well into the beef.
Mix in the yoghurt and tomato followed by mint leaves, coriander leaves and potatoes.
Add a bit of bit of water and enough salt, mix well and cover and cook for about 15 to 20 minutes, or till the meat and potatoes have cooked through.
Open lid at intervals and give a good mix. 
Also, add more water if its too dry or if there is loads of water, evaporate it on high heat.
Mix in the green peas, and also check for salt. Add if required.
Finally, sprinkle the remaining garam masala, give one final mix and transfer to a serving bowl.
Just before serving, garnish with coriander leaves.
IMG_6293 
Notes: Freeze the remaining in an air tight container and use to stuff buns, Sloppy Joe's, and keema dosa.
Feel free to use the same recipe with lamb.
You can also double the recipe.
You can do the entire cooking in a pressure cooker as well.
I like my kheema without any gravy, like a semi dry consistency. If you'd like more gravy, add water accordingly.

Monday, 23 April 2012

Afghani murg (chicken) malai kebabs with cumin flavoured rice

IMG_0376
After a week of glorious weather (where everyone thought summer arrived early, even the weather man jumped up in glee) its back to winter like drab this part of the world. Its been filled with rainy days the past 2 weeks and although the trees are in full bloom and the birds are chirping and there is peace in the world, the temperatures are 10C and 12C and the fierce winds make it feel like 5 or 6. Since weather reports form a major chunk of my life these days, I had to update you on it :)

In all honesty, I love rains. The heavy, you cant see whats in front of you, making loads of noise kinda rains, like the monsoons in Kerala. The story is different here because, you wont even know its raining unless you look outside. It comes and goes like a thief and quite unpredictably, like a woman. Like for example, yesterday I woke up to bright sunshine and brilliant 14C temperatures, windows were left open and beer bottles were opened. I went about making lunch thinking I would be able to take some pics finally (oh ya its always that way and not the other way round). 

By the time lunch was done, it was overcast and gloomy, threatening to rain. It finally did, around 4pm and I thought, perfect, let me grab a cup of tea and cosy up with a cookbook. Made tea in 5 mins, settled down on the couch with a throw and the rains had disappeared and the sun was out. So I jumped up immediately, frantically arranged my props, prepped up the food and yes, you guessed it right, it started raining. I was so pissed off, I didn't even have the energy to put back all the stuff I had painstakingly arranged (strewn all over the floor would be more precise). I hoped it would be sunny again and it did become bright for a couple of minutes, but by then I was so engrossed in the book, I couldn't care less. It's sad really, because it was a recipe I would have definitely loved to put up here. This morning isn't any better and the weather forecast says, its raining all week. So I guess the recipe is not meant to be displayed as yet..Sigh!
IMG_0385 
That brings me to this kebab recipe, which I did make on a rainy Sunday and was just the perfect thing to eat on a cold dreary day. The difference, however, was that in spite of the horrid lighting I still managed to take pics (of course they are not really the best, but I still made it work). A friend and I were chatting about food a couple of weeks back and she said she tried these kebabs and they were great. I asked her for the recipe but she said she couldn't find it. So Google came to my rescue and I found a recipe which had all the yummy ingredients and immediately knew it would be a success. So I went about sourcing the stuff and made it the very next day.

The outcome was this really cheesy, juicy and absolutely delicious kebab. The recipe is more or less similar to the Reshmi kebab, but I would say this one is waay better and so so good, it puts other kebabs to shame, really, it does! I don't usually brag about the food i make unless its extremely good. and this definitely is high up there on the food pedestal. I cant wait to make it again (once my oven gets  fixed). I must admit however, that the cardamom taste in this recipe is prominent and this, in spite of reducing it drastically from the original recipe. But I guess that's really one of the specialities of the dish. Do reduce it even more or omit it completely, if you cant stand it.

Recipe adapted from here
IMG_0336-1 
Boneless chicken- 500 gms (I used chicken thighs)
Ginger paste- 1 tsp
Garlic paste- 1 tsp
Rice vinegar- 1 tbsp
Cashew nuts- 3 tbsp
Milk- 3 tbsp
Cheddar cheese- 2 tbsp, finely grated
Cardamom powder- a little less than 1/4 tsp or to taste (powder the seeds alone from about 5-6 pods)
Freshly ground black pepper- 1 1/2 tsp
Garam masala- 1 tsp
Egg- 1, lightly beaten
Double cream- 2 tbsp
Salt- to taste
IMG_0377 
Cut up the boneless chicken pieces into bite size pieces (not too small) and marinate it with ginger, garlic pastes, vinegar and salt and keep aside while you get the remaining preps going.
Soak the cashew nuts in milk for about 15 minutes and then blend to a smooth paste.
Transfer the mix into a bigger bowl and add to it the grated cheese, cardamom powder, black pepper, and garam masala.
Whisk the egg and cream together separately till just combined, and add it to the cashew-cheese mix.
Mix till you get a smooth paste.
Pour this mixture onto the marinated chicken and mix well, making sure all the pieces are well coated with the paste
Cover with a cling film and marinate it for a minimum of 1hr. I kept it in the refrigerator over night.
About an hour or so before cooking, soak around 6 to 8 bamboo skewers in water. 
Also bring the marinated meat to room temperature.
When ready to cook, preheat the oven in the grill mode.
Thread the chicken on to the skewers, about 4 to 5 pieces per skewer (of course depending on the size of the pieces) and place on a baking tray lined with aluminium foil.
Place under the grill and cook for about 6 to 7 minutes on one side.
Take the tray out, turn the chicken pieces over, baste with remaining marinade if required, and place it back under the grill for a further 6-7 minutes or till the meat is tender and cooked through.
Test this by inserting a fork into the centre and separating the flesh. If it falls off easily, you are good to go.
Keep aside for about 5 minutes before digging in.
Serve with a green chutney as appetiser or with flavoured rice and raita as part of mains.
IMG_0358 
Notes: Feel free to use chicken breasts instead of thighs. I find breasts absolutely tasteless- contextually speaking of course ;)- so never bother using it in any cooking.
Use apple cider vinegar or any vinegar of choice (except for maybe balsamic and red wine vinegar).
Cheese variety also can be varied I guess, but make sure you grate it fine because only then will they stick to the meat.
Replace double cream with yoghurt or crème fraiche.
If you don't want to grill the meat, then bake in an oven preheated at 176C for about 30 minutes, flipping sides and basting occasionally.

Cumin flavoured rice
IMG_0396 
Basmati rice- 1 cup
Oil- 1 tsp
Cumin seeds- 1 tsp
Whole black pepper- 1 tsp, lightly crushed
Green peas- 1/4 cup (optional)
Lime juice- a dash (optional)
Salt- to taste
Water- 2 cups
IMG_0386 
Wash and drain the rice. Keep aside.
Heat the oil in a wide, deep pan and add the cumin seeds.
Once they start to splutter, add the black pepper, garam masala and green peas.
Stir for a couple of seconds after which you add the drained rice.
Stir fry on medium heat till the rice becomes slightly translucent.
Meanwhile, boil 2 cups of water in a kettle and pour into the rice.
Add enough salt and a dash of lemon juice (this prevents the rice from sticking to each other).
Give on final stir, cover the pan with a tight lid, reduce heat to low and cook for about 15-20 minutes or till the rice is well done.
Remove from heat, fluff the rice using a fork and serve immediately.
IMG_0393 
Notes: Use ghee instead of oil for a richer flavour.
You can of course do a pulao version by sautéing onions etc etc,.
Garnish with coriander leaves for that extra kick.

Wednesday, 4 January 2012

Paneer tikka masala

IMG_6900
...is such a popular dish here in UK, it puts me to shame. I mean at least the ones I have tasted are so goddamn horrible, I have no idea how people eat it assuming its one of the most awesomest Indian dishes to date. I tried it at a restaurant once and it was so sweet and horrible, I don't even want to describe how the store bought ones tasted.

See, when I first came UK 4 years back, for one whole year, we survived on store bought ready meals and such and since the tikka masala's looked popular here, I used to quench my poor Indian palate with those pathetic store bought tikka masala preparations and each time I swore never to buy it again.

It was only recently I made myself a batch of the paneer tikka masala at home and realised it was actually so so so much more different and better than the restaurant/ store bought ones. I'm sure the authentic Indian restaurants will do justice, but I've had terrible bad luck with take always and never again will I buy this.

That said, making it is no easy feat. Its time consuming and messy, not to mention highly unhealthy. But once in a while I guess its ok to indulge (although I notice, this once-in-a-while is becoming a little too often), so go ahead and make this. Its fabulous with parathas and naan.
IMG_6906
Recipe adapted from here and here
For marinade
Paneer- 200- 220 gms (around 2-21/2 cups), cut into cubes
Greek yoghurt- 3 tbsp
Chilli powder- 1/2 tsp
Ginger paste- 1/2 tbsp
Garlic paste- 1/2 tbsp
Tandoori masala- 1 tsp (optional)
Kasoori methi (dried fenugreek leaves)- 1/2 tsp, crushed
Lime juice- a few splashes
Salt- to taste
IMG_6931
For the sauce
Ginger paste- 1/2 tbsp
Garlic paste- 1/2 tbsp
Tomato purée- 1 cup
Kashmiri chilli powder- 1 tsp
Coriander powder- 1 tsp
Garam masala- 1/2 tsp
Kasoori methi- 1 tsp, crushed
Single pouring cream- around 1/4 cup
Sugar- 1/2 tsp
Oil- 1/2 tbsp
Water- 1 cup
Salt- to taste
Coriander leaves- 2 tbsp (optional)
IMG_6893
If the paneer is store bought, then cut them into cubes and pour some hot water over. Keep aside for a couple of minutes and then drain to get soft, clean paneer.
Marinate the paneer with all the ingredients under the 'to marinate' section and keep aside for 1/2 an hour.
When ready to use, preheat the oven to about 200C.
Line a baking tray with aluminium foil and layer the paneer on it.
Bake for about 5 minutes on each side and then turn the grill mode and broil on high for about 3 to 4 minutes on each side, to get a charred effect.
Remove from the tray and keep aside.
In a large saucepan heat the oil and add the ginger and garlic paste. Cover to avoid spluttering all over the place.
Add the tomato puree and cook, stirring in between, for about 5 minutes
In goes the chilli powder and coriander powder, stir it in a cook further, till you start noticing the oil separate.
Add half the water, stir and bring to a gentle boil.
Reduce heat and add the sugar and kasoori methi. Stir it in and cook for a couple of minutes
Finally slide in the paneer tikka and garam masala and stir to cover the paneer pieces with all the gravy.
Add about 1/2 cup more of water, stir well and cook for another 5 to 6 minutes. Check for salt, add if required.
Just before taking it off the flame, reduce heat and stir in the cream.
Garnish with coriander leaves and serve hot.
IMG_6879
Notes: Replace paneer with chicken, voila..chicken tikka masala :)
I am thinking, there are so many ways of making this, but this clicked for us and we loved it

Sunday, 4 December 2011

Aromatic chicken pilaf

IMG_7483-1
I have realized that I should just stop making biryani altogether. Other than the few times I have succeeded, its all been a bad experience. I mean we still eat it with gusto even if it turns out a little less like biryani and more like a sadam, but I cant entirely depend on it to fetch brilliant results. Its simply because I still haven't mastered the art of cooking rice to perfect consistency, chicken to perfect gravy amounts and then doing the dum. Most of the time I have a very impatient husband whining in my ear about 'the damn dum' method saying its been kept for too long, and its ready to eat now, and we don't even need to really do the dum method. By that time even I'm impatiently waiting to dig into the biryani and fall for everything Ro has to say.

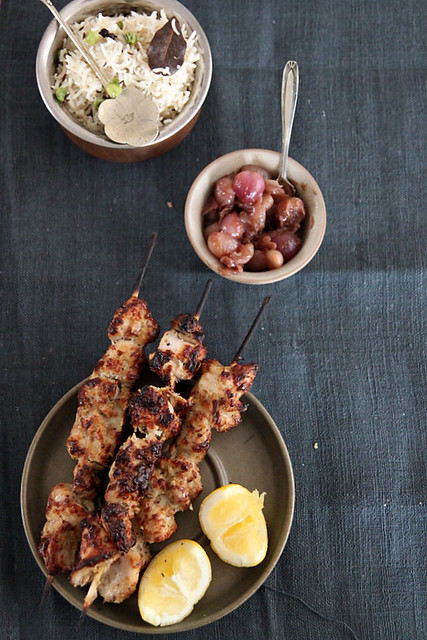
So to sum it up, my biryani expeditions are rather funny and so I've resigned to making pilaf which is much much much easier, more or less the same flavours (although connoisseurs in the field would beg to differ) and most of the time quenches my biryani craving.

Remember me telling you about an unassuming cookbook a friend had gifted. Well that book is called 
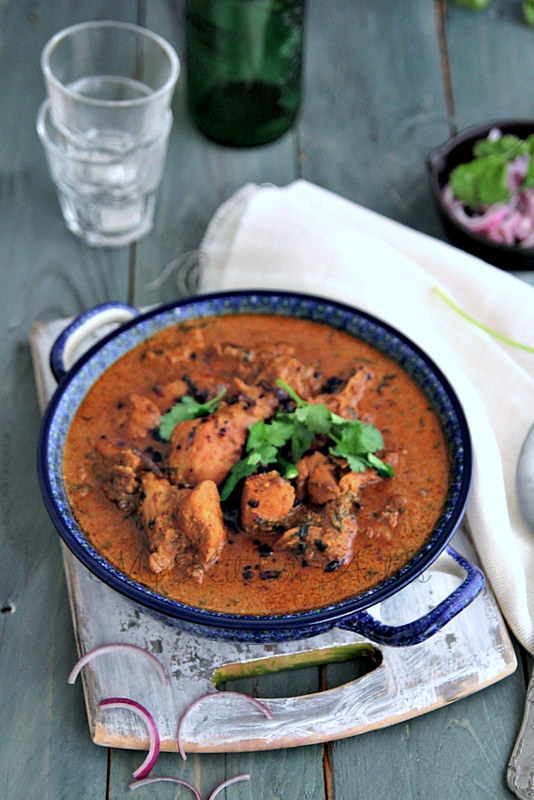
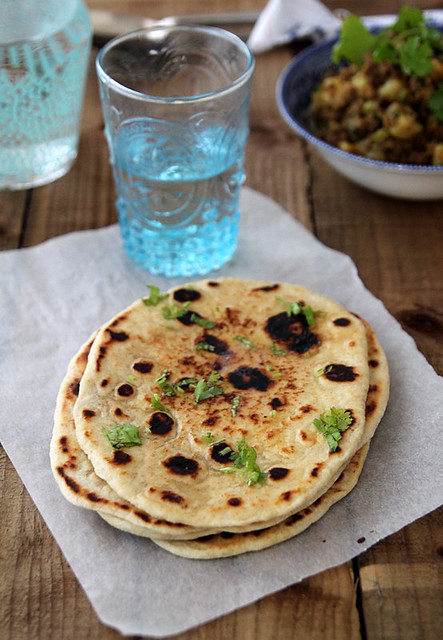
200 curries by Sunil Vijaykar and it has sooo many amazing and super easy recipes, perfect for a lazy bum like me. This pilaf recipe has been adapted from the book and can be whipped up in no time. The ingredients list may look massive, but really, it can be whipped up in a jiffy. Its also kind of like a one pot meal, perfect for those winter nights indoors.
IMG_7459
Boneless chicken breast or thighs- 350 gms (approx 4 large chicken thighs/ breasts)
Basmati rice- 200 gms (1 cup)
Yoghurt- 2 tbsp
Coriander powder- 1 tsp
Chilli powder- 2 tsp
Curry powder- 2 tsp
Cumin seeds- 1 tsp
Cardamom- 2 pods
Cloves- 2
Cinnamon- 1 1/2 inch stick
Bay leaf- 1
Onion- 1 large, thinly sliced (preferably red onion)
Garlic cloves- 4, roughly chopped
Milk- 1 tbsp
Saffron threads- 1/4 tsp
Frozen green peas- 1/2 cup
Chicken stock- approx. 500 ml (or 2 cups)
Salt- to taste
Oil- 1 tbsp + enough to fry the shallots
English shallots- 2 small, sliced lengthwise
Coriander leaves- 1 tbsp, chopped finely (for garnish)
IMG_7474
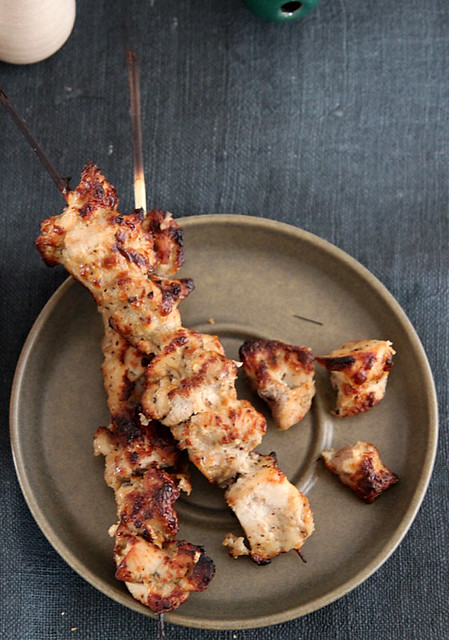
Clean and slice the chicken thighs into small bite size pieces and marinate with yoghurt, coriander powder, chilli powder and curry powder for about 1/2 an hour or if you have time, longer in the refrigerator.
Wash the rice till water runs clear and then soak in warm water for a while (optional)
Warm the milk a bit and soak the saffron threads in them.
You can go about getting all your other ingredients ready while the meat is marinating.
When you are ready to cook, place a deep, heavy chefs pan on medium high heat and pour in 1 tbsp of oil.
When the oil is really hot, add the marinated chicken and cook, stirring continuously, for about 5 minutes or till the chicken is cooked 3/4th. (I went ahead and cooked the chicken completely)
Once cooked, drain and keep aside.
Into the same pan (add more oil if required) throw in the spices- cumin seeds, cardamom, cloves, cinnamon and bay leaf- and wait for it to sizzle and release all the aroma.
Throw in the onions and garlic and sauté till the onions wilt and turn a golden brown.
In goes the frozen peas and the precooked chicken. Sauté well on medium heat, just to thaw the peas.
Add the drained rice and stir it in gently, so that all of the ingredients are well combined.
Into the chicken stock, add the saffron milk and give a gentle stir. Colour would change, but that's fine really. Also do a taste test to check for salt as you don't want to over do it while adding salt to the rice.
When the rice becomes a wee bit glazy add the chicken stock, season with salt and give a final stir.
Close with a tight fitting lid and simmer for 15 minutes or till the rice is perfectly cooked.
While the rice is cooking, heat some oil in a sauce pan and fry the shallots till crispy and brown. Drain on paper towels and keep ready.
When the rice is cooked, take it off the flame and leave it covered for a further five minutes.
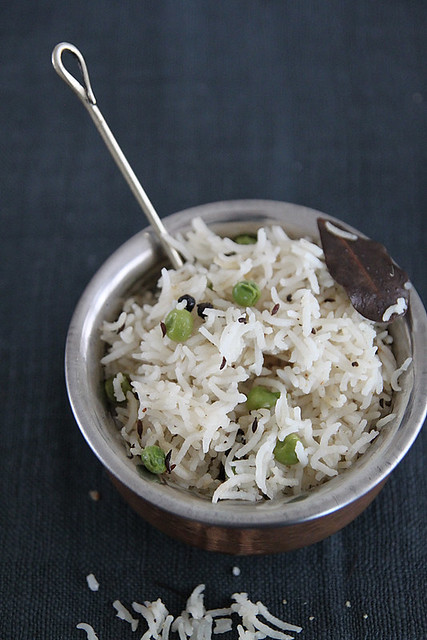
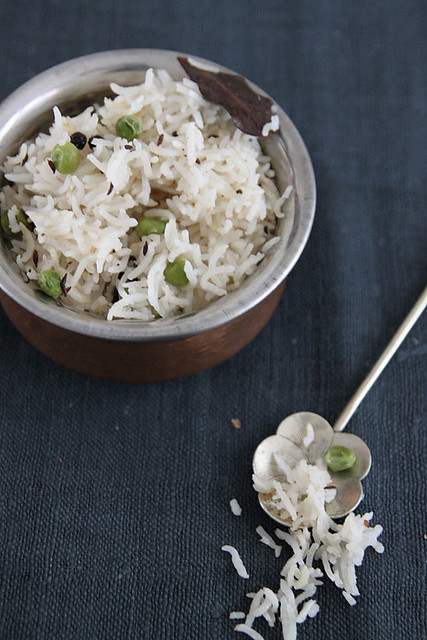
Then fluff the rice using a fork and transfer to a serving bowl.
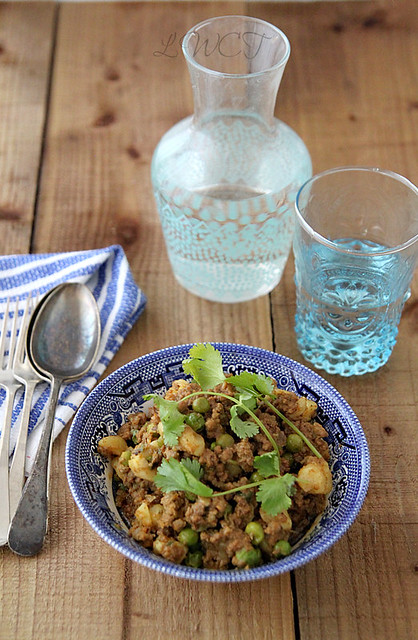
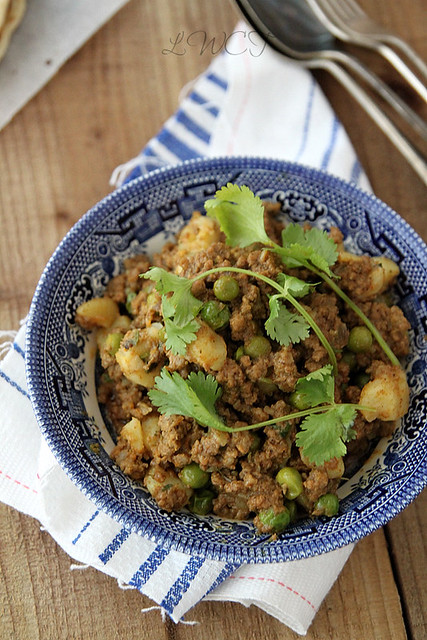
Garnish with the fried onions and coriander leaves and serve with some cucumber raita.
IMG_7465
Notes: The original recipe called for dried apricots/ sultanas (125gms) but I don't like to bite into those and so didn't bother adding them. If using, stir it in with the chicken stock.
I dissolve a chicken cube/ bouillon in 2 cups of boiling water just before adding to the rice, which starts boiling on the hob top almost immediately. I then close with a tight fitting lid and cook on low heat for about 10 to 15 minutes, checking half way through with a fork, if the rice is cooked or not.
If you don't want to marinate the chicken before hand, then throw in all the masala powders after you cook the onions and garlic and then add the chicken and cook completely. Continue from the step where you add frozen peas.
You can replace the oil with ghee if you prefer it that way.
Also, adding the spices (cardamom, cloves and cinnamon) are completely optional. 
Add paneer instead of chicken and also slice a bell pepper and add along with the onions if you want a veg version.
Replace curry powder with any meat masala.

Saturday, 13 August 2011

Spicy Bombay potatoes

IMG_3803
I honestly never intended to take such a long break from blogging. It just happened and I kinda started enjoying the peace and quiet that came after the cooking process.  I mean I enjoyed not rushing to catch the sun for good pictures, to arrange and wash the props and to be honest, I kinda liked the 'not cooking fancy dishes so i can show off on my blog' phase a whole lot that I pretended I didn't even have a food blog.

In between I would whine to Ro about how I haven't updated the blog in over 10 days and he would be least bit bothered. It kinda rubbed off on me too, I must add. So when a whole lot of you guys wrote in asking if everything was fine, I was overwhelmed. The London Riots didn't affect us much, except for a day when all the nearby supermarkets and shops were shut, just as a precaution, which put me in a bit of a distress considering I plan on a day to day basis (not just grocery, everything in life really). But otherwise, the affected areas were no where near ours and so it was fine. Its all under control now and thank you so so much for writing in.
IMG_3778
Anyways, coming to the recipe...a couple of days back I was so lazy to cook that I decided to pick up one of those ready meals from the store. I would never learn from my mistakes, and so picked up Indian grub. Yes I bought Bombay Potatoes and pulao from a British grocery store. Did I think it would be authentic? I don't know, those Bombay potatoes looked so yum and I decided to just go ahead and buy it (without thinking, of course!). It tasted so horrid but I had to force it down my throat, because I had to "pay" for my actions. That's when I wondered, c'mon how difficult can it be to make these at home, and I did, today!
IMG_3837
Bombay potatoes are so damn popular here in UK, you can find it in almost all the grocery stores and heck Shwartz even has a spice mix called Bombay potatoes. I wonder if there is actually something called Bombay Potatoes errr.. in Bombay? Or is it like the Chicken Manchurian which I presume originated in India and the Chinese have no idea about? Whatever the scene, I made it today and it was waaaay better than the store bought one. You can serve this hot or cold, and serve as a side to grilled chicken or Indian breads.

I have also entered this into the 'Love the Garden' competition (which I should have done long back, but obviously waited till 3 days before it ends), so it would be great if you can head over and vote for this recipe. I already feel kinda lame asking you guys for a favour :)
IMG_3804
Baby pearl potatoes- 250 gms (washed and scrubbed well)
Red onion- 1 large
Ginger paste- 1/2 tbsp
Garlic paste- 1/2 tbsp
Coriander powder- 1 tsp
Chilli powder- 1/4 tsp
Turmeric powder- 1/8th tsp
Cumin powder- 1/2 tsp
Tomato- 1 small (optional)
Garam masala- 1/4 tsp
Mustard seeds- 1/4 tsp
Curry leaves- a sprig (optional)
Oil- 1 tbsp
Salt- to taste
IMG_3786
Pre cook the potatoes till they are about fork tender. Not too mushy though. You can do this either in a microwave, pressure cooker (1 whistle) or on the stove top by boiling it in water. keep aside.
Heat oil in a large wok and splutter the mustard seeds.
Add the curry leaves at this point (if using) and stir for a couple of seconds.
In goes the onions. Sauté till they are about light brown in colour, on medium heat.
Add the ginger and garlic paste and continue to cook till the raw smell disappears, about 5 minutes or so on medium heat. 
Add the spices- coriander powder, chilli powder, cumin powder and turmeric powder- and mix well. Cook till they no longer smell raw, but nice and fragrant instead.
Tip in the chopped tomato and stir well. Cook till oil starts separating. Add a wee bit of water if it starts scorching at the base.
Season with enough salt.
Add the cooked potatoes and mix them all together, making sure the masala coats the potatoes well.
Increase the heat a bit and let it roast in the spices for a couple of minutes. Make sure you keep stirring in between.
Sprinkle the garam masala on top, give it a good stir and after about 2 minutes, take them off the flame.
Transfer to a serving bowl and enjoy!
IMG_3815
Notes: You can do the same with large potatoes, just that pre cooking them might take a bit longer. You might also want to peel them in that case.
Adjust the spice level if you are not up for it.
Some versions have bell pepper, I didnt have any at hand, so omitted it. Feel free to add it along with the potatoes.