Wednesday 28 March 2012

Nanaimo bars

IMG_0068
BBC2 airs a baking competition called 'The Great British Bake Off' and I love it. I have been religiously watching it since it started airing and wait for the cook book to come out after the season, just to gawk at all the pics and maybe try something if its not too complicated. The winner of the first series was food blogger Edd Kimber of The Boy Who Bakes. He, of course, came out with a book full of fabulous bakes and such. I picked it up from the library only to flip through it, but unlike all other cookbooks, this one actually inspired me to make quite a few things...well actually 2 things..which turned out perfectly well.

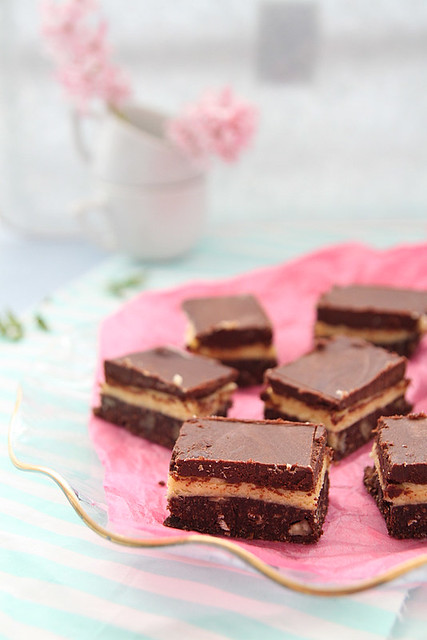
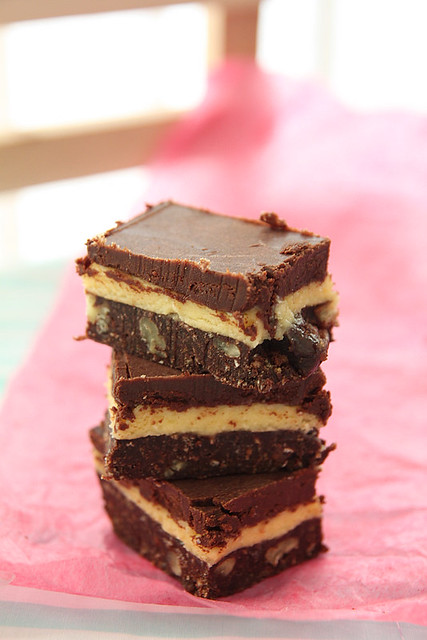
Nanaimo bars (you can read the history and all about it on Wikipedia) were one of them and although I have seen it cafe's and bakeries, I never bothered trying it for the simple reason it had chocolate in it. It also gave me the feeling of a super rich dessert, high in calories and the various recipes proved that. I didn't want to make a huge batch and end up throwing out most of it or even worse, eating it all up on our own. So when we were asked to a friends place for Sunday lunch, I thought I'll make some and take half of it there. Since its a setting process, I spread the entire procedure over a couple of days and had it ready 2 days before the party. I had sliced one piece to check if it tasted nice, and it did, but not in an 'oh my god why the hell did I wait so long to make this orgasmic dessert' way but more in a 'hmm its a nice thing to munch on' way.
IMG_0095
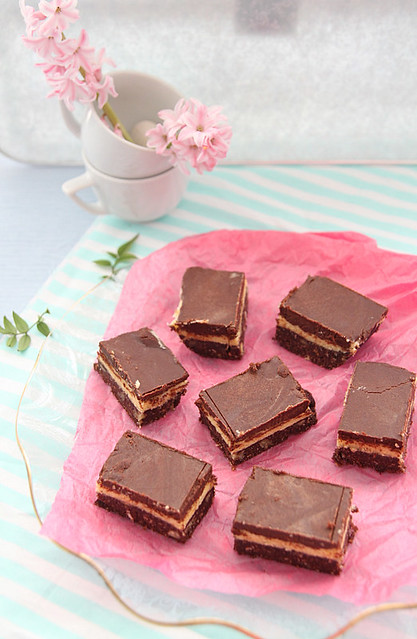
I left it in the refrigerator, nicely covered and headed to a movie during which time the husband got home and dug into it. Not one piece, but 3 squares he had, all in one go. I did not notice this because Ro does not have the habit of raiding the fridge and cupboards looking for things to eat (unlike me) and I didn't think I should warn him about NOT touching what's in the ceramic tray. Then the day before the party I take the tray out and half of it has disappeared. Greediness got the better of me and I tried one slice. At that point it was certainly an 'oh my god.....orgasmic dessert' moment. I decided to not take it to that friends place and we enjoyed it all to ourselves. Ro is even pleading to make another batch soon. I cant get myself to do so (considering the huge amounts of yumm stuff that went into it) but I shall sometime, or when I have another party I need to take something to :)

On a completely different note, I finally managed to get my recipe index intact. Its still in the work-in-progress state, but its well on its way to completion. Have updated the side bar with my fb, twitter, flicker accounts. So if you want to hear more of my brags and complaints and such please feel free to connect with me there. Phew! who said food blogging was child's play? No one? (I think I did when I initially started the blog) ;)
IMG_9757
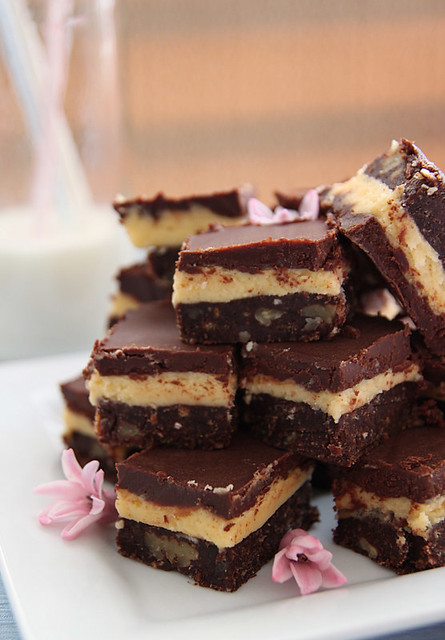
Recipe adapted from The Boy Who Bakes (makes around 20 to 25 squares)
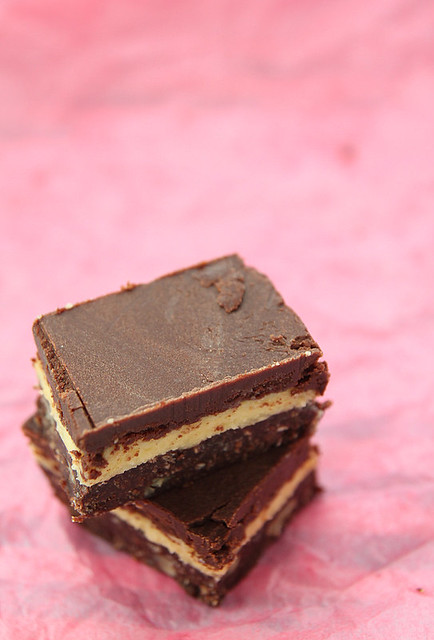
Bottom layer
Digestive biscuits- 150 gms (I used McVities, but any rich tea biscuits should do)
Butter- 85 gms
Caster sugar- 38 gms
Cocoa powder- 23 gms
Egg- 1 large
Vanilla extract- 1/2 tsp
Desiccated coconut- 50 gms
Pecans- 37 gms, roughly chopped

Middle layer
Butter- 50 gms
Icing sugar- 170 gms
Custard powder- 1 1/2 tbsp
Double cream- 50 ml

Top layer
Dark chocolate- 113 gms, finely chopped
Double cream- 50 ml
Unsalted butter- 20 gms, softened
IMG_0089
Get a large baking pan (I used a 23 x 13 rectangle casserole dish) ready and line the bottom and up the sides with aluminium foil. Leave some extra hanging over the sides, so its easy to take it out as a whole for convenience of slicing.
Place the biscuits in a plastic bag and use a rolling pin to crush them to resemble bread crumbs. If you have a food processor, then just pulse a couple of times to get the desired consistency. 
Transfer the biscuit crumbs into a mixing bowl and add the desiccated coconut and chopped pecans. Mix well and keep aside.
Melt the butter in a sauce pan over medium heat.
Then remove from heat and whisk in the sugar and cocoa powder, followed by the egg. Beat it into the mixture.
Place the pan back on heat and cook for about a minute, or until the mixture thickens, making sure to whisk constantly.
Remove from heat and stir in vanilla extract.
Pour this into the biscuit mixture and give it a good mix
Tip it into the baking tray, spread it out and press it in as evenly and tightly as possible, so it wont crumble when cut into.
Cover with a cling film and chill for a minimum of 1 hr.

While that's chilling, get the middle layer going.
Beat the butter, using a hand mixer or in a free standing mixer, until light and fluffy.
Gradually beat in the icing sugar until you get a smooth mix.
Add custard powder and cream and beat on low until just combined.
Then increase speed and beat well till you get a light and fluffy mixture.
Spread this evenly on top of the biscuit base.
Cover and chill for another hour or so.
IMG_0062
Finally, for the top layer, make a ganache.
Keep the chopped chocolate ready in a bowl.
Bring the double cream to a boil and pour over the chocolate pieces.
Leave to stand for about 2 minutes and then stir well until you get a smooth mix.
Add the melted butter and stir further to get a silky ganache.
Pour this over the butter cream layer and spread as evenly as possible.
Cover and chill until ready to serve.

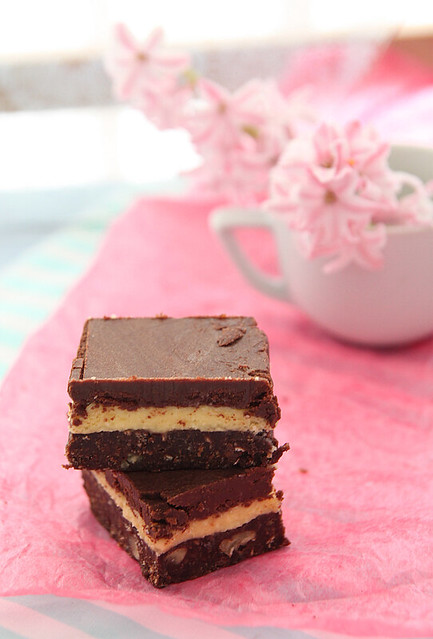
To prevent the chocolate layer from cracking, take the baking pan out of the refrigerator about 10 minutes prior to slicing. Then run a clean, sharp knife under hot water, wipe dry and slice. It would be far easier and less messier.
IMG_0079
Notes: I used our Indian desiccated coconut for this. Was a bit wary about how it would turn out, but it worked out just fine. Feel free to use the one meant for baking.
The original recipe called for walnuts, but since I didn't have any, I used pecans. Any kind of nuts should be fine.
I made the base and chilled it for a whole night. I basically took my own sweet time to do the layers which was a very good idea, because patience is not my thing. I probably would have ruined it, if I made it all the same day.
I sliced them up and stored in a container for a week. It was absolutely fine. 
Make sure you slice them into small pieces, because this is super rich and you don't want to over do with a big piece.

Saturday 24 March 2012

Roasted tomato chutney/ achar

IMG_0021-1
Whenever I invite people over for a meal, I get all worked up and start planning for a 101 things to make. I even buy all those ingredients for the 101 things and since my organisational skills are extremely good I end up cooking the very last moment, panic and in the nth hour decide to not make half of the things I planned on preparing.

Story of my life.... You'd think I'd learn from mistakes, no, not me, that ship has sailed long past and I sit and wallow in sympathy (or at least hope I get some sympathy). I panic and turn to the husband who decides to console me by saying I take too much unnecessary pressure, its only a bunch of friends, you don't even need to make starters, why are you overdoing it, no one will eat so much so on and so forth...not what you want to hear when you have guests coming in any time, a messy (open) kitchen, at least two dishes on the hob (bubbling away) and a human version of an exploded volcano- that's me btw (forgive the pun).

Its always the starters that I end up leaving for the last minute and invariably not make it at all. Ro keeps telling me its rude to hover around the kitchen when there are guests involved. I admit its rude to cook while they are around, but checking in on stuff in the oven, filling a tart or even frying something is acceptable, especially because these things, if made before hand, loses all the goodness. Which of course is all Greek and Latin to my husband and we end up arguing about it (always and in between all this commotion). 
IMG_0047
He offers to help, like thread stuff on to skewers and stuff, but god it takes an awful lot of time, Ro being the perfectionist he is, and asks at least 10 different questions on how to do it. Did I tell you I have no patience to answer to people when I'm in the midst of something? Well, my husband of 6 yrs doesn't get it and keeps asking me 'does the tomato have to always go in first? Why are we threading it, cant we just pile it all in a bowl and serve, its going into peoples mouths, no one cares. To avoid all this nonsense, I don't ask him to help with preps. Trust me, its a smart move, because over involved husbands are a pain to deal with, I've seen some and I don't want to encourage it. So the rule in our household is..if you need help, ask for it.

So anyway, coming back to the topic, we had a few relatives over a while back and since there were quite a few of them we decided to order biryani from a fav restaurant of ours. Since main course was taken care of, I had all the time in the world to go ballistic on starters. Again, after a warning from the husband that I shouldn't over do it, since biryani is a heavy meal, I still went ahead and make a tonne of starters. I also decided to do a wine and cheese pairing since most of them were wine drinkers (and also because I had just researched and written an article on wine pairing and it sounded too good to pass). I made this chutney rather by fluke and it ended up being a great accompaniment with cheese and crackers. It is so easy to put together and stays in the refrigerator for quite some time. I also use this as a dip for momo's, vada's and even dosa and idli. The measurements are all adjustable, so bear with the vagueness.          
IMG_0016
Ripe tomatoes- 250 gms, sliced in half (any variety is fine)
Olive oil- 1/2 tbsp
Sea salt- to sprinkle
Pepper- to sprinkle (freshly ground)
Coriander leaves- 1/2 tbsp, chopped (optional)
Green chilli- 1, roughly chopped
Ginger paste- 1 tsp
Garlic paste- 1 tsp
Vegetable oil- 1/2 tbsp
Mustard seeds- 1/4 tsp
Fenugreek powder- a generous pinch
Asafoetida- a pinch
Salt- to taste
222
Pre heat oven to 200C
Line a baking tray with silver foil and arrange the tomatoes on it, cut side up.
Drizzle the olive oil over the tomatoes and sprinkle generously with salt and pepper.
Roast in the oven for about 35 to 40 minutes.
Once done, take it out and leave to cool. You can peel away the outer covering if you want, but I left it on.
Grind together the roasted tomatoes, coriander leaves and green chilli to a paste-like consistency.
Mix with the ginger and garlic pastes.

When ready to cook, heat oil in a sauce pan and add the mustard seeds. Let it splutter.
Add the tomato paste along with fenugreek and asafoetida powder and cook on medium heat till you see the oil separating. Keep stirring in between.
Check for seasoning, add if required and take it off the flame.
Leave aside to cool and serve it with some crackers and cheese.
IMG_0003
Notes: Its a slightly tangy dish, so be prepared.
Add more green chillies if you want it spice or if you want a mild version, omit the green chilli altogether and add a half tsp of Kashmiri chilli powder instead.
Replace olive oil with any other oil. I like how the olive oil gives a distinct taste.

Monday 19 March 2012

Chicken ghee roast

IMG_9651
....yes the name makes you gain at least 5 pounds and eating it makes you gain .. I don't know do the math ;)

That said, this is probably one of the yummiest chicken roasts I have ever had. I mean, how bad can it be? Its cooked in ghee and has the yummy flavours of garlic and tamarind and such. Once I made it, I just couldn't stop going back for more. I finally had to stash it away in the refrigerator, because otherwise dinner would have been love and fresh air.

This roast has made its way to my kitchen plenty of times and each time I think of taking pics so I can record my version on the blog, but there are usually no leftovers or very little, and its forgotten. This time I made it during the day so I could take pics before lighting became an issue. But as you can see from the pictures, lighting was an issue, and I hate the pics, but I am still going ahead and posting them here, because you guys deserve to know about this awesome dish. I chanced upon a gorgeous blog called Cherie's Stolen Recipes on one of my surfing sessions, and I'm in love with all those Mangalorean recipes she has posted. Have bookmarked quite a few and this is the first I'm trying. Thanks Charishma for the brilliant recipe. It sure is a keeper.

Now, before I go forth, I must admit that this is not the authentic way of making chicken ghee roast, which I believe is a Mangalorean speciality. I went ahead and took the easy lazy way out and made it to suit our taste (read, less spice). This is traditionally a very very spicy dish, oozing with ghee. As much as I love the ghee flavour, the quantity mentioned made me gasp, and so I have adjusted it without compromising too much on the taste. The ghee flavour was still prominent, but not in an over powering sort of way and needless to say, this is not a dish you can have on a regular basis. Indulging in it once in a while is absolutely forgiven (or to an extent encouraged) :)
IMG_9654
Recipe adapted from here
Chicken- 500 gms (bone in pieces)
Lemon juice- from half a lemon (about 2 tsps)
Turmeric powder- 1/2 tsp
Yoghurt- 3 tbsp
Salt- to taste

To grind
Kashmiri chilli powder- 2 tbsp
Dry red chillies- 2
Peppercorns- 1 tsp
Coriander seeds- 1/2 tbsp
Cumin seeds- 1/4 tsp
Fenugreek seeds- 1/4 tsp
Garlic-pods- 10, peeled
Tamarind paste- 1/2 tsp diluted in 1 tbsp water

Ghee- 4 tbsp (a little more than 1/4 cup)
Curry leaves- 2 sprigs
Coriander leaves- to garnish (optional)
IMG_9658
Clean and cut the chicken into medium size pieces.
Marinate with lemon juice, turmeric powder, yoghurt and salt and keep aside for at least an hour or more (cover and refrigerate if marinating for more than an hour. I kept it over night)
While that's taken care of, dry roast the Kashmiri chilli powder, dry red chillies, peppercorns, coriander seeds, cumin seeds and fenugreek seeds for a couple of minutes, just to get the aromas going. Take care not to burn them.
Grind this along with the garlic pods and tamarind (with the water) to a smooth paste.
When ready to cook, place a heavy bottomed pan on medium heat and add 2 tbsps of the ghee.
Once hot, add the marinated chicken and cook till 3/4th done. Toss it around a bit so it gets cooked more or less evenly.
Once done, transfer the cooked chicken and the juices released to a separate bowl.
Return the pan back on to the heat and add the remaining ghee. 
Add the ground masala and cook on medium heat till the oil starts resurfacing. Keep stirring in between to prevent the paste from burning and sticking to the pan.
At this point throw back in the cooked chicken along with all the stock and toss it around to coat the pieces well.
Add salt if required and cook for a further couple more minutes, till the chicken is completely cooked and there is no more gravy visible. It should be sort of dry.
Add the curry leaves and coriander leaves (if using), give a final stir and remove from the heat.
Serve with some hot rotis or ghee rice. Yummmoo.
IMG_9655
Notes: Original recipe calls for the dry Kashmiri chillies (15 of them).
If using tamarind pieces, dilute a small piece in 1 tbsp water, squeeze it out and use the water without the tamarind.
The colour is supposed to be a deeper red, but I suppose that comes with using dry Kashmiri chillies.
If you are adventurous, go ahead and use 1/2 a cup instead of the 4 tbsp :)

Linking this up to the Indian Food Palooza event hosted by the three lovely ladies Prerna, Kathy Gori and Barbara. Don't forget to check it out.

Wednesday 14 March 2012

Carrot cake

IMG_9148
My mom makes the best carrot cake evah. I don't think I have enjoyed any other carrot cake as much as I've enjoyed hers. The ones that you get in Ottolenghi is a close second, although sometimes I hate biting into all those walnuts and coconut slivers. And the ones you get in bakeries and such, are somehow not moist enough and I hate the marzipan toppings they come with. So whenever I crave a good ol' carrot cake I resign to using mummy's recipe which never fails.

Ro hates a carrot cake where you bite into small pieces of carrots and says he cant eat a cake made of vegetables. So that's one of the reasons why I go back to making mummy's cake where she kinda makes a puree with the carrots and uses that in the cake. This makes it incredibly moist and you don't see or bite into carrot pieces, but still end up with a nice carrot flavour. But me being me, soon gets bored with the same ol' thing and I firmly believe in the saying 'variety is the spice of life.' So recently when I craved some carrot cake, I started going frantic searching for recipes online.
IMG_9172-1 
Needless to say, the search ended up in a plethora of recipes leaving me thoroughly confused. I wanted a simple recipe which used basic ingredients and was easy to put together. This recipe is just that and more because it tastes fabulous. I would have personally preferred it to be a bit more sweeter, but I still enjoyed the cake nonetheless. Ro for that matter couldn't even make out it was carrot cake until I told him it was and of course he made a fuss about it. But I was glad to see him going for a second piece after all that drama. The cake keeps well for a couple of days at room temperature in an air tight container, that is if you can manage to stay away from it.

I love the carrot cake-cream cheese combo. Well I like it more for the cream cheese, I must say. Its one frosting I absolutely love, and know to make and so it somehow makes its way through to almost all the elaborate cakes I bake. This time I didn't want to over do it with frosting since it was just for our use, and its more forgiving on the hips. So if you want to go all out, double the recipe, make it into a layer cake, dab loads of cream cheese (recipe here) and make a deal out of it. You will thank me for it, trust me :)

On a completely different note, I would love to thank my friend W for putting together the header for me. I bug him for all my doubts regarding logos and html codes and such and he's really good at it. The deal was I'd bake him some goodies in return for the header. A cake coming your way W :)
27 
Recipe halved from here
Plain flour- 1 cup
Baking soda- 1 tsp
Salt- 1/2 tsp
Cinnamon- 1 tsp, powdered
Nutmeg- 1/4 tsp, grated or ground
Ginger- 1/2 tsp, powdered or grated
Granulated sugar- 1 cup
Vegetable oil- 1/2 cup + 2 tbsp
Eggs- 2 
Carrots- 1 1/2 cups, peeled and finely grated
IMG_9141 
Sieve/ mix together the first 6 ingredients into a bowl. Keep aside.
In another bowl beat together, with a wire whisk or wooden spoon, the sugar and vegetable oil till well blended.
Add in the eggs, one at a time, whisking well after each addition.
Add the flour mixture and mix well so that no traces of flour is seen. 
Finally, fold in the grated carrots.
Line a 12 hole cupcake pan (or cake pan) and pour the batter in, till about 3/4th full.
Bake in an oven preheated at 175C for about 15 to 18 minutes or till a skewer comes out clean.
Take them out of the oven and leave aside to cool for five minutes after which you can transfer them on to a wire rack till completely cool.
While they are still slightly warm, roll them in caster sugar or dust some powdered sugar on top for added benefit.
IMG_9152 
Notes: I would probably add 1/4 cup more of sugar because I love a sweet cake. In this case I'll probably avoid rolling/dusting sugar once the cake is done.
I used the fine grater on my grater box which yielded really fine carrot slices and once the cakes were done, you couldn't find traces of carrots (which was a good thing, if you ask me). The process is a bit more tiresome, but if you don't mind pieces of carrots in your cake, then go ahead and grate it bigger or whichever size you prefer.
I used mini bundt pans and got 6 of them. I had to bake it for about 20 minutes though
If you like walnuts and raisins, add about 1/2 a cup of coarsely chopped walnuts and 1/4 cup raisins along with the carrots and fold it all together.
If you are frosting the cake, do so only after the cakes have completely cooled down.
Also, you wont be able to store them at room temperature if using cream cheese frosting. Store it in the refrigerator and use it within 2 days, after which the cream cheese goes bad.

Saturday 10 March 2012

E.ON Innovation

   
I was never the type who used to care too much about saving energy, wastage, etc etc. until I started running a home on my own. I then realised that there were umpteen ways in which you could save energy at home, and not just sourcing the food aspect alone, but with storing, cooking and even cleaning to be precise. So when E.ON announced the launch of an interesting project called the E.ON Innovation- an online community aiming at inspiring the general public (of course UK based) to come up with brilliant ideas to design the next big energy saving product or service- I decided it was high time I sat down and thought about ways to practise this at home.

Linked to the Channel 4 series 'Home of the Future', E.ON features five different challenges in the areas of rest, work, play, food and wellbeing, wherein you can put on your thinking caps and come up with innovative ideas that may make you the next big thing in the world of inventions, or even better, the best submission from each of these themes will win a home energy make over worth up to GBP 2000. If thats not enough, a 'Shining Star' winner will be selected, in which case the prize deal is increased to a home energy make over worth up to GBP 10,000.
This week the challenge is on the theme of food, and along with encouraging all of you to come up with ways to save energy with regard to storing, preparing and cooking food, I thought I'd ring up a few myself:

1. Use the kettle to boil water, and not use the hob top (which takes more time). Also, boiling the exact amount of water required and not huge quantities, which will go to waste and use up more energy.

2. Try and use the microwave as much as possible for reheating food, as opposed to using the oven or hob which requires a 10 minute pre heating time and then a minimum of at least 10 to 15 minutes to heat the food. A tip to save energy in case you need to use the oven, is to turn it off 10 minutes prior to the actual time as the oven will retain enough heat to do the job effectively. Same goes for a hob as well.

3. The pressure cooker, I think, is one of the best kitchen utensils I have ever owned. It not only does the job in half the time, but also saves loads of energy. If you dont have one, just get one without thinking twice. Trust me, its a good investment

4. You are usually given different ring options for cooking on the hob top, try and use the ring that matches your vessel and not a smaller one, in which case you are wasting energy.

5. Boiling rice, pasta, lentils etc take a whole lot of time. So if possible, make large chunks of this ahead and store in the refrigerator or freezer for later use. I know for a fact that rice and lentils stay in the freezer for week without any problem.

6. When you buy grocery, check the expiry date and think if you will be able to utilize it by the use-by date and wont have to waste it.

There are lots of ways in which you can actually save energy at home when it comes to food. I now make a conscious effort to do all this and more, and I hope you do too.

If you have a brilliant idea you want to put forth, then log on to www.eon-innovation.com and submit them there, before the 9th of April and be part of the project by following E.ON on Twitter @talkingenergy and keep a watch out for the hashtag #eoninno.
Viral video by ebuzzing                              

Tuesday 6 March 2012

Lentils with coconut milk (parippu curry)

IMG_8533
I am in no mood to ramble today because I've not been feeling too well. Took a long bath which was supposed to refresh me, but instead I'm feeling more lethargic. Have so much of work to complete and deadlines to meet but I have just been sitting on it. I started this blog post a couple of days back, and keep writing bits and pieces here and there. So today I finally decided to finish it off. At least I can console myself saying I have finished a blog post.

Coming to the recipe... If you ask me what my comfort (Indian) meal is, I will go for rice, dal, potato fry, pappad and pickle. I can seriously live on dal for any number of days. But for someone who loves dal, I actually don't make it that often. I wonder why. Anyway, I derived inspiration to make this dal after Finla posted her version. I love dal with coconut in it and the tedious traditional way to do this would be to grind dessicated coconut with a whole bunch of other ingredients and add it to the dal etc etc. I have tried that version as well, but this kinda fetches the same, or even better results with the use of just coconut milk.

The recipe is from the book The Kerala Kitchen by Lathika George, a book I stashed away because of a couple of recipes that gave me disastrous results. I found that the masala's mentioned were way way way too much for the said quantities of meat and the book has no pics, which makes it boring and incredibly difficult for me to figure out what the end result should be like. So when Finla posted the recipe with the pic, I couldnt say no. It looked way too good to pass and I decided to give it a shot soon after. I was not disappointed, so yes, I must admit that the book does have its plus points after all.
IMG_8529
Toor dal- 3/4 cups (any lentil can be used)
Water- 2 cups
Thin coconut milk- 1/2 cup (*refer notes)
Ginger- 1 tsp, thinly sliced
Green chilli- 1, slit (add more if required)
Turmeric powder- 1/2 tsp
Cumin powder- 1/2 tsp
Thick coconut milk- 1/2 cup (**refer notes)
Salt- to taste

Tadka
Oil- 1 tbsp
Mustard seeds- 1/2 tsp
Shallots, 1/4 cup, thinly sliced
Garlic- 3, thinly sliced
Curry leaves- a sprig
Dry red chillis- 2, torn in half
IMG_8512
Wash the dal and soak it in some water for about an hour or so (I of course don't plan, so omitted this step)
Cook the dal with water, thin coconut milk, ginger, green chillis, turmeric powder, cumin powder and salt in a pressure cooker. About 2 to 3 whistles on medium heat should be fine. The lentils should be cooked, but not too mushy. 
Take the cooker off the flame, release the pressure, open the lid and pour in the thick coconut milk. Give a thorough stir. Keep aside.
Heat the oil in a kadai and throw in the mustard seeds.
Once they splutter, follow up with shallots and garlic and fry for about a minute or so, till just when they start browning.
Add the curry leaves and dry chillies, stir around a couple of seconds and take it off the flame.
Pour this over the cooked dal, give a stir and serve hot with some hot rice, pickle and pappad. Ah bliss...
IMG_8524
Notes: Original recipe calls for split pigeon peas, but I didn't have any so used toor dal instead.
If you don't own a pressure cooker (first of all, buy one), do the cooking in a large pot. It might take longer, but it can be done. In that case, once the dal is cooked, take it off the flame and add the thick coconut milk.
While reheating, make sure you don't let it boil.
I froze the remaining dal and it worked out perfect. Just thaw it completely before reheating it on low fire.
*Thin coconut milk is more watery and not thick or creamy. What I do is mix about 1/4 cup canned coconut milk with enough water to get a thin consistency. (it doesn't mean skinny coconut milk or light coconut milk)
**thick coconut milk on the other hand is thicker and much more creamier. If I don't shake the canned coconut milk to mix it up, when I open it, I find a thick layer of coconut cream. I dish this out immediately and use it to make the thick coconut milk, by just diluting it with a few spoons of water or the coconut water collected at the bottom of the can.