Tuesday 29 March 2011

Fruit fusion (salad)

You know what I realised, I have never posted a salad recipe here, in spite of eating them on a regular basis. It probably is because I very rarely make a salad from scratch. As in I pick up the mixed salad packet from the supermarket and then just add some dressing (whatever it is I feel, to be precise) and I'm good to go. Ro usually ruins the salad by adding enormous quantities of Italian or ranch dressing and makes is as unhealthy as you can imagine. Like that's not enough, he comes up with smart-ass things like, 'oh my god I'm eating an entire tree for dinner.' And then I stopped making salads for him, but when I eat, he'd dig into it and then not finish what's on his plate, ending up in arguments about whether to keep them back in the fridge and then throw it out after a couple of days or just spare me the time and effort and throw it out now itself. Its like having a frikkin 3 year old at home (ironic because he refers to me that way).
So this 3 year old that I'm talking about, has been bugging me to make fruit salad at home. I keep putting it off giving lame excuses like 'what??? fruit salad? weren't you sick of eating it back in India at all the Christian mallu weddings.' And then when we have invited people over and I'm thinking out loud about the menu Ro would sweetly chime in, 'please make fruit salad and custard or ice-cream for dessert.' My are-you-kidding-me look would stop him from further interactions. Oh yes, I'm a mean, mean wife, to say the least! I know wives who bend backwards to serve the husbands, especially their food needs. Me, not one of them. In fact I'm so damn selfish that I never buy things I don't like (fish tops the list).
Today also, this happened by fluke. I would never make fruit salad. For one, I think its an absolute waste of fruits. Why would you want to put them all together when you have the privilege of delving into each and every one of them separately and enjoying it a whole lot more? Two, if you don't eat it immediately after you make it, it becomes the most horrid thing to devour..the fruits start fermenting and you have no choice but to throw it out. 
I was out galavanting and on my way back stopped at the supermarket cos I was out of milk. Instead of just going straight to the particular isle and picking it up, I get carried away to the fruit section. Saw these pretty clementines still with the leaves and such, strawberries on a roll back, mangoes (not yet in season though) and pink grapefruit (something I was totally intrigued by) and picked it all up. What was supposed to be a one pound bill, ended up being a tenner...all for Ro, if ever he asks me why I do grocery shopping every day (for just the 2 of us), and sometimes even twice a day (like today because obviously i forgot to buy important things like coffee and eggs, and then Ro had to make a trip at 8.30pm).
The grapefruit was a bit of a disaster since I had no clue how to peel it or chop it or whatever, but managed somehow. They are the prettiest pink ever :). But on the whole, it was a breeze to put together and I added some zing to it with a few other ingredients which made it yummy. 

Mango- 1, sliced into cubes
Strawberries- 1 cup- hulled, halved and then quartered
Pink grapefruit- 1, peeled, chopped (please google for instructions on how to do this)
Clementines- 2, small, peeled 
Coriander leaves- 1 tbsp (finely chopped)
Caster sugar- 2 tbsp (or more if you want it really sweet)
Lime juice- 1 tsp (or more is you please)
Salt- a generous pinch
Put all the ingredients in a salad bowl and toss well to combine. 
Refrigerate for a while and then serve in individual glasses as it is, or with some chilled Greek/flavoured yogurt.

Notes: The addition of salt was such a brilliant idea. I mean I loved it so so much. Avoid if you are not too sure.
PS: OMG I cant believe I wrote all this shit for one fruit salad. Ro loved it nonetheless. Not that mean a wife after all huh? (please say yes)

Saturday 26 March 2011

Nigella's sweet and salty Crunch Bars

We were invited to a birthday party of a one yr old fella last weekend and this was on the menu. It tasted so good, I actually ate quite a bit of it. Even Ro for that matter kept going back and taking two or three pieces each time and I had to ask our host how it was made. She said she saw it on Nigella's show and gave me an outline of what it was, and some tips as well.

A few days later, I wrote to her asking if she had a concrete recipe and she passed on the details. Exchanged a few emails, googled a bit and there, I was ready to make the yummiest chocolate bar ever!
I mean I gasped when I saw the amount of butter it used, but what the hell...when its a one time thing, its OK to go a bit berserk right? I made this a couple of days back and have stored it in an air tight container in the fridge and its perfectly fine. Ro takes it to work for his sweet intake after lunch and I munch on it when I'm desperate for a sugar high. I am thinking this will make perfect 'take to a friends house' gift or do it up it small colourful wrappers and it would be great at parties as well.
The recipe has been adapted from her show and from here
Dark chocolate- 200 gms
Milk chocolate- 100 gms
Butter- 125 gms
Golden syrup- 3 tbsp
Unsalted peanuts- 250 gms
Cadbury's Crunchie bars- 4 x 40 gms
Salt- 1/4 tsp
Place a saucepan on low-medium heat, break the chocolate into smaller chunks, add butter and golden syrup and melt.
While that's taken care of, in another bowl break the Crunchie bars into smaller chunks and add the peanuts to it. Add the salt and mix well.
Take the chocolate-butter off the heat and stir to check if you have a smooth mix. Tip in the peanut-Crunchie bar mix into the chocolate and stir gently to coat the nut mix. 
Pour on to a foil tray (which is ideal) or on to any baking dish and smoothen it out evenly.
Refrigerate for a minimum of 4 hours.
After the bars have set well, remove them from the foil tray and cut into smaller pieces and store in an air tight container.
Notes: The original recipe calls for salted peanuts, but I was advised that they were a tad too salty and so I went with regular peanuts and added the salt just to get that salty feel.
The chocolate too, you can make it all milk, all dark or equal quantities. We prefer dark choc to milk ones, but since I was a little concerned about it being too bitter, I decided to use 100 gms of milk chocolate.
You can also use any nut of your choice...hazelnuts, cashew nuts, walnuts etc
Using a foil tray is great because the whole thing just comes off as a large bar and you can chop it up on a cutting board.
Updated to add: A lot of you wrote in asking what Crunchie bars are..well they are like a honey comb coated in chocolate and is made by Cadburys in the UK. It may be available elsewhere as well but for those who cant get a hold of it, Nigella has her own version of the Crunchie bars called Hokey Pokey and you can make it on your own. Its super easy, here is the link http://www.nigella.com/recipes/view/hokey-pokey-36
Sending this to Food Palette series brown over at Torviewtoronto

Wednesday 23 March 2011

Sunday brunch for two

I love the whole idea of a brunch. I've said that loads of times and here I am saying it again. There is something romantic about the whole brunch bit, even better when you are not making it and you just sit there with a cocktail and make idle conversation with friends. I keep thinking about making Sunday a brunch day, but I wake up at quite an ungodly hour and by that time Ro would have already had his breakfast and then brunch idea keeps getting pushed on to lunch. But I still like to refer to it as brunch, you know..because I can :)

Last Sunday wasn't any different. Had a late night out on Saturday and by the time I woke up it was close to 10 and of course Ro had made himself a nice lavish breakfast with eggs and the works and I was just getting into cooking mode when the husband decides he wants lunch NOW (this is probably at around 11.30- 12, and after a heavy breakfast). I was so damn pissed that I decided to ignore him and make my so-called brunch, whatsoever.
By the time I was done it was about 1.30 (perfect lunch time, if you'd ask me) and Ro obviously wanted to eat what I made and did so with a long face. And then we had to argue about random stuff (so not what I had in mind) and I stormed out of the room leaving everything in the kitchen as it is and vessels unwashed. If Ro hadn't even bothered to clean up, I would have probably stormed out of the house itself, but that drama didn't happen and by evening Ro pretended all was good with the world and I even bribed him into making me a hot cuppa ginger-lime tea (oh its awesome if you haven't tried it btw) and then caught a movie (The Lincoln lawyer which was interesting to say the least). Dinner out and cocktails were a great end to an otherwise normal Sunday and I decided 'all's well with the world, after-all' :)

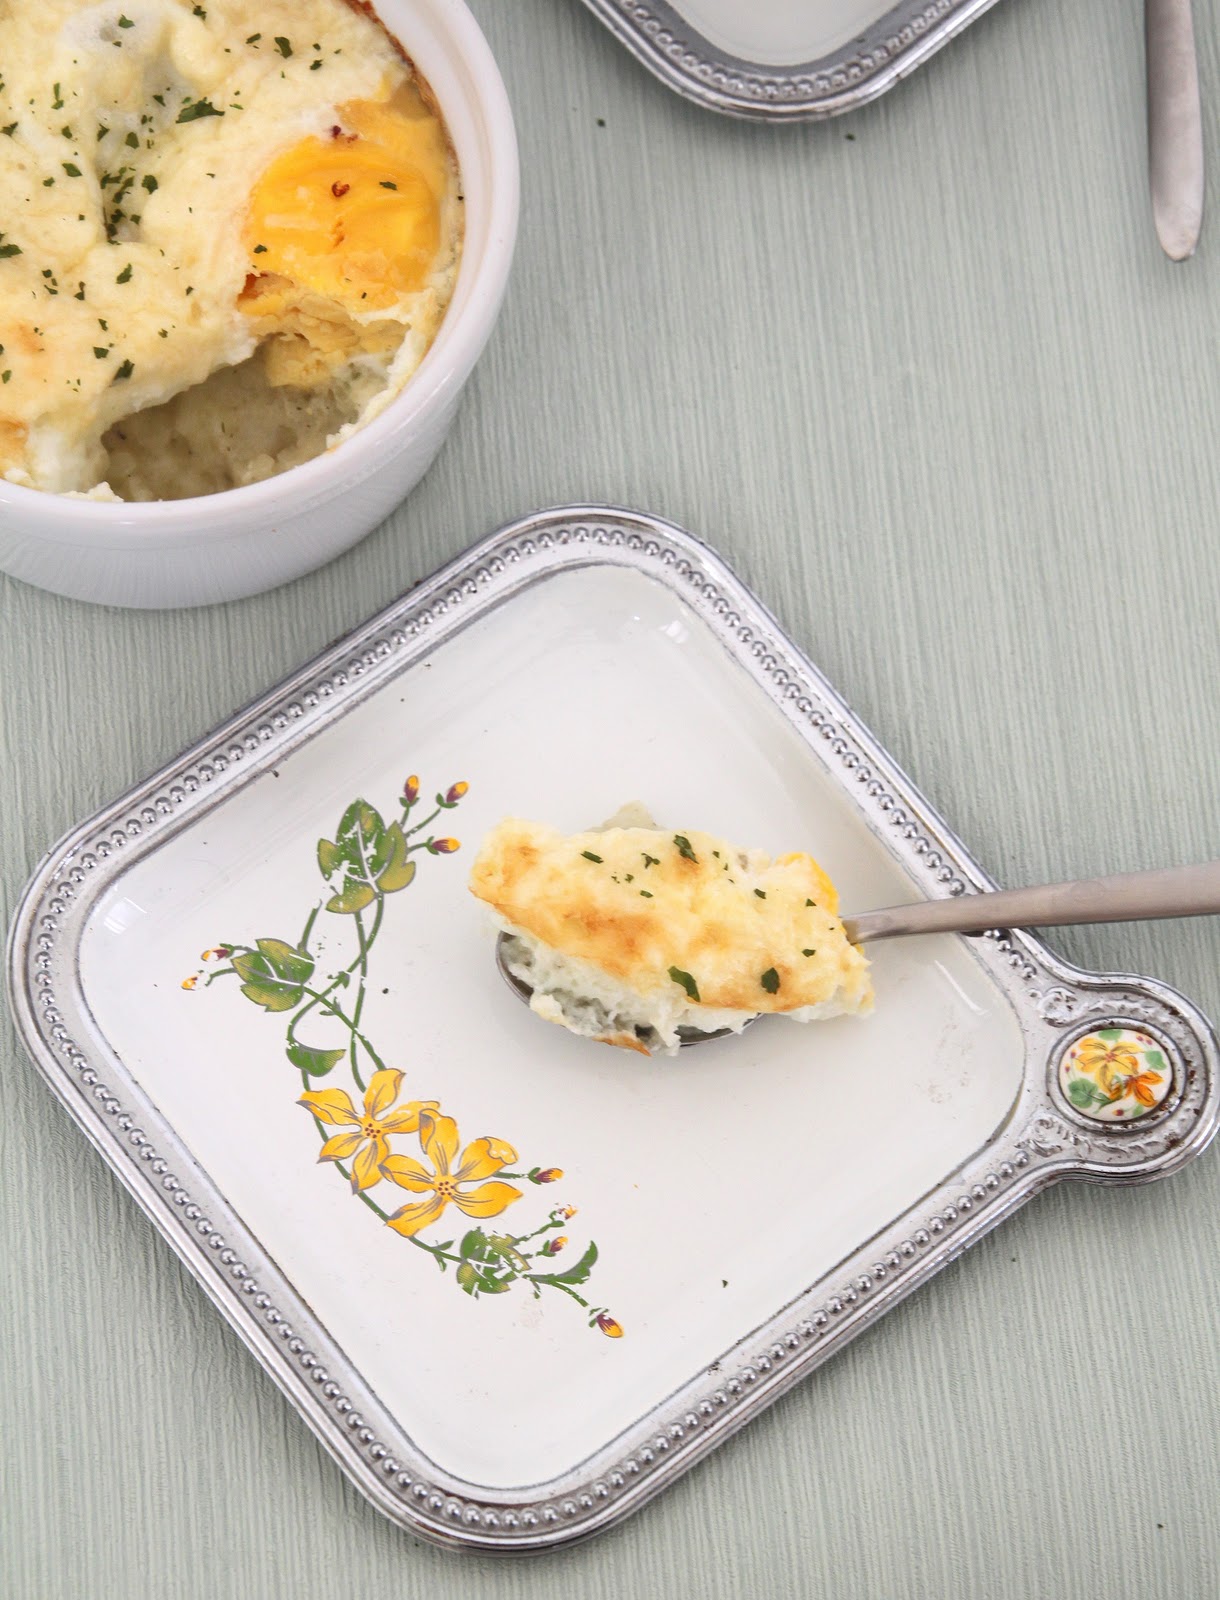
Individual oven-coddled eggs with mashed potato and herbs (Baked eggs and potato)
I found this recipe while I was browsing and the bon appetit online version appeals a lot to me, the pictures at least and its very rarely I actually read through a recipe (typical me) unless I'm looking for something in particular. This recipe by Dorie Greenspan caught my eye since i WAS looking for a baked egg brunch idea and have no regrets. It tasted so darn good that I cant wait to throw a brunch party and flaunt it. Go ahead say it 'I'm so vain' ;)
Anyhoo, the herbs in this dish just added that awesome flavour and I cant imagine why I never really used Rosemary and Thyme in my cooking. But like I have mentioned before, its an acquired taste, and if you don't like it...then you just don't!
Also, I was wondering how incredibly cute these eggs would have looked in the amazing Le Creuset cookware. Cant wait to get my hands on some of those.
Milk- 1/4 cup
Bay leaf- 1
Potatoes- 7 oz (I used about 5 to 6 baby potatoes)
Shallots- 2 medium, thinly sliced
Butter- 1tbsp
Rosemary- 1/2 tsp, minced
Thyme- 1/2 tsp, minced
Eggs- 3
Whipping cream- 3 tbsp
Freshly grated Parmesan cheese- 3 tbsp or as per your taste
Salt & pepper- to taste
Chives or parsley- to sprinkle (optional)
Bring the milk to a boil, add the bay leaf and let it seep for about 15 minutes.
While that's taken care of, cook the potatoes in boiling water till mashable consistency..say about 15 to 20 minutes. 
Drain, remove skin and mash with a potato masher or fork.
Add the shallots, butter, rosemary, thyme and milk (discard the bay leaf), season with enough salt and pepper and mix well till you get a smooth consistency.
Butter 3 ramekins and divide the potato mix equally.
Crack one egg each carefully over the mashed potato in each ramekin.
Spoon 1 tbsp cream on top of each egg and also sprinkle enough (approx. 1 tbsp) Parmesan cheese.
Preheat the oven to 176C and place the ramekins in a baking tray. Fill the tray with enough hot water making sure they come half way up the ramekin.
Bake for about 20 minutes or until the egg whites are set but the yolk is still soft.
Take it out of the oven, sprinkle some parsley or chives and serve on its own or as a side to any main meal.
Notes: I halved the recipe. Double it if you need to please more guests :)
You can also make the whole thing in a baking dish rather than doing it individually in ramekins.
I baked it for a bit longer (30 minutes) cos I was a little scared of the uncooked yolk (salmonella and all that crazy stuff you know!). Also I hate runny yolk. But I think 30 was a tad too much and it became a bit too hard, so lesser time hence forth.
You also don't need to particularly bake it in a water bath. Tried both ways, not much difference.

The best ever beef chops with gravy
My mom-in-law, who is such an awesome cook, introduced me to these beef chops on my visit home last December. I stood by her side trying to grasp all that she was showing me but you know me, how spaced out I am, that I start thinking about what to wear for the dinner party that evening. So after the first few steps, it all went over my head. I told mamma that I will call her up for the recipe and method since I was pretty sure I wouldn't remember half of what she showed me. I went back to my place and bragged about this dish to my mom and one day while we were sitting around chatting, my mom asked me for this recipe and I had no clue. No problemo, I called up my mother-in-law and she gave me the details. Made it and it was such a big hit. Came back to England and obviously I had forgotten the recipe AGAIN! Lucky for me, my sister-in-law and family had just relocated to UK and time differences were not an issue. Called her up and got the details on how to make it. Made it and it was brilliant (although Ro would beg to differ). Made it again last weekend and it was even better. So before I forget here's the recipe for my mom in laws kick ass beef chops with gravy.
Thin cut beef steak or frying steak- 500 gms
Onion- 2 small, finely chopped
Ginger- 1 inch piece, thinly sliced
Garlic- 3 pods, thinly sliced (optional)
Soy sauce- 2 tbsp (or less if you don't want a strong taste)
Tomato ketchup- 1 tbsp
Freshly ground pepper powder- to taste
Salt- to taste (check if required at all)
Oil- 2 tsp

Potatoes- 3 large, cut into wedges or circles (you can also use baby potatoes)
Boil the potatoes till about 3/4th done. It shouldn't be over cooked. Keep aside.
Cut the beef steak into smaller slices and thin it out using a mallet or if you don't have that, just use a knife as a mallet and lightly chop it on either side..through the entire length of the steak (I know I'm not making much sense here, but I promise I'll post a pic the next time I do it)
In a bowl mix together the rest of the ingredients checking for enough salt and adding as required.
Place a pressure cooker on medium high heat and layer the beef steak slices at the bottom. Don't over crowd it and make sure they don't overlap.
Place a generous layer of the onion mix on top of the beef followed by the remaining beef and onion mix, till you are done, making sure you end with the onion mix.
Add a 1/4 cup water (if you want more gravy), close the lid, wait for the steam, place the weight and cook for about 4 to 5 whistles or about 10 to 12 minutes. You would know how long the beef you get cooks, so do accordingly.
Once the steam releases, open the lid and separate the beef chops from the gravy and the onion. Leave the gravy on medium heat to simmer for a while to get a thicker consistency. If there is not much gravy, you can add a wee bit water here.
Heat a frying pan and pour the oil. Swirl it around to coat the pan and once hot, char/fry the beef chops in batches. Just to get the beef a bit brown, you can skip this step if you are lazy. Remove and place in a serving dish.
Do the same with the pre-cooked potato wedges as well. Fry till the colour changes to a light brown. Place them on top of the beef chops and pour the gravy over it. Try and cover most of the chops and potatoes.
Serve hot with chapathi or garlic bread or like I did with the baked eggs.
Notes: My mom in law places the potatoes as well inside the pressure cooker so that also gets cooked simultaneously. I don't trust myself with that method because I always end up over cooking it.
Since I already had my carb in take with mashed potatoes, I avoided the potato wedges with the beef chops and hence its not in the picture.

Thursday 17 March 2011

Smoked Salmon bread pin wheels (easy appetizer alert!)

I was not a Sushi fan, till recently. Well, a pseudo sushi fan really, cos i actually like the veggie ones and the smoked salmon ones for some strange reason.

I had guests a couple of days back and bought smoked salmon to serve with blinis' as appetizers, but the plan never materialized due to, lets just say, lack of planning:)
The smoked salmon did cost a bit and the expiry date was nearing and I didn't know what to do with it. That's when I stumbled upon this recipe on foodgawker and decided to give it a shot. Must say its so darn easy, looks fancy and tastes awesome with just soy sauce (like how you eat Sushi) or on its own.
Smoked salmon- 120gms (approx. 6 to 8 thin slivers)
White or brown bread- 4 slices
Any spreadable cheese of your choice (cream cheese) or crème fraiche or even salsa - 4 tbsp (or more if you want it strong)
Cut off the edges from the bread and thin it out using a rolling pin.
Spread the cheese generously 9esp if you don't want that raw fish taste), place two slices of salmon and roll it up gently from one end.
Place a cling wrap ready. Keep the rolled bread on one end and roll it up tightly.
Refrigerate for at least 3 hrs.
Just before serving, remove cling wrap, slice it up and arrange on a fancy plate.
See I told you it was easy.
Notes: Replace the salmon with ham or corned beef or mushroom pate or anything roll-able
Stick it on toothpicks and you don't have to get your hands dirty

Friday 11 March 2011

Yellow is definitely the new black (or you can also call it Amritsari Dal)

I flip through cookery books at the library and then something fancy catches my eye and I end up borrowing it. Then it stays on my shelf till I have to return it, (that is, if by chance I open it and find out I'm not late as yet... I mostly end up paying a fine) with hopes of wanting to try some recipe from the book vanishing in thin air. So this time too I ended up picking a book by Madhur Jaffrey (I had no flippin clue who she was..in fact I thought it was a he till I saw her picture) and was adamant I would try out at least one recipe from the book before I returned it. And I did -with great difficulty- but I did, that's the important thing...yaaaayy. 

When Ria posted a question on FB asking what according to you was comfort food, I replied saying rice, dal, pappad, pickle and beef fry. And then I wondered, according to me comfort food also has to be something I can whip up in a jiffy. Pappad, I have a packet at home all the time (thanks to it being compared to crisps here in UK, they now sell fried ones in packets), pickle, the stock from home still adorns my pantry shelf and rice, its just so much more easier now that I follow Jamie Oliver's method (till then I used to dread the soaking and draining and all that). I was stuck at dal and beef fry. Beef fry, I thought is icing on the cake...I mean it would be nice to have it as part of a meal, but then I can do without it too, if I have all the other stuff.
That brought me back to dal..something that does take a lot of time for me, but something I love, love, love (stressed it enough?). And then I stumbled upon the recipe for Amritsari Dal in MJ's ancient book Flavour's of India and decided to give it a go, still assuming its gonna take time. But boy was I surprised. This is like the easiest and tastiest dal recipe evah. The lesser the ingredients the better it is for me...and if it tastes good, damn good for me (and Ro too since he washes up after my cooking expedition).

Amritsari Dal (more or less adapted from Flavour's of India by Madhur Jaffry)
Mung dal- 25 gms
Masoor dal- 25 gms
Toor dal- 50 gms
Turmeric powder- 1/2 tsp
Water- 2 1/2 cups
Cumin seeds- 1/2 tsp
Asafoetida- a pinch
Onion- 1 small, thinly sliced
Green chilli- 1, chopped
Finely chopped ginger- 1 tsp
Finely chopped garlic- 1 tsp
Fresh Coriander leaves- a handful (optional) or dried ones- 1 tsp
Garam masala- 1/4 tsp (optional)
Lime juice- 1/2 tsp
Ghee- 2 tsp
Salt- to taste
Wash and drain the dal's and put in a pressure cooker with turmeric powder, 1 tsp ghee and enough salt. Stir and cook till about three whistles. Once pressure releases, open lid and keep aside. Add more water if you feel the dal is too thick.
In a deep pan, heat the remaining 1 tsp ghee and splutter the cumin seeds.
Add the asafoetida and give it a good stir.
In goes the onion, green chilli, ginger and garlic. Sauté till they are nice and fragrant and wilted a bit.
Add the coriander leaves and chilli powder and stir well.
Pour the cooked dal into the pan with the masala and mix well. Check for salt, add if required.
Sprinkle the garam masala over the top and mix it in. Simmer for a few minutes. .
Add the lime juice, give one final stir, garnish with coriander leaves and serve with love.
Notes: You can add a tomato instead of the lime juice. I didn't because chopping one up was tedious at that point
The recipe calls for urad beans and chana dal. I didn't have either, so I used all these. I had seen other recipes online using masoor and toor and mung dal. 

Sending this over to Ammalu's kitchen who is hosting My Legume Love Affair this month, brain child of Susan from The Well-Seasoned Cook.

Tuesday 8 March 2011

Dulce de Leche cake

I know, I know...there's been a lot of talk about DDL in the blogosphere. And I'm joining in with this cake I've made a couple of times at home, and it has never disappointed me. I say me, because Ro is such a sucker for anything chocolate and anything caramel, butterscotch, praline etc. is of not so much importance to him. I'd baked this 3 layer mocha cake (which tasted more like a chocolate cake) with whipped cream frosting a few weeks back and since I wasn't too happy about it, Ro took it upon himself to finish off the entire thing....in a matter of 2 weeks that is. And I was getting sick of this cake in the refrigerator staring back at me, and had to have something else to feast on while Ro indulged in this mocha disaster. 
I also thought I'd have to make ddl the scary way (in the pressure cooker) and so was putting this off for a long long time. Lucky for me, it was available at the local store under the name caramel and a small note saying its ddl. So fear not people, at least those in UK, just check for Nestle Carnation caramel ..its the same damn thing! Strangely though, the Carnation ddl just didnt do the trick for me..I mean I thought I would finish off half the can just on its own (like how all the other bloggers out there had mentioned and like how i normally do with the condensed milk), but this was unappealing and was a bit of a bummer really. I cant point my finger and say, yes, that was the problem, but it just didn't hit the right spot. I had plans to make Jamie Oliver's banoffee pie, but since caramel is the base and since I didn't really like it on its own, I am not going to attempt doing that. Well, unless I get the proper ddl bar from an Argentinian store or something like that (high-frikking-unlikely). The ddl flavour from Haagen-Dazs is so yummy, I thought it would be more or less like that. Silly me, for thinking that.
Anyhoo, I first incorporated my condensed milk pound cake recipe into the ddl cake, and it turned out good. Then I stumbled upon Divya's ddl cake recipe and found out that was a tad easier than my method. Since I had all the time in the world, I thought I'd even make a blog post out of it. 

I halved/tweaked Divya's recipe a bit (I knew I was going to hog the entire thing on my own)
Icing  sugar- 1/2 cup
Butter- 1/2 cup (113 grams)
Nestle Carnation Dulce de leche- 1/2 cup
Egg- 1 large
Vanilla extract- 1/2 tsp
All purpose flour- 85 gms
Baking powder- 1/2 tsp
Salt- a pinch
Mix together the flour, baking powder and salt. Keep aside.
Beat butter and sugar till light and fluffy. 
Add ddl and mix till well combined.
Reduce speed to the lowest and add the flour . Beat until just mixed.
Add the egg and vanilla extract and mix well again. I did  this on low speed and then pulsed just to get it all together. 
Grease a 9 inch cake pan or line a cupcake tray with 6 cups and pour in the batter.
Bake in an oven pre heated at 180C for 40 to 45 minutes and for cupcakes about 30 to 35 minutes.
Do the skewer test and if it comes out clean, you know what to do :)
I drizzled some left over ddl on top of the cake. Loved it to bits.
Really, you cant go wrong with this cake. And for all those who don't get ready made ddl (mom are you listening???), check out this step-by-step procedure on Divya's blog. And no I would never try this method because of my fear of pressure cookers, which will haunt me forever I guess :O

Sending this to Sweets for a Saturday hosted over at Lisa's

Friday 4 March 2011

Review: Domino's pizza versus the sad one I made

I love Domino's pizza.period. And no I wasn't paid to say that. We have been big fans of Domino's from the time we were in India, since Saturdays are usually pizza and movie days and I totally look forward to it. We used to get the cheese stuffed crust back in India, something I miss out here, but I have a whole lotta other varieties to choose from.

So when I was given an opportunity to make my own pizza and compare it to the Domino's pizza, I didn't think twice, but jumped at it. Neat huh? Well yes, till I made my own pizza and figured out Id never be doing that again!
Other than the fact that I love their flavours, what I love even more is the fact that I can order the pizza online from Dominos and the deed is done in a matter of a few clicks. We have saved our info on their website and the next time we just have to log on and place our order. You get a confirmation number and if you are not comfortable giving your credit card details online, you can pay them on delivery. We have personally never had a bad experience with them; as in we didn't have to call and confirm or there is no delay in delivery. In fact they are scarily on time. You tell them you want it delivered at 8.15 and you'd be surprised when they land up exactly at that time, as opposed to a certain other pizza chain (lets just say the name starts with P) never delivered our pizza till an hour later. While we are on the pizza subject, I must also add that I have tried almost every pizza delivery place nearby, but we end up being loyal to Domino's just because their delivery is to the dot. You don't want to order for pizza and keep the movie and beer waiting just to realize that its been over 30 minutes and the pizza guys are still nowhere to be seen and even worse, you call them up and find out they are accidentally at the wrong place, or stuck in traffic (lame).

So we ordered 3 pizza's from Domino's over the weekend: 
The new Spanish Sizzler which has roast chicken, green peppers, chorizo sausage and roquito peppers. It was alright, except I didn't really like the sweetness of the peppers that much. 
The Tandoori Hot which was basic except that I love the hot jalapeño peppers in them
And my favourite the Mighty Meaty which has all those gorgeous toppings I love- pepperoni, ham, beef, sausage and mushrooms. 
And what I made at home a few days later was a Pepperoni and cheese pizza and my version of the Tandoori Hot. If I were to compare the pizzas, I'd say mine were horrible (no I'm not sucking up to Domino's..I mean it), except I was quite generous with the topping. Other than Mighty Meaty, I thought all the other pizza's were a big meagre when it came to the topping. I could find bits of chicken here and there, but not as much as I would have liked- an issue I've always had with Pizza chains. Taste-wise I must add, Domino's' any day kicked my pizza's butt. The cheese, the sauce, the spice everything was brilliant. I always end up burning the cheese and the topping and if I want to keep that consistency right, I end up under cooking the pizza base. Well its cos of hopeless amateurs like me, that chains like Domino's thrive I think :)

So without boring you any further, here's my recipe:

For the base:
All purpose flour- 145 gms + extra for dusting
Active Dry Yeast- 1 tsp
Salt- a pinch
olive oil- 1 tsp
Warm water- as required (I used about 100ml)
(or like me, just buy the ready made pizza base mix add enough water and make the dough)

Mix the yeast into the water, stir to dissolve and keep in a warm place for 10 minutes
Mix the AP flour and salt together in a mixing bowl, make a well in the centre and add the yeast mixture and oil to form a slightly sticky mixture. You can keep adding water till you get the deserved consistency.
Transfer the dough onto a lightly floured surface and knead for 10 minutes or until smooth and pliable.
Place it back into the mixing bowl, cover and keep in a warm place for up to 2 hrs. It would double in size by now. Punch the air out and knead for another 2 to 3 minutes and then roll out into a size (and shape) you prefer.
Topping:
Red pesto (I used that instead of pizza sauce)
Grated parmesan cheese
Grated mozzarella cheese
Cheddar cheese (optional)
Pepperoni slices

For the tandoori chicken:
Chicken breasts- 1 medium
Yogurt- 2 tbsp
Ginger paste- 1 tbsp
Garlic paste- 1 tbsp
Lime juice- 1 tbsp
Kashmiri chilli powder- 1 tsp
Cumin powder- 1/2 tsp
Coriander powder- 1 tsp
Tandoori masala- 1 tbsp (If you have this, omit coriander and cumin powder)
Salt- if required

Mix all the ingredients together and marinate the chicken. Keep aside for 15 to 20 minutes. Grill in the oven at 176 for about 15 to 20 minutes on each side
Slice into strips and use for the pizza.

Assembling:
Generously spread the red pesto on the pizza base, leaving about half an inch from the sides.
Grate some parmesan cheese on the top
Cover with enough pepperoni/ tandoori chicken
sprinkle some mozzarella and cheddar on top and bake in an oven preheated at 220 for about 15 to 20 minutes.
I sprinkled some coriander leaves on top of the tandoori chicken pizza and it tasted good.

If anyone in UK is interested in taking part in this challenge, please do let me know and I can pass on the necessary details. You can make your own vegetarian pizza and compare it to a veg one as well..whichever suits you.

With thanks to Dominos Pizza for a gift voucher to pick up the pizza